The walls of your living room are more than just structural boundaries—they are blank canvases waiting to showcase your personal style and create the atmosphere you desire. Whether you’re drawn to the timeless elegance of architectural moldings, the raw authenticity of exposed brick, or the contemporary sophistication of textured panels, your wall treatments set the tone for your entire living space. In today’s dynamic interior design landscape, walls have evolved from simple painted surfaces into multidimensional expressions of creativity, combining function with aesthetic appeal to transform ordinary rooms into extraordinary sanctuaries.
The power of thoughtful wall design cannot be overstated. A well-executed accent wall can anchor your furniture arrangement, create visual interest in an otherwise neutral space, and even manipulate the perceived dimensions of your room. From dramatic color-blocking techniques to intricate gallery wall arrangements, from sustainable reclaimed wood installations to luxurious Venetian plaster finishes, each approach offers unique benefits and challenges. Understanding how different materials, colors, textures, and lighting interact allows you to make informed decisions that align with both your aesthetic preferences and practical needs.
In this comprehensive guide, we’ll explore 31 distinctive wall design ideas for living rooms that span the spectrum from traditional to contemporary, minimalist to maximalist, budget-friendly to investment-worthy. Each concept has been carefully selected to demonstrate proven design principles while offering inspiration that you can adapt to your specific space, budget, and style preferences. Whether you’re planning a complete room transformation or seeking a single statement wall to refresh your living area, these ideas will equip you with the knowledge and inspiration to create a living room that truly reflects who you are.
1. Sophisticated Navy Blue Paneled Accent Wall
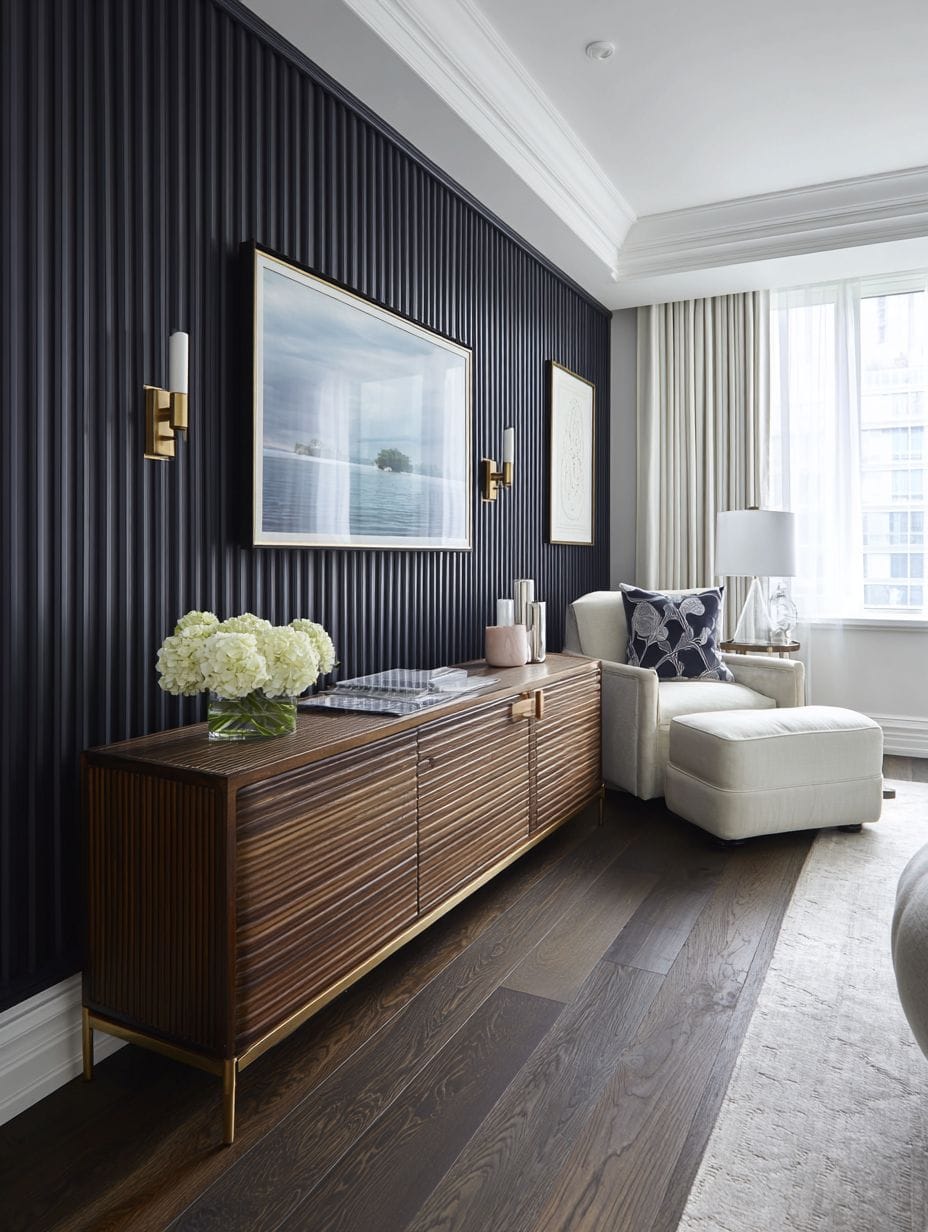
The deep, luxurious tones of a navy blue accent wall immediately command attention while creating an atmosphere of refined elegance. This design features vertical paneling that extends from floor to ceiling, adding architectural dimension that transforms a flat surface into a textured focal point. The paneling creates subtle shadows that shift throughout the day as natural light moves across the room, adding dynamic visual interest without overwhelming the space. A low-profile media console in natural walnut wood provides warm contrast against the cool navy tones, its minimalist brass hardware catching light and adding subtle metallic accents.
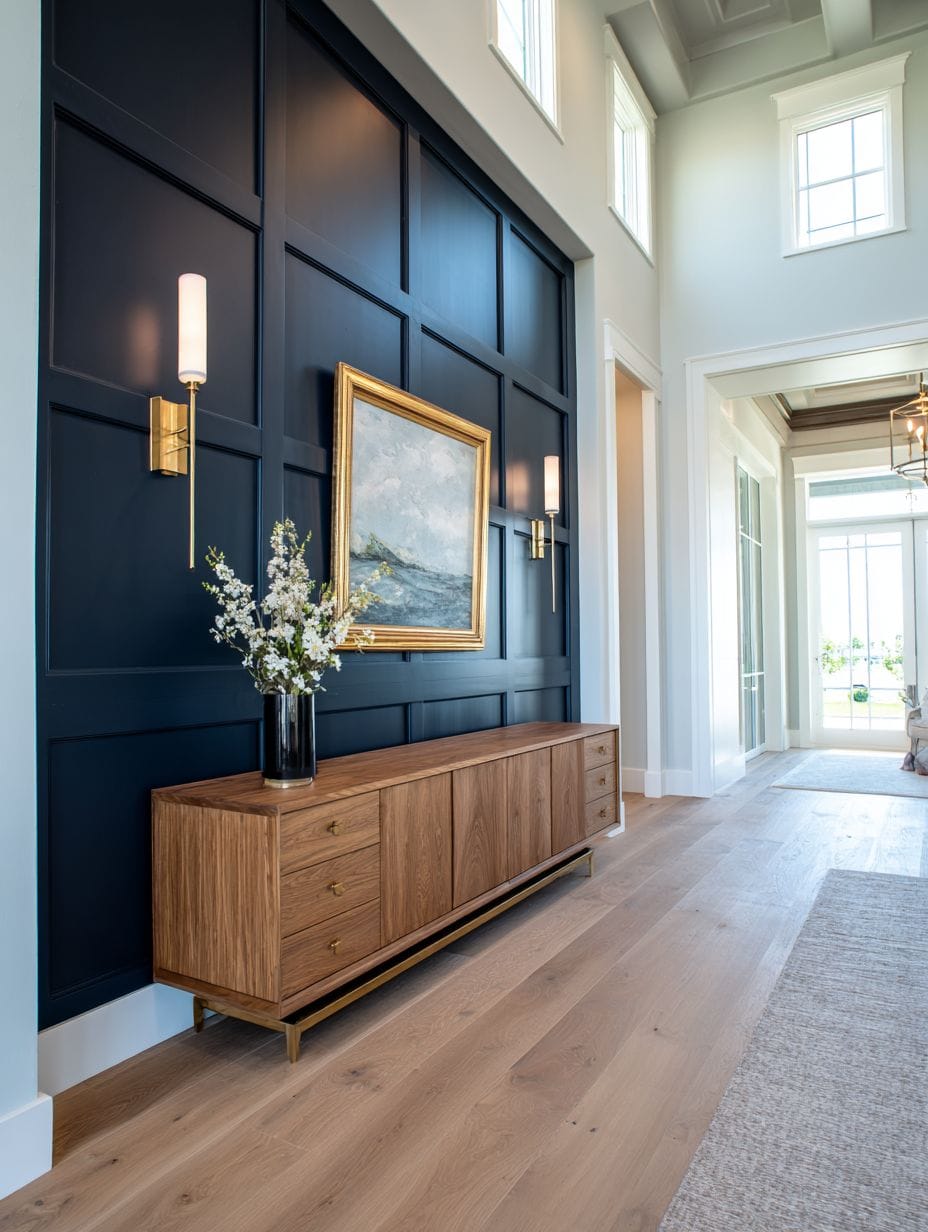
The surrounding walls in soft white create a gallery-like backdrop that allows the navy feature wall to truly shine. This contrast prevents the dark color from making the room feel enclosed, instead creating a sophisticated balance between drama and airiness. Recessed lighting strategically positioned to highlight the textured paneling enhances the dimensional quality, creating depth perception that makes the wall appear to have even more architectural presence. The vertical lines of the paneling also create an illusion of higher ceilings, an optical trick that benefits rooms of any height.
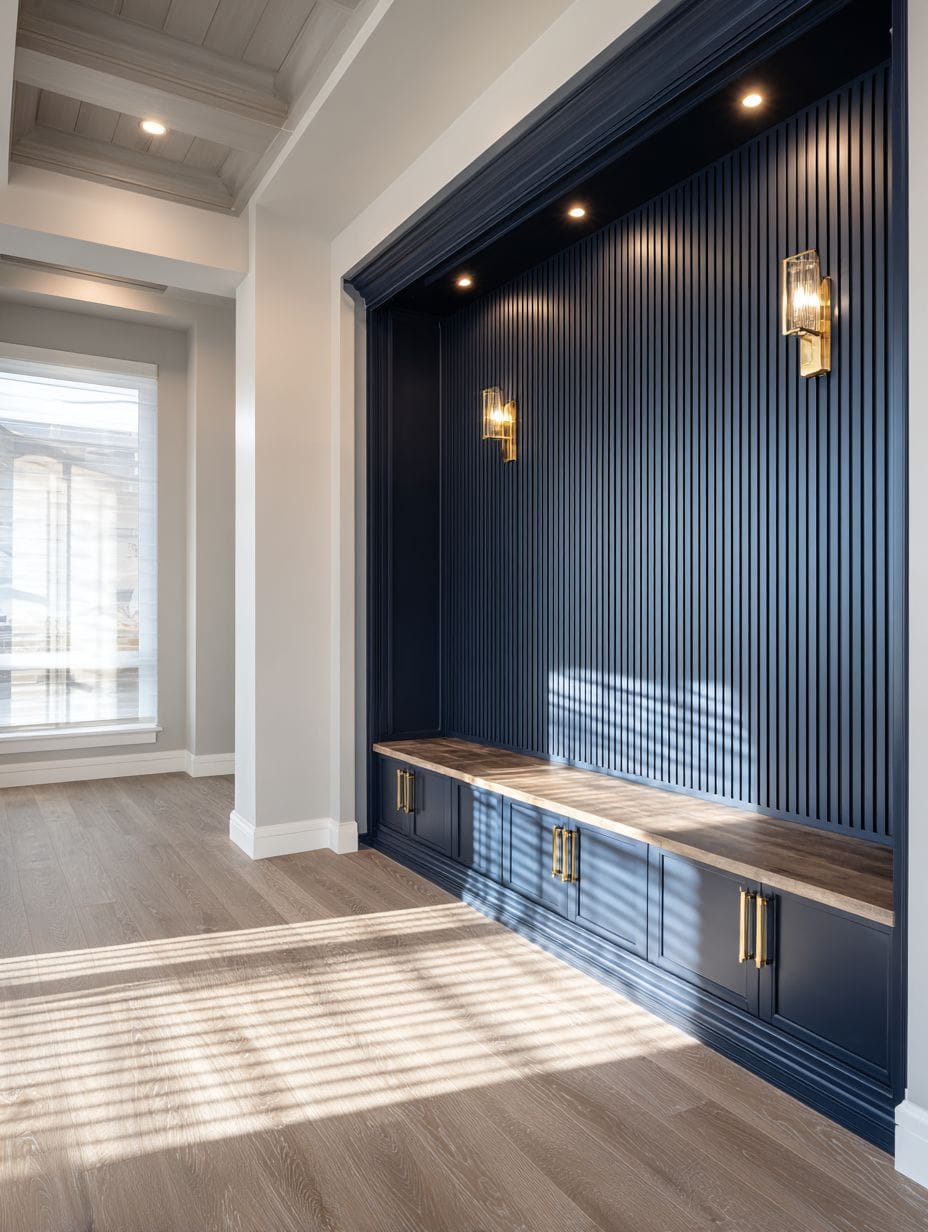
This wall treatment works exceptionally well in living rooms where you want to create a sense of sophistication without relying on busy patterns or excessive decoration. The navy blue serves as a neutral backdrop for artwork and decorative objects while providing much more personality than standard grey or beige. The material choice of painted wood paneling offers durability and timelessness, ensuring your investment will remain stylish for years to come.

- Select the right shade: Choose a navy with slight grey undertones rather than pure royal blue for a more sophisticated, versatile look that works in various lighting conditions.
- Panel spacing matters: Maintain consistent spacing between vertical panels (typically 6-12 inches) for visual rhythm and professional appearance.
- Layer your lighting: Combine recessed ceiling lights with wall sconces to eliminate shadows and showcase the paneling texture from multiple angles.
- Balance with warmth: Introduce warm wood tones and brass accents to prevent the cool navy from feeling cold or institutional.
2. Floor-to-Ceiling Built-In Bookshelf Wall
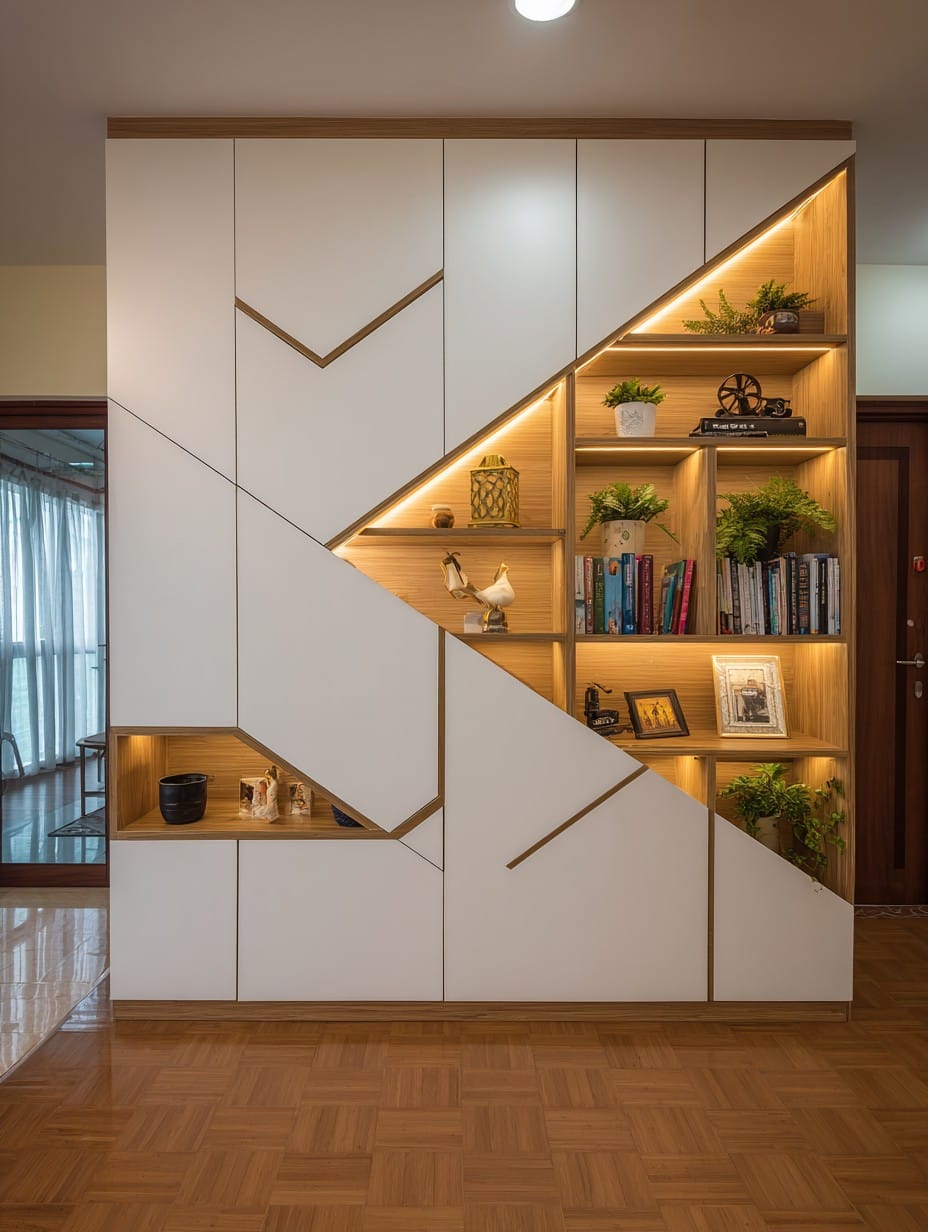
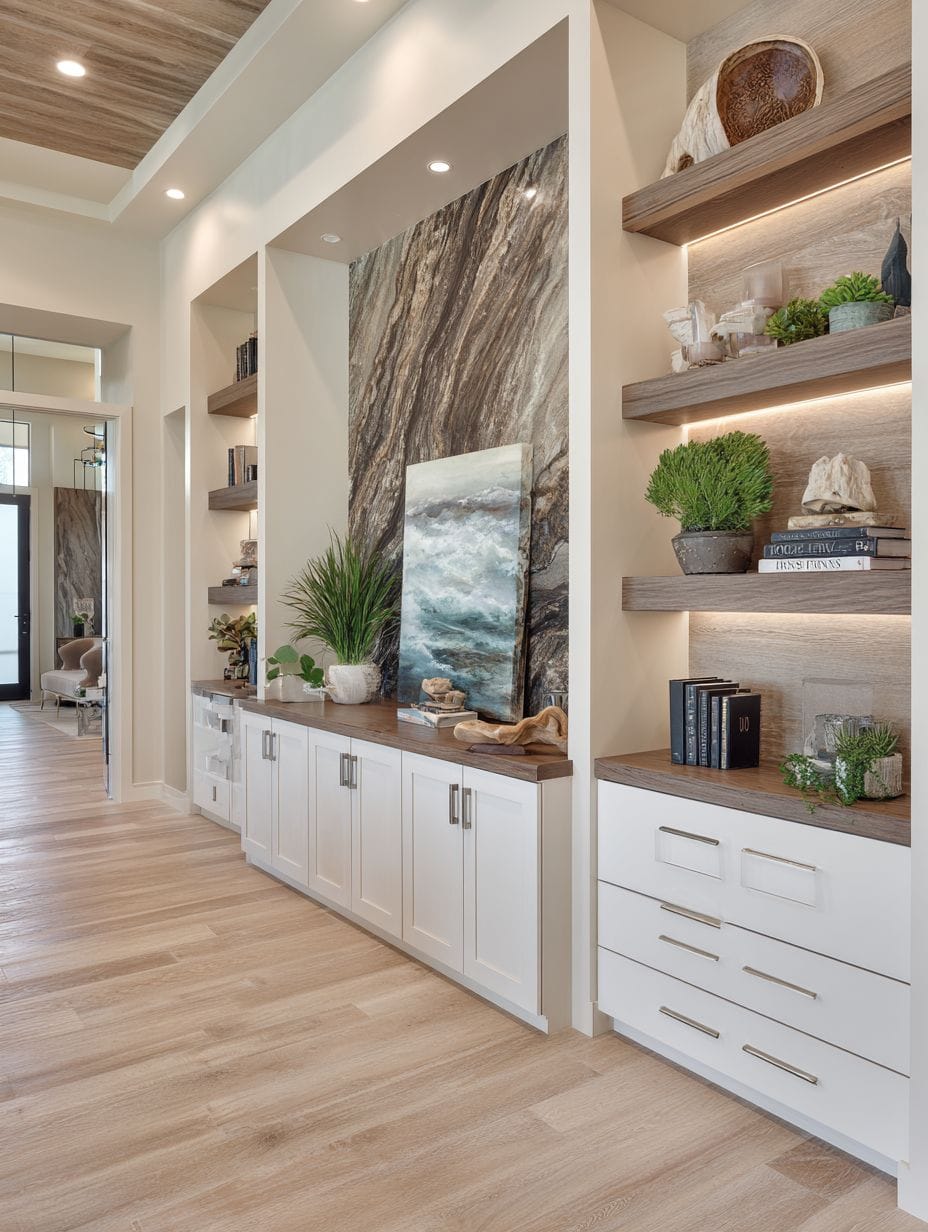
A floor-to-ceiling built-in bookshelf wall transforms functional storage into an impressive architectural feature that celebrates both practicality and aesthetics. Painted in warm white to maintain brightness in the room, this custom millwork features asymmetric shelving with varying heights and depths that create visual interest through irregular rhythm. The thoughtful design accommodates books of different sizes, decorative objects, plants, and personal collections, turning everyday items into a curated display that tells your story. Integrated LED strip lighting tucked beneath select shelves provides soft illumination that highlights displayed items while creating ambient warmth during evening hours.
The beauty of this design lies in its flexibility and personalization potential. Natural wood backing on strategically chosen shelves adds warmth and prevents the all-white treatment from feeling too clinical or stark. This technique also helps ground the vertical expanse and creates subtle zones within the larger wall unit. The asymmetric arrangement prevents the mathematical rigidity that symmetrical shelving can create, instead offering an organic, collected-over-time aesthetic that feels more residential than institutional.
This wall treatment serves multiple purposes beyond simple storage. It provides acoustic dampening through the books and objects it holds, helps regulate room temperature through insulation, and creates a focal point that draws the eye upward, emphasizing ceiling height. The built-in nature means no wobbling freestanding units and a seamless integration with your architecture that adds genuine value to your home.
- Plan for proper depth: Standard shelves should be 10-12 inches deep, but vary depths throughout to accommodate different object sizes and create visual variety.
- Include ladder access: For shelves above 7 feet, consider a rolling library ladder for both function and visual charm.
- Wire for lighting early: Install electrical rough-in during construction phase to avoid visible wiring with integrated LED systems.
- Style with the rule of thirds: Fill approximately two-thirds of shelf space, leaving one-third empty to prevent overwhelming visual clutter.
- Mix horizontal and vertical: Alternate between stacking books vertically and horizontally for a curated, designer look.
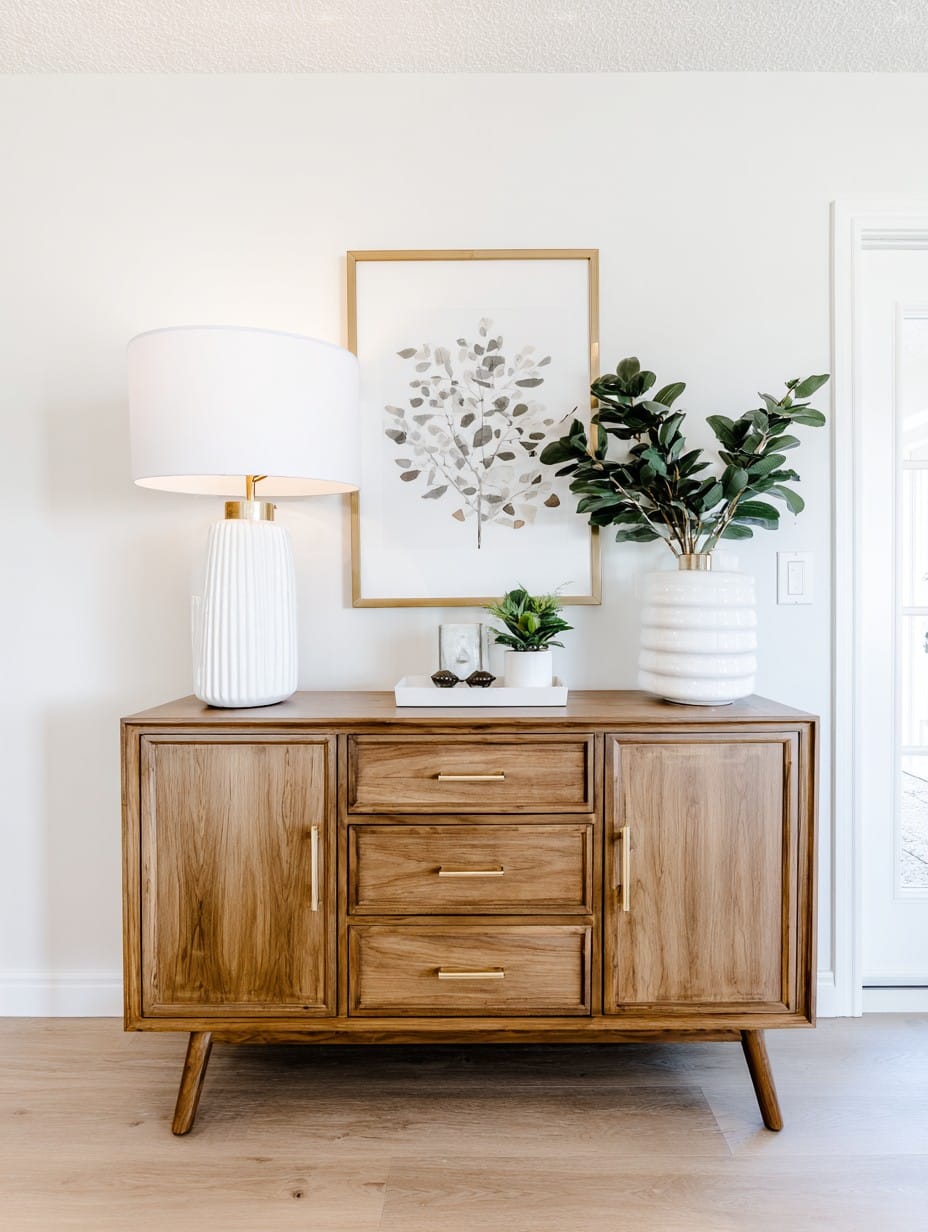
3. Contemporary Geometric Wallpaper Statement
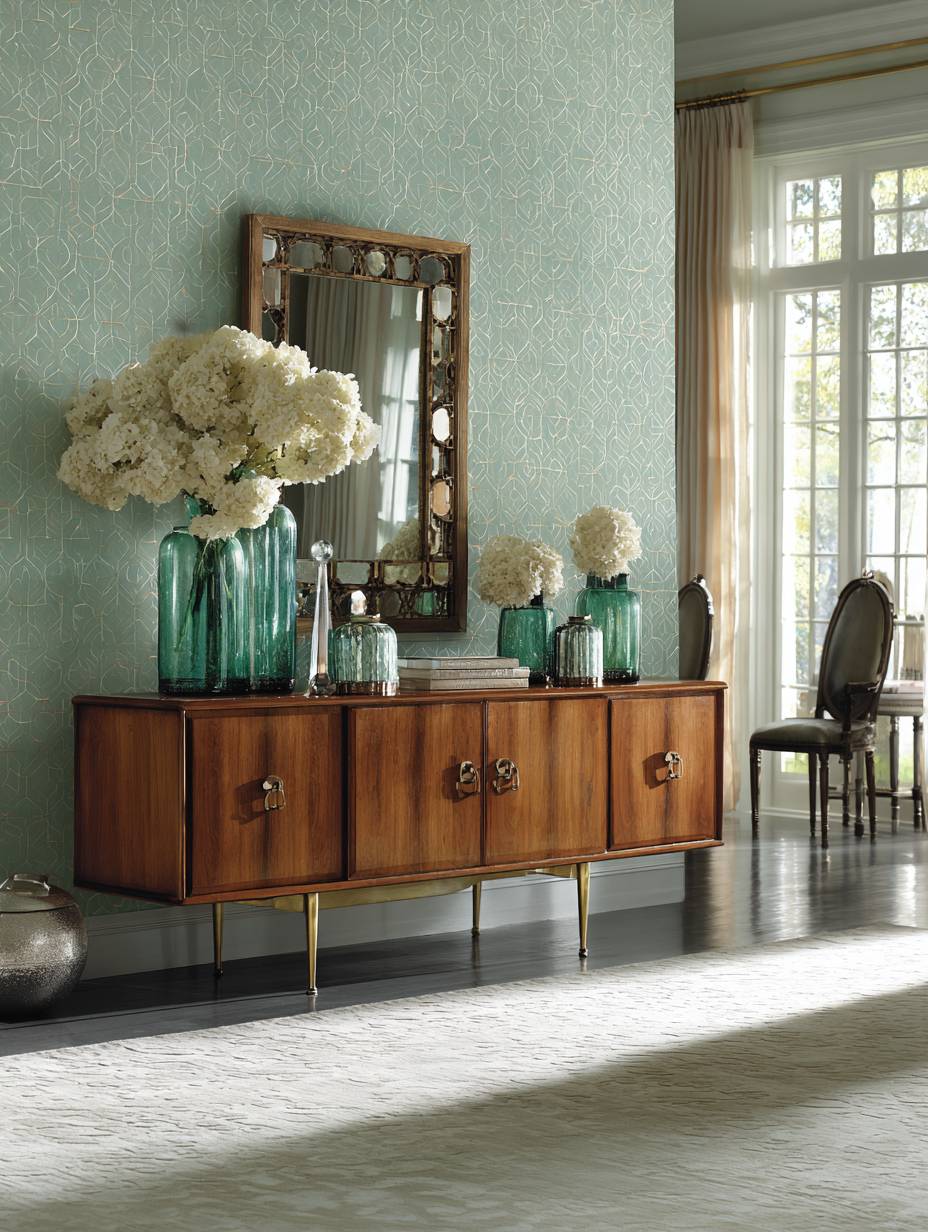
Wallpaper has evolved far beyond the floral patterns of decades past, and this contemporary geometric design in muted sage green and cream demonstrates the medium’s modern sophistication. The clean lines and subtle metallic details create a pattern that reads as both textile-like and architectural, adding personality without overwhelming the senses. The sage green tones bring nature indoors while maintaining a contemporary edge, and the cream background ensures the pattern doesn’t dominate but rather complements your existing furniture and decor.
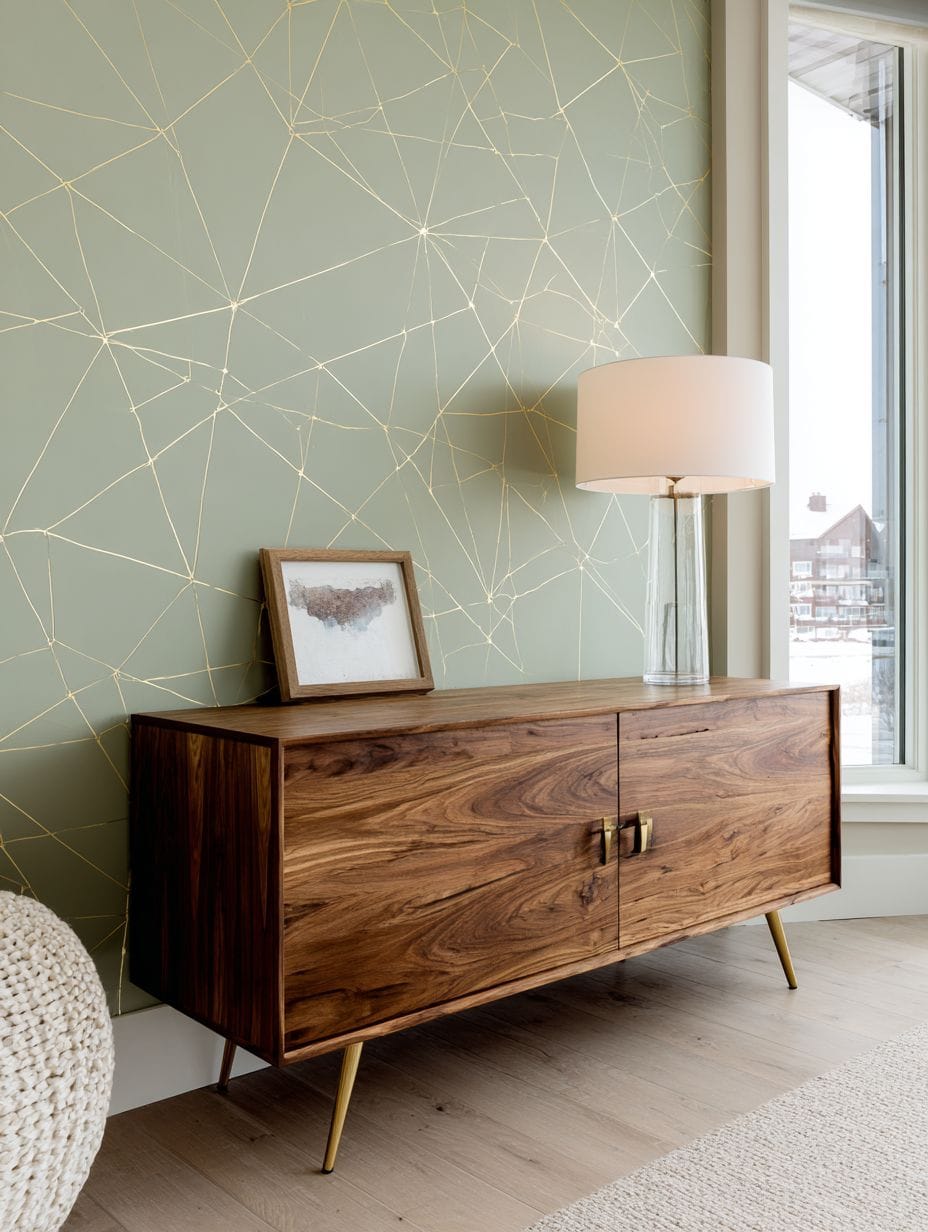
The metallic accents woven throughout the pattern catch and reflect natural light, creating a dynamic surface that changes appearance throughout the day. This reflective quality adds depth and dimension to the wall, making it feel less flat and more sculptural. A mid-century modern credenza positioned beneath the wallpapered wall creates a purposeful vignette, its brass legs echoing the metallic elements in the paper while its warm wood tone provides organic contrast to the geometric precision above.
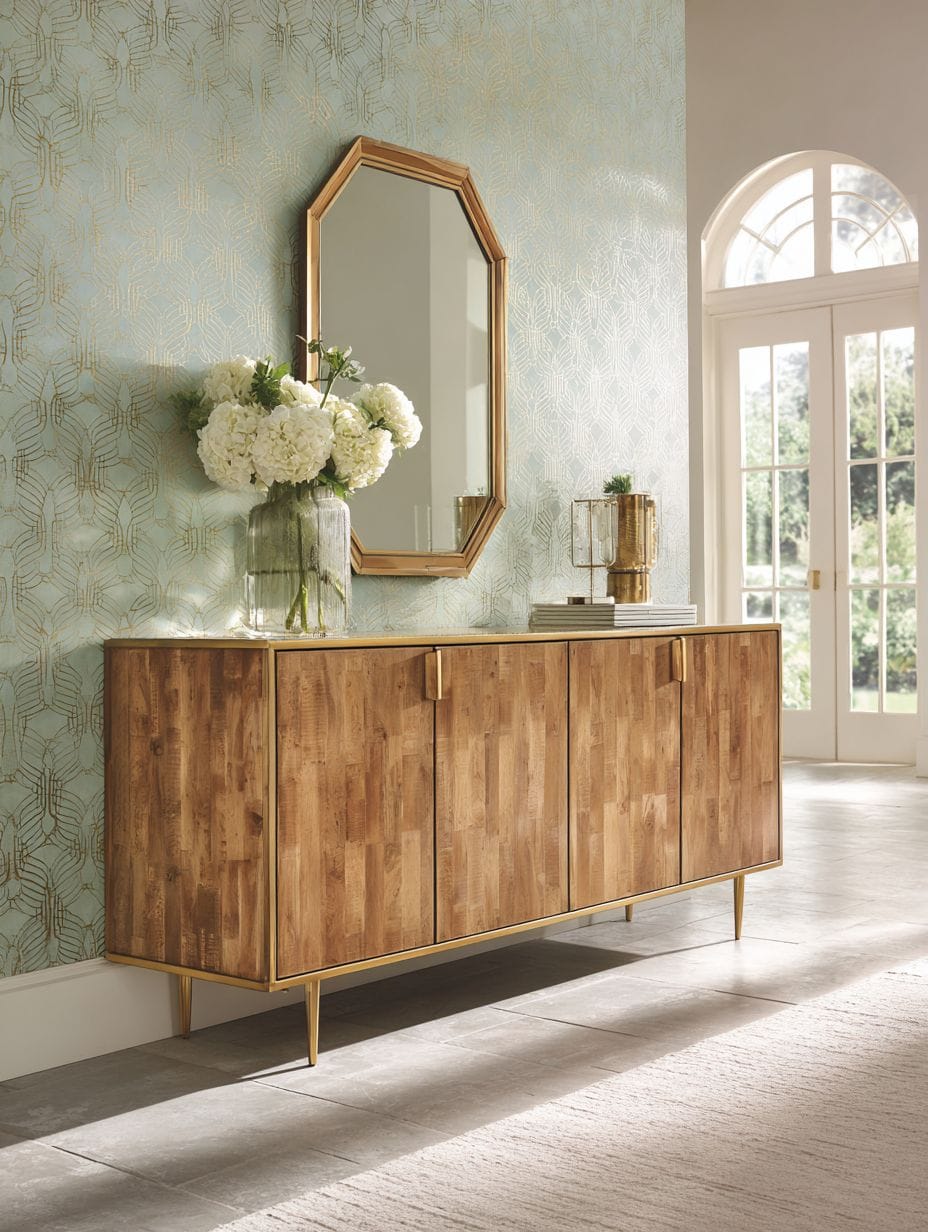
This approach offers the drama of an accent wall with the relative ease of application that wallpaper provides—a weekend project rather than a weeks-long renovation. Modern wallpapers also offer improved durability and removability compared to traditional options, making them ideal for renters or those who like to refresh their spaces periodically. The pattern scale strikes a perfect balance: large enough to make an impact from across the room, yet detailed enough to reward closer inspection.

- Order extra rolls: Purchase 10-15% more wallpaper than calculated to account for pattern matching and potential future repairs.
- Prepare walls properly: Ensure walls are smooth, clean, and primed to prevent texture show-through and ensure proper adhesion.
- Consider removable options: Peel-and-stick wallpapers offer easier installation and removal, ideal for renters or commitment-phobes.
- Match furniture scale: Pair geometric wallpaper with furniture that has clean lines to avoid visual competition between patterns.
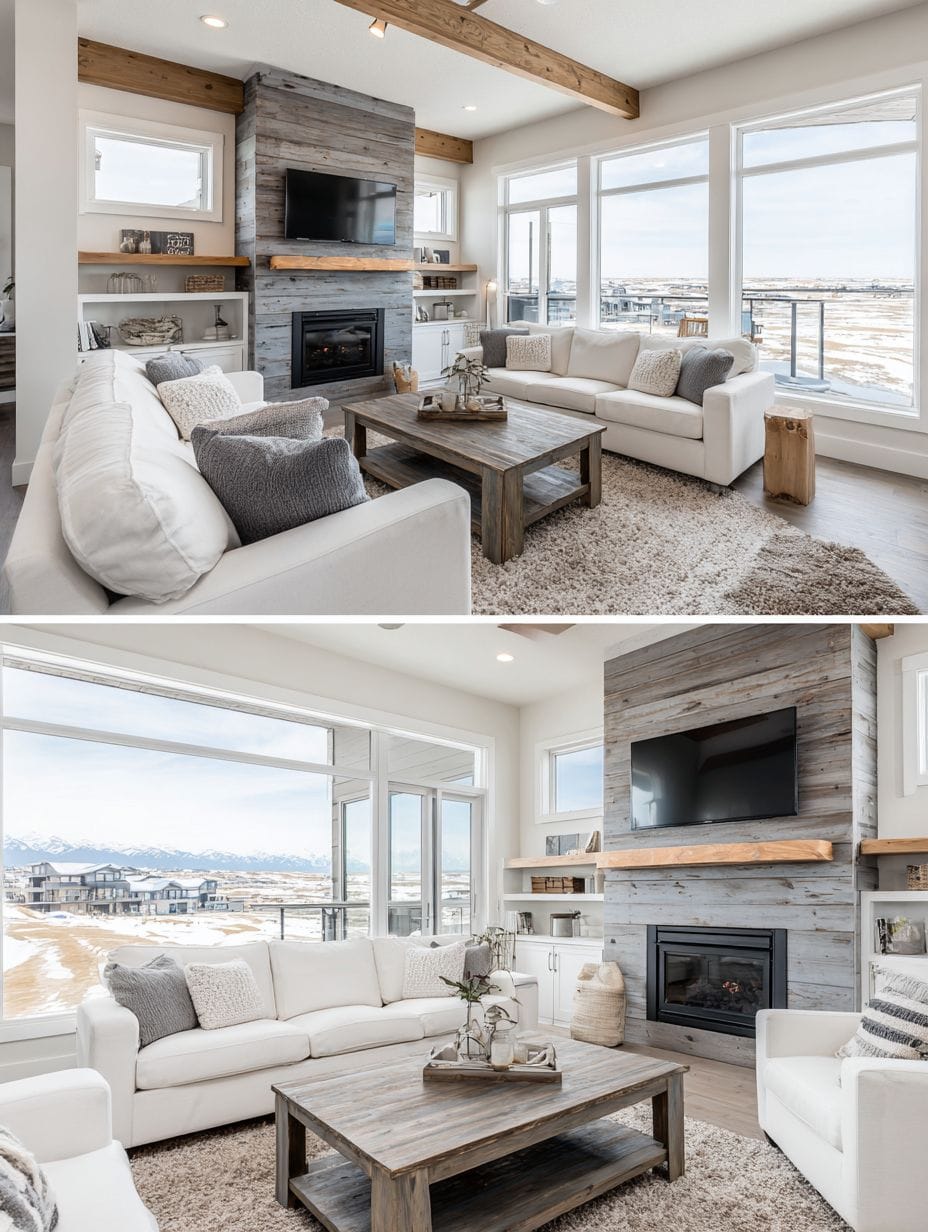
4. Rustic Reclaimed Wood Plank Wall
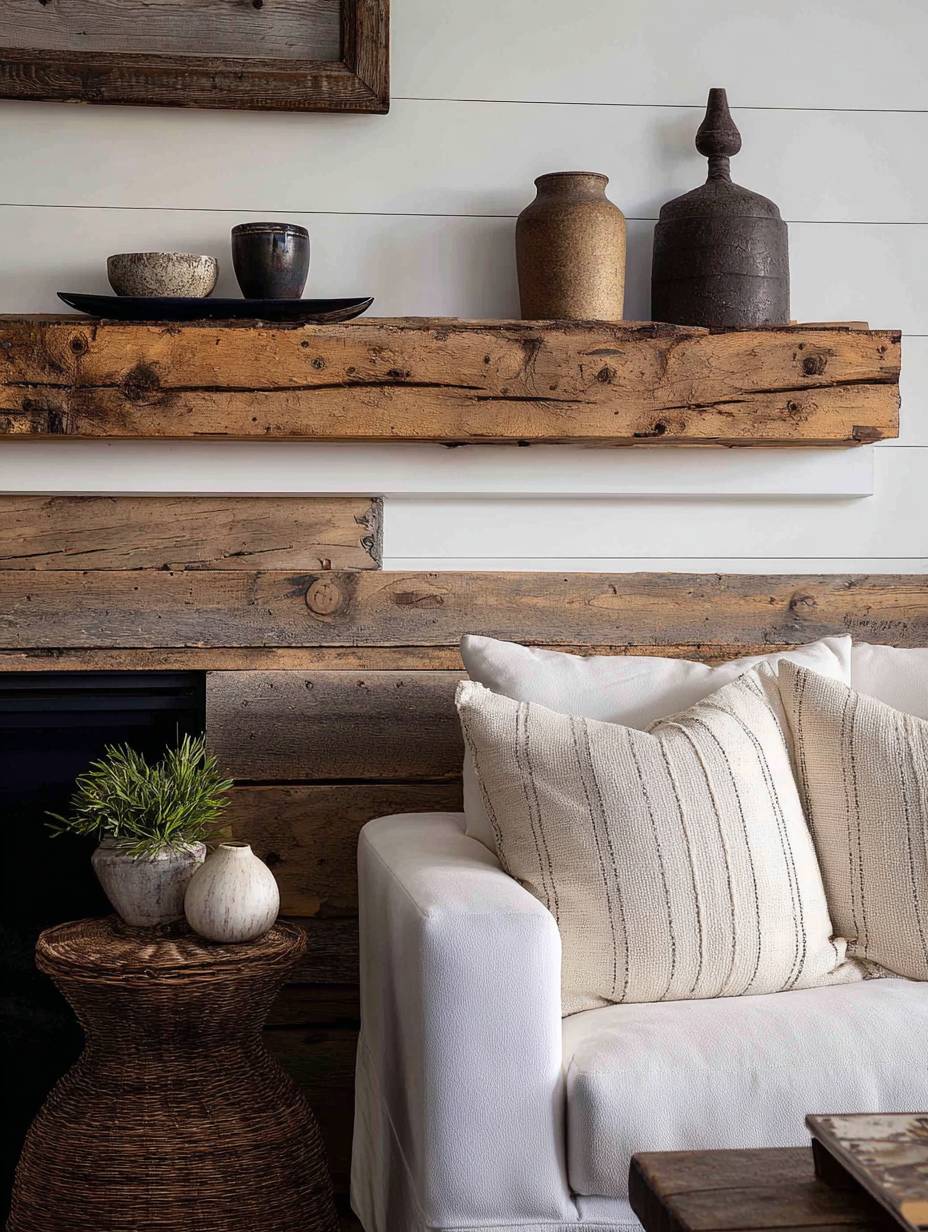
Few materials convey warmth and authenticity quite like reclaimed wood, and when arranged horizontally across an accent wall, weathered planks create an immediate connection to nature and history. Each board carries its own story—visible grain patterns, natural color variations, nail holes, and aged patina that cannot be replicated by manufactured materials. This living room feature wall celebrates imperfection and authenticity, creating a textured backdrop that adds character without requiring any additional decoration. The varying widths and tones of the planks prevent monotony, creating an organic rhythm that the eye naturally appreciates.
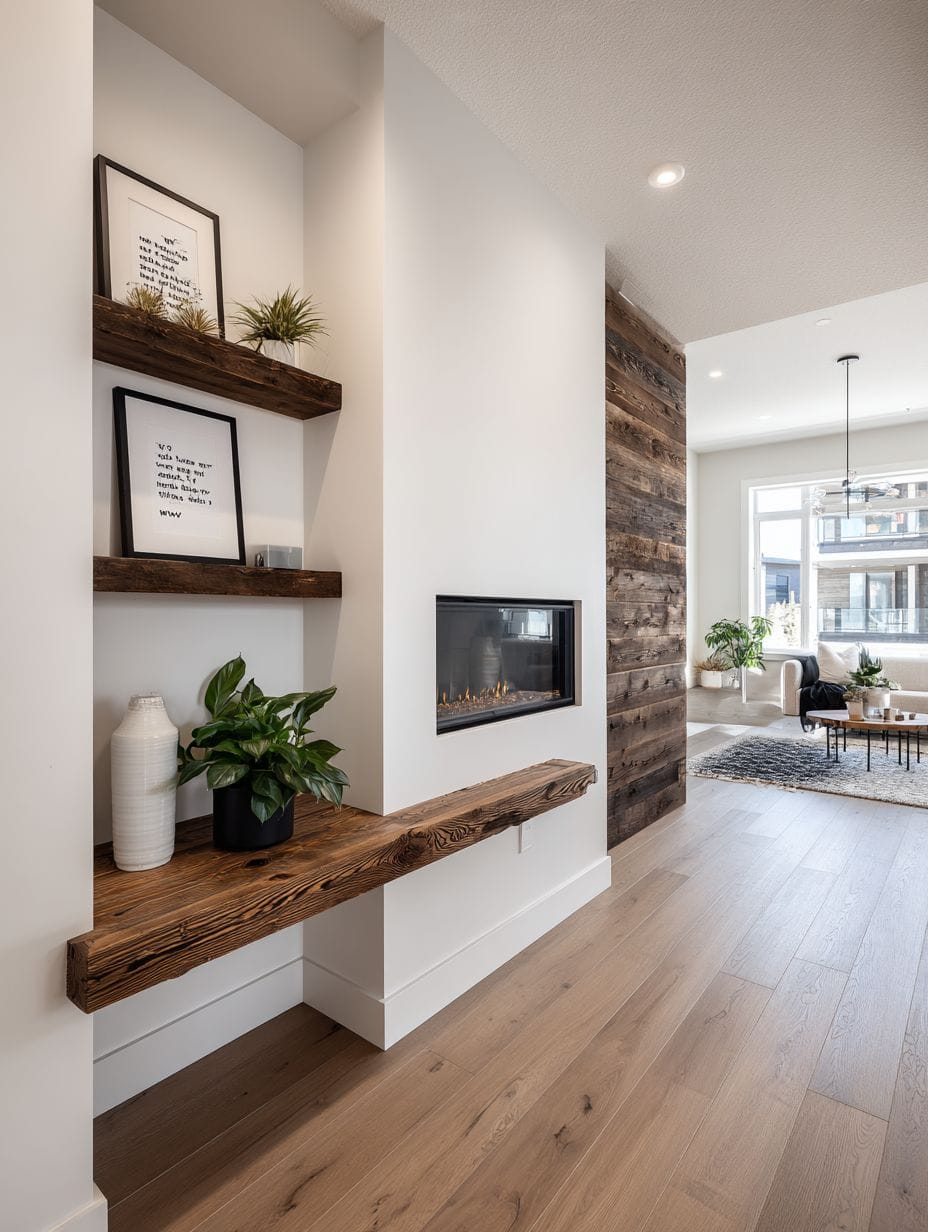
The weathered texture stands in beautiful contrast to white-painted surrounding walls, creating a focal point that grounds the entire room. A floating wooden mantel shelf mounted against the reclaimed wood provides display space without interrupting the flow of the planks, its clean-lined simplicity allowing the wall’s texture to remain the star. The horizontal orientation of the planks creates a subtle visual expansion, making the wall—and by extension, the room—feel wider than its actual dimensions.
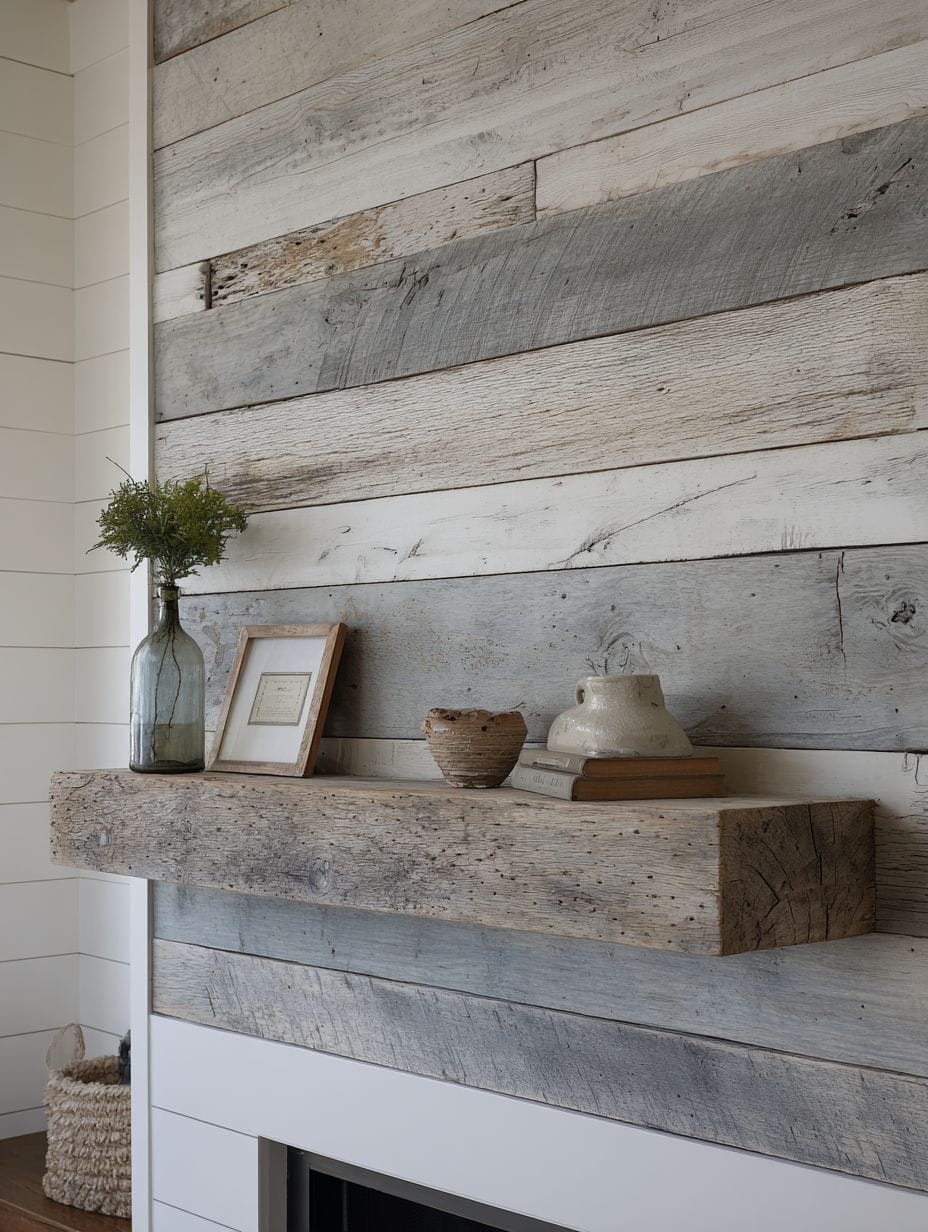
This treatment works particularly well in spaces seeking to balance modern furnishings with rustic warmth, bridging contemporary and farmhouse styles effortlessly. The natural insulation properties of wood also provide practical benefits, helping to regulate temperature and reduce echo in the room. The investment in quality reclaimed wood pays dividends in longevity and timeless appeal—this is a wall treatment that will never feel dated or require updating.
- Source responsibly: Purchase reclaimed wood from reputable suppliers who can verify origin and ensure proper treatment for indoor use.
- Acclimate the wood: Store planks in your home for at least 48 hours before installation to allow them to adjust to interior humidity levels.
- Seal appropriately: Apply a matte or satin sealer to protect against moisture and make dusting easier while preserving the weathered appearance.
- Plan your layout: Dry-fit planks before installation to arrange the most visually appealing combination of colors and textures.
- Consider weight: Ensure your wall can support the weight of solid wood planks, or consider lighter wood veneer alternatives for certain wall types.
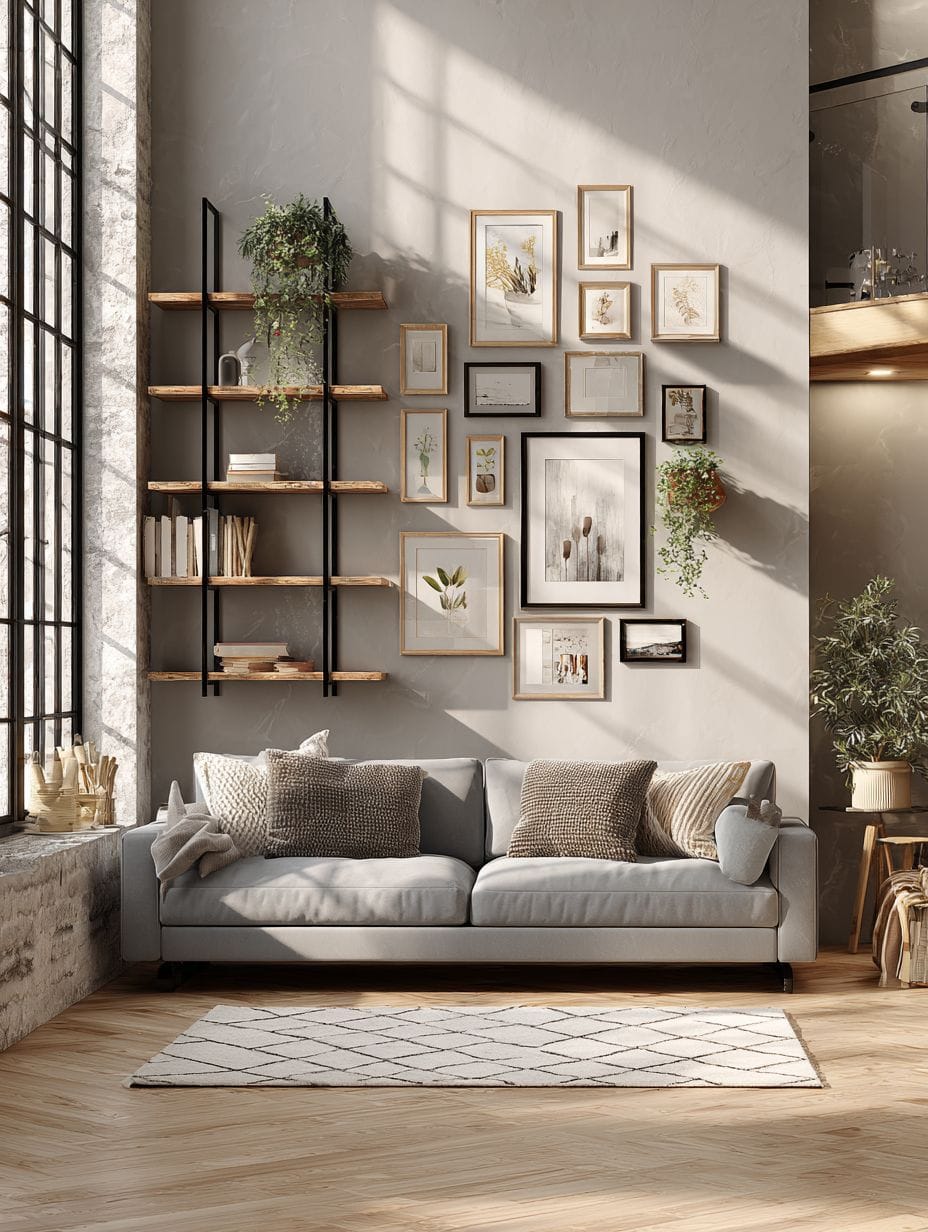
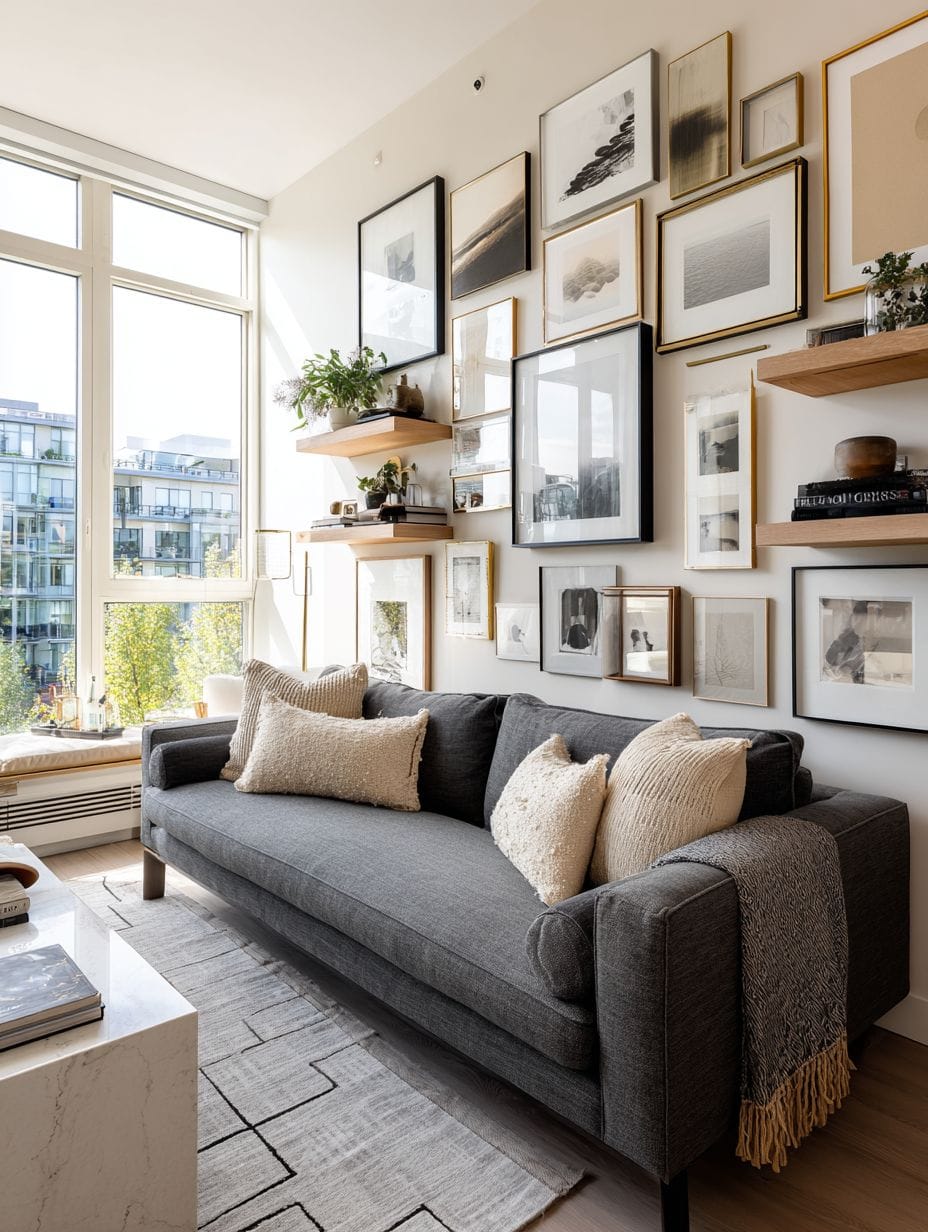
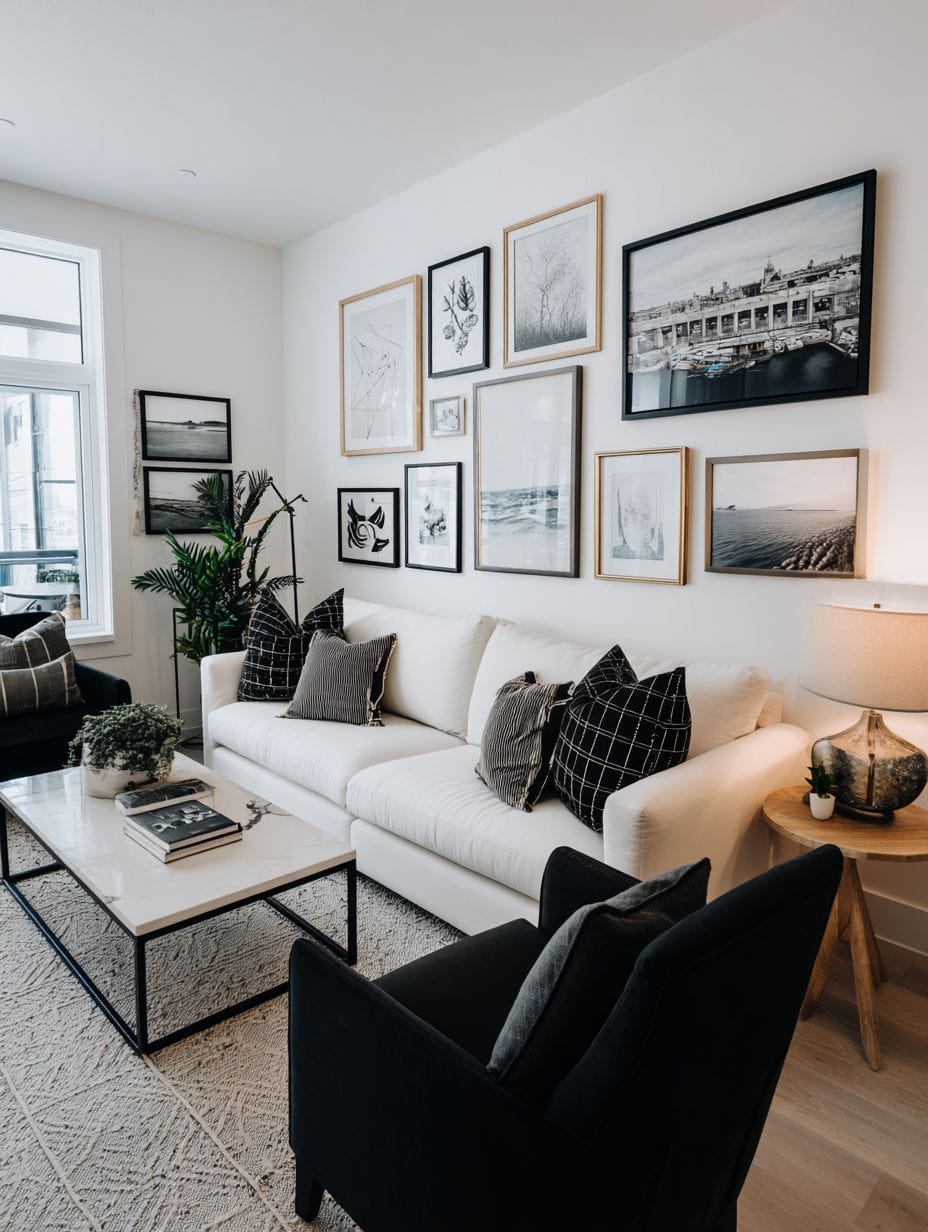
5. Curated Gallery Wall Arrangement
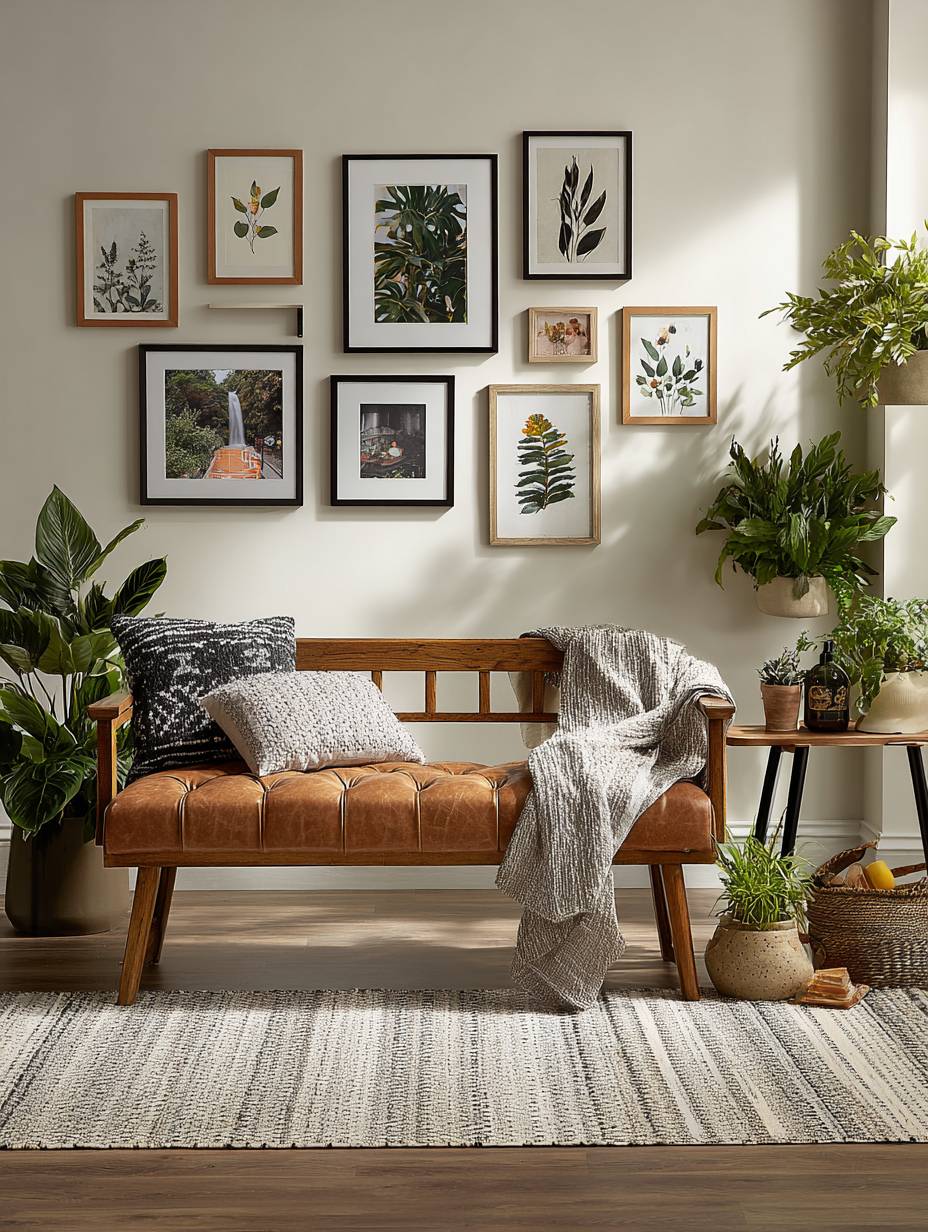
The gallery wall represents one of the most personal and flexible wall design approaches, transforming a collection of artwork, photographs, and prints into a cohesive visual statement. This classic design features twelve frames in a thoughtfully mixed combination of black, white, and natural wood finishes, creating visual interest through variety while maintaining cohesion through consistent two-inch spacing. The varying frame sizes—from small 5×7 prints to larger 16×20 pieces—create a dynamic composition that guides the eye across the wall in an engaging visual journey.
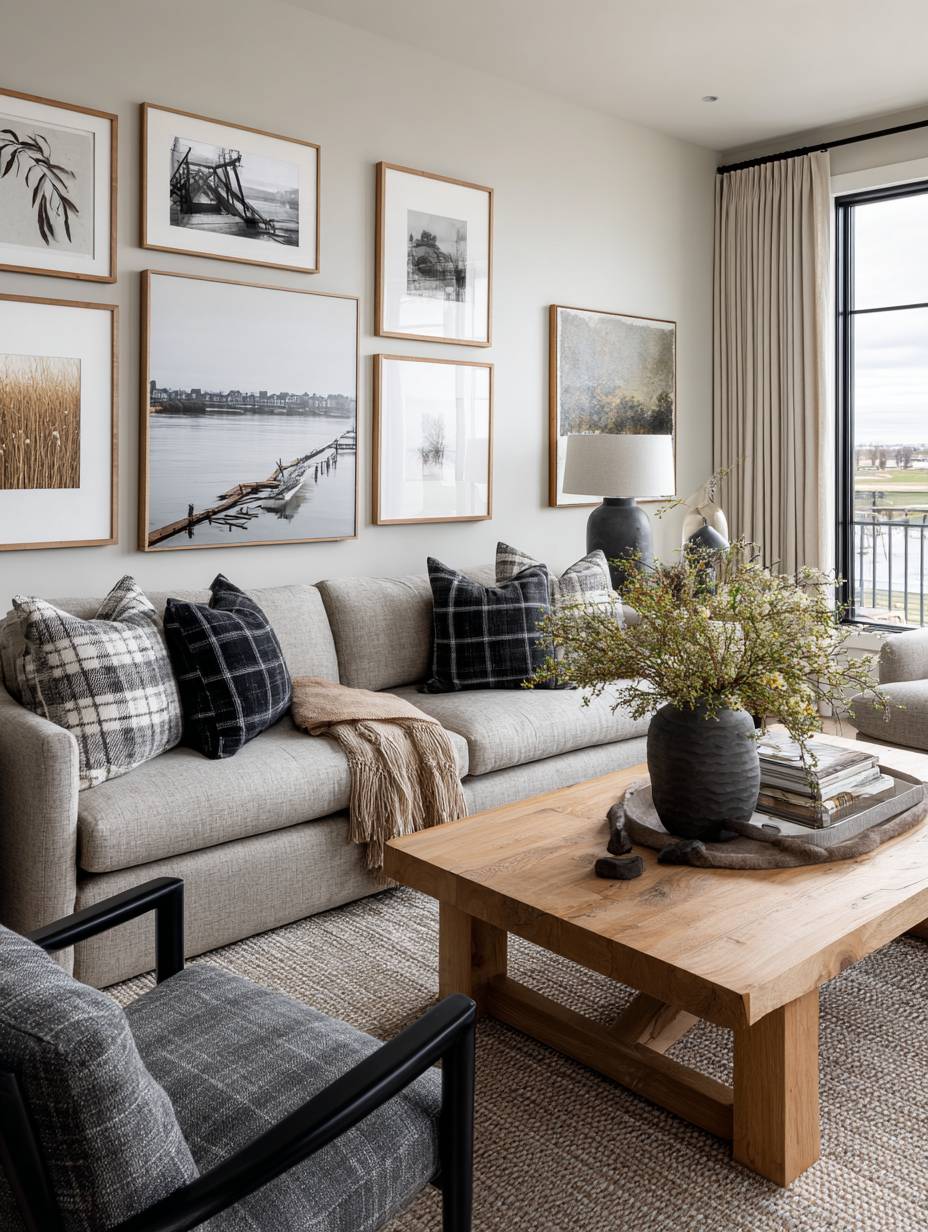
The content within the frames matters as much as the arrangement itself. A balanced mix of photography, abstract art, and botanical prints provides diversity in subject matter and style, preventing the gallery from feeling too themed or predictable. The strategic arrangement considers both symmetry and asymmetry—the overall shape of the gallery wall remains balanced, but individual frame placement feels organic rather than mathematically rigid. This approach creates a collected-over-time aesthetic that suggests genuine curation rather than a pre-packaged set.
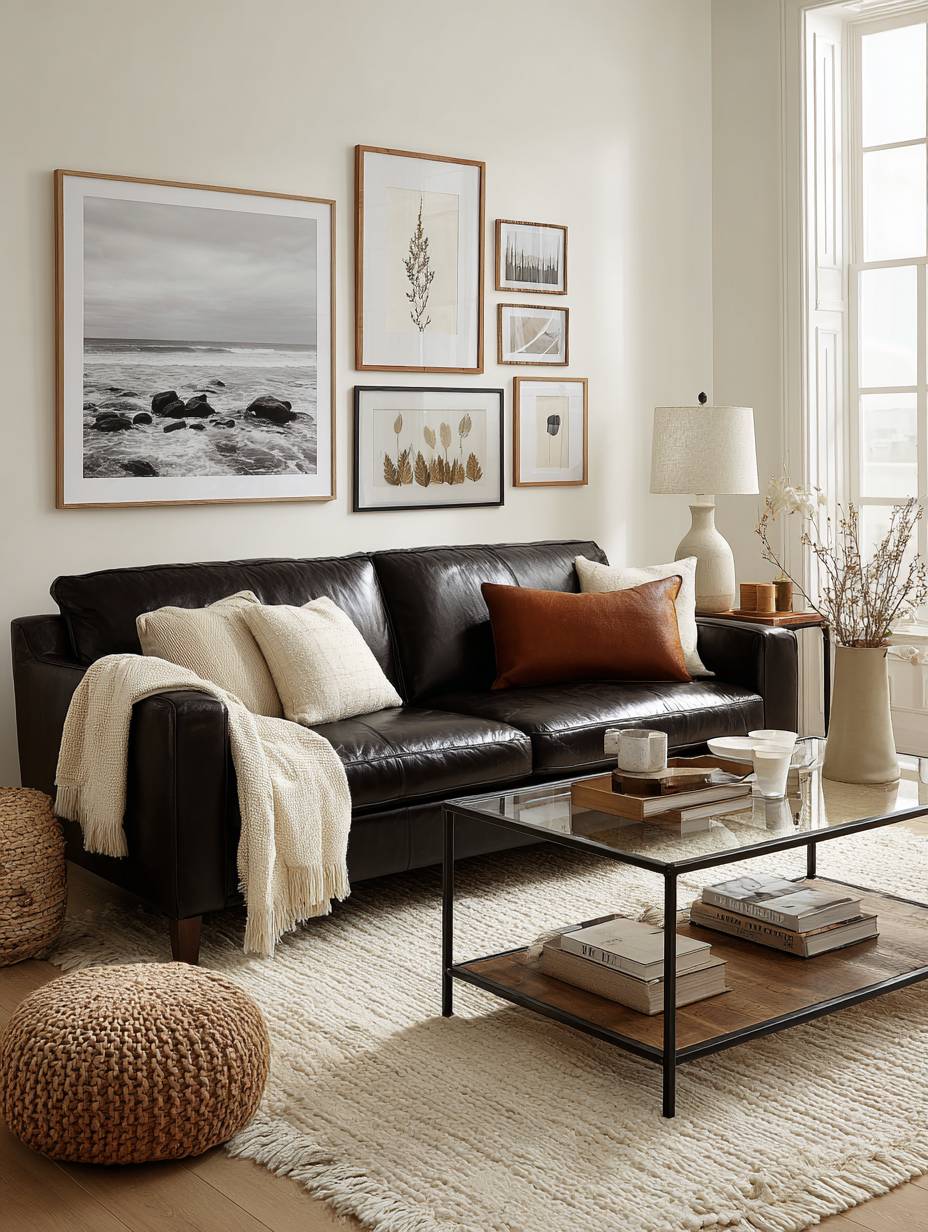
Professional interior design photography captures the balanced composition with soft natural lighting that prevents glare on glass while highlighting frame details and the artwork itself. The wall color—typically a neutral that doesn’t compete with the artwork—serves as a gallery-quality backdrop. This design approach offers infinite flexibility: you can easily swap out individual pieces as your tastes evolve, add to the collection over time, or completely rearrange the layout without making permanent changes to your walls.
- Plan on paper first: Trace your frames on paper, arrange on the floor, then transfer measurements to the wall for perfect placement.
- Maintain consistent spacing: Use a measuring tape or spacers to ensure equal gaps between all frames for professional polish.
- Consider sight lines: Hang the center of your gallery wall at 57-60 inches from the floor (standard gallery height) for optimal viewing.
- Mix frame styles thoughtfully: Limit yourself to 2-3 frame styles/finishes to maintain cohesion while allowing variety.
- Include dimensional elements: Add small shelves or 3D objects to create depth variation within your gallery wall.
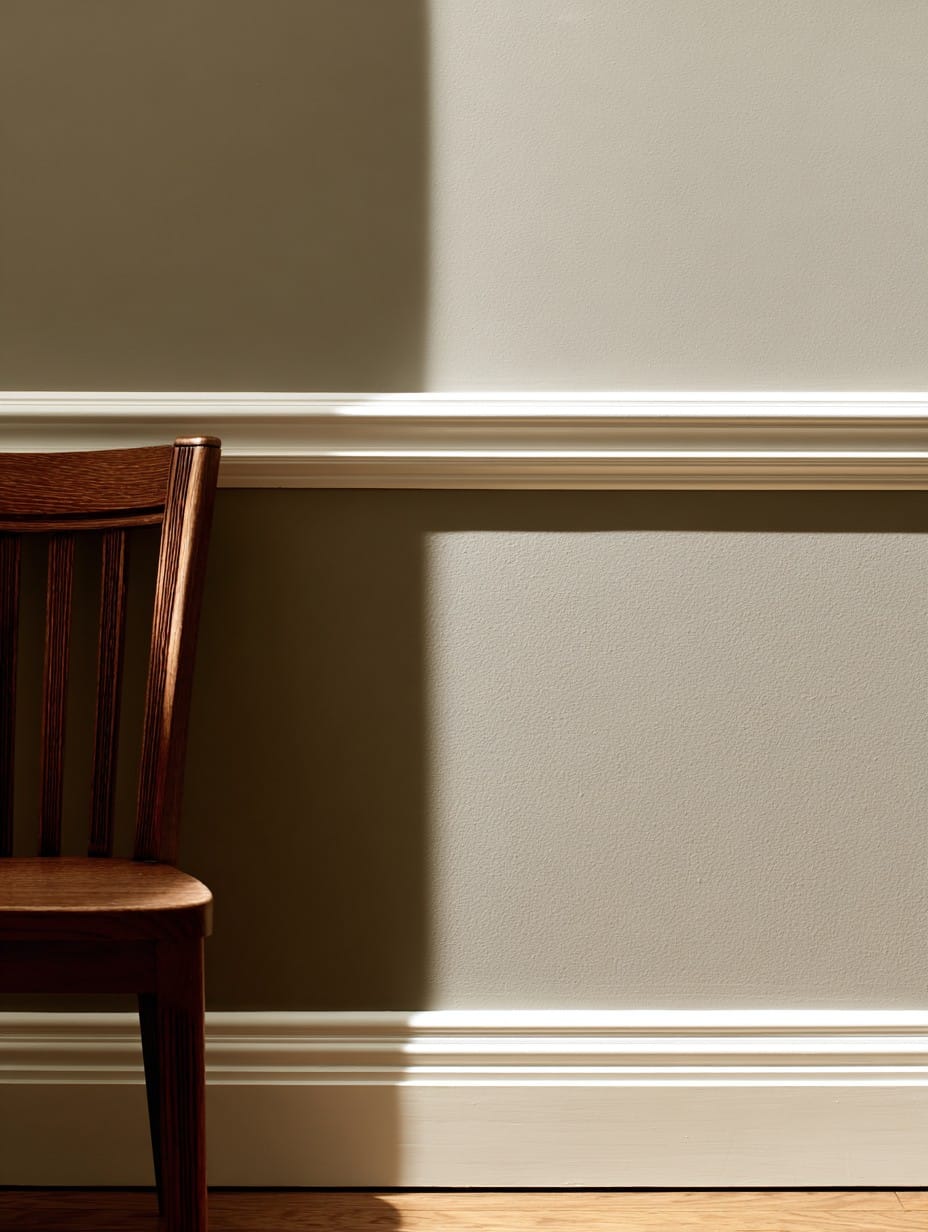
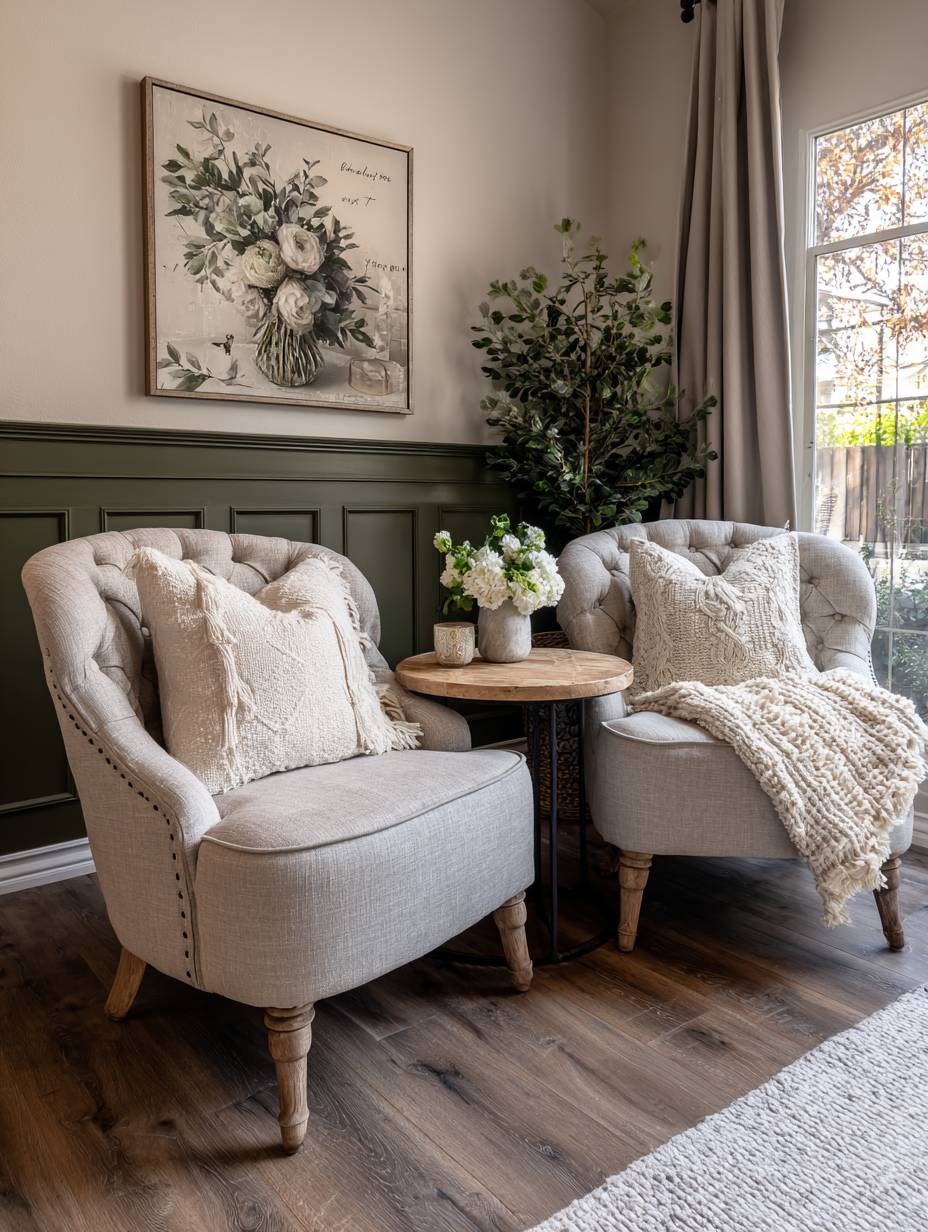
6. Elegant Board and Batten Wainscoting
Board and batten wainscoting brings traditional architectural charm to contemporary living rooms, creating a sophisticated wall treatment that has stood the test of time for good reason. This elegant design features vertical boards (battens) applied over a flat panel base, extending halfway up the wall and topped with a decorative chair rail. All painted in crisp white, the raised battens create subtle shadows that add dimension and visual interest to what would otherwise be a plain painted surface. The upper wall, finished in a soft grey-blue, creates gentle contrast while maintaining an overall serene and cohesive color palette.
The dimensional nature of this wall treatment serves multiple practical purposes beyond aesthetics. The wainscoting provides protection to the lower portion of walls in high-traffic areas, guarding against scuffs, marks, and wear that naturally occur in living spaces. The chair rail creates a natural visual break that can make rooms with very high ceilings feel more intimate and properly proportioned. Crown molding completing the top of the wall creates a finished, polished look that speaks to quality craftsmanship and attention to detail.
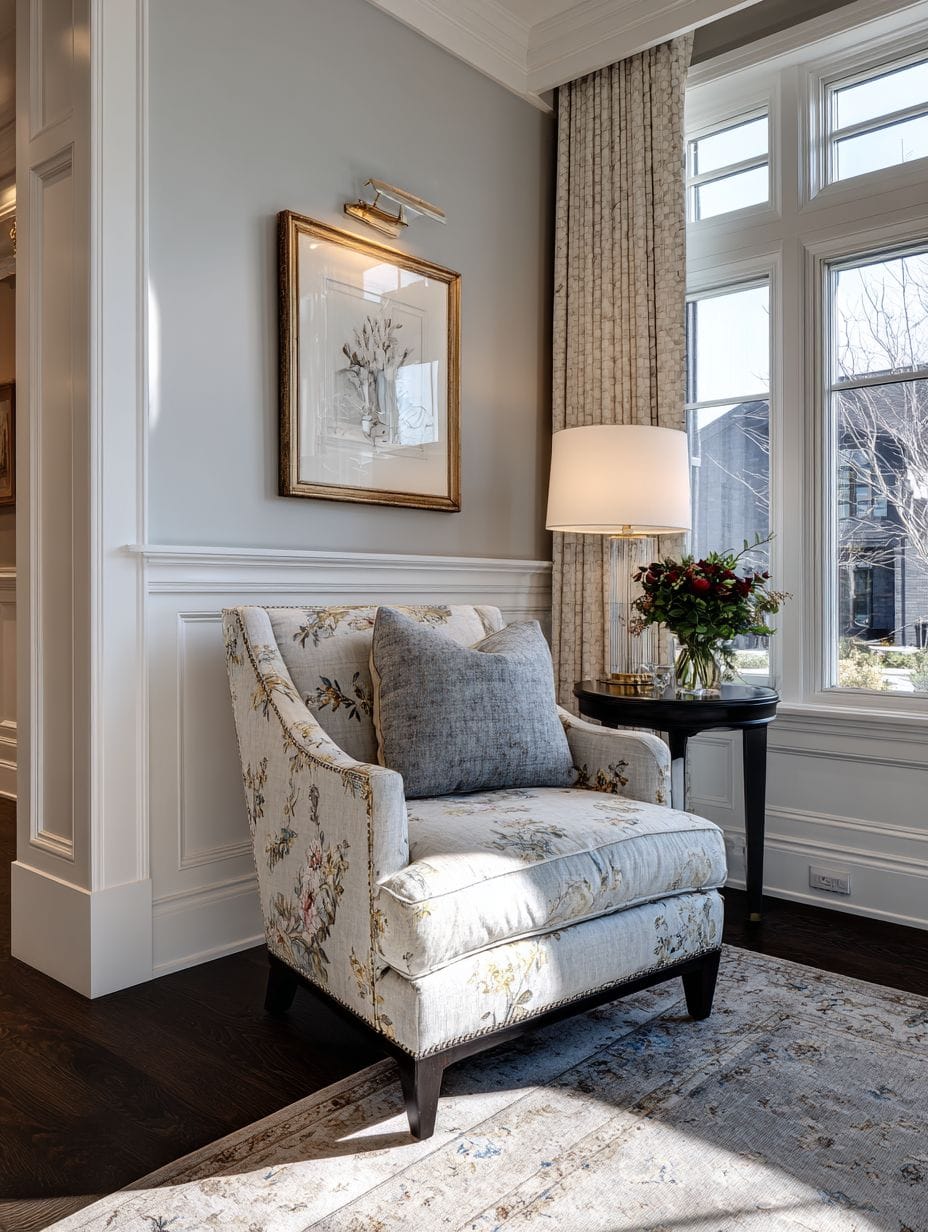
This treatment particularly shines when natural daylight moves across the walls throughout the day, emphasizing the dimensional shadows created by the raised battens. The clean white finish reflects light beautifully, helping to brighten the room while the upper grey-blue section adds personality without overwhelming. The style bridges traditional and transitional aesthetics, making it appropriate for both period homes and newer constructions seeking architectural character.
- Calculate proportions carefully: Traditional wainscoting extends one-third to two-thirds up the wall; taller applications make ceilings feel higher.
- Space battens evenly: Measure and mark batten placement precisely, typically spacing them 12-18 inches apart for balanced rhythm.
- Use quality materials: Choose MDF or solid wood rather than thin strips for battens that create substantial shadows and look authentic.
- Paint before final installation: Prime and paint all pieces before mounting for easier application and cleaner results.
- Fill and caulk meticulously: Take time to fill nail holes and caulk seams for a seamless, professional finish that looks built-in rather than applied.
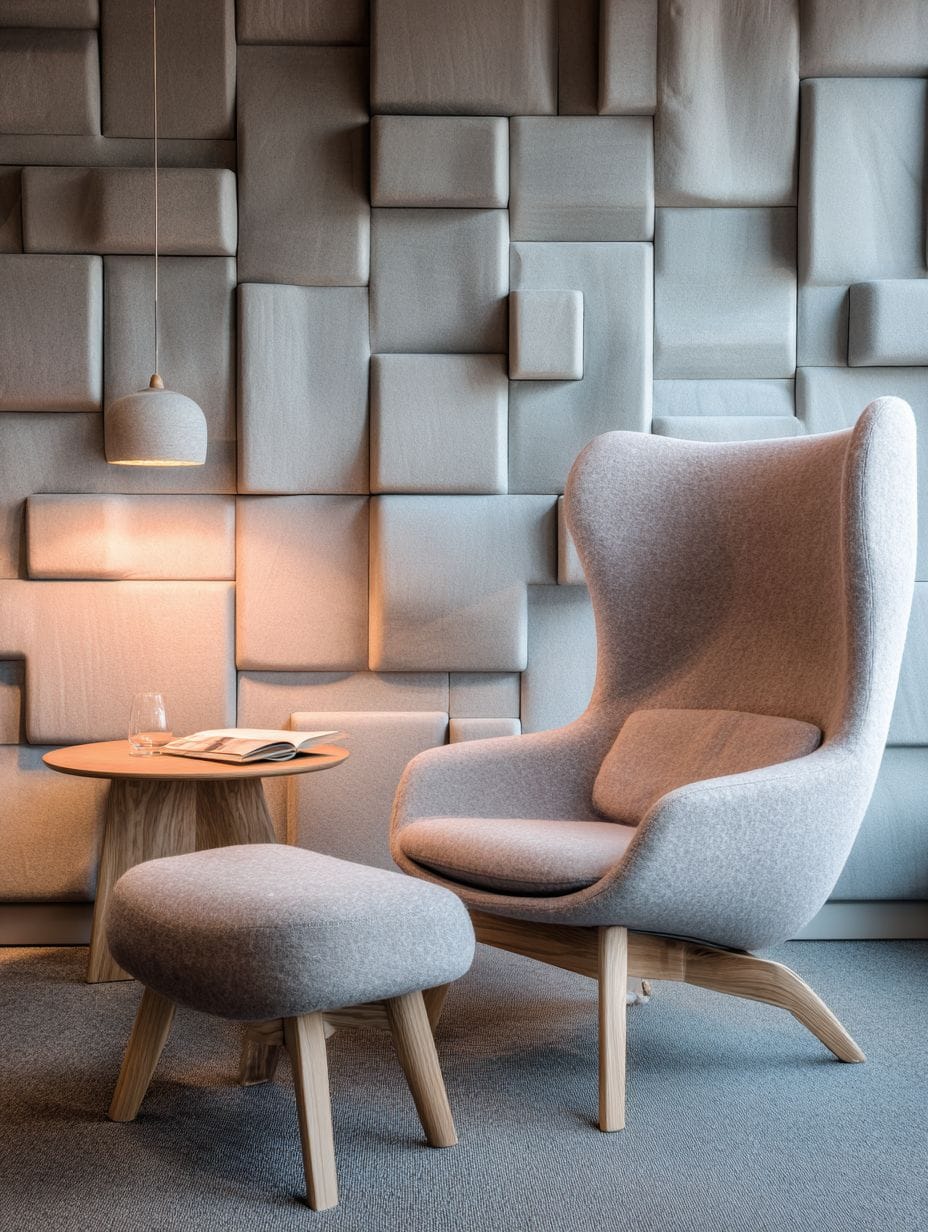
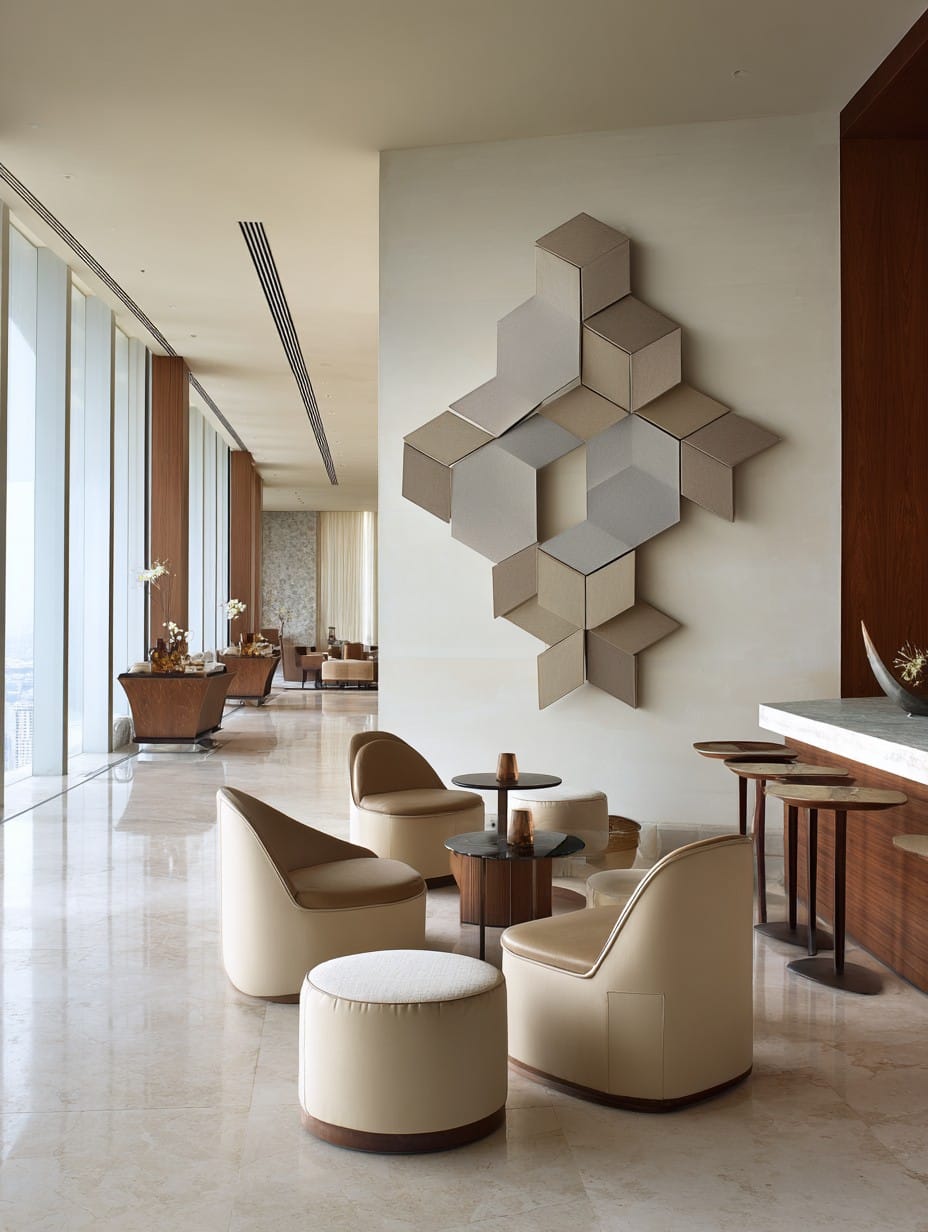
7. Modern Three-Dimensional Textured Panels
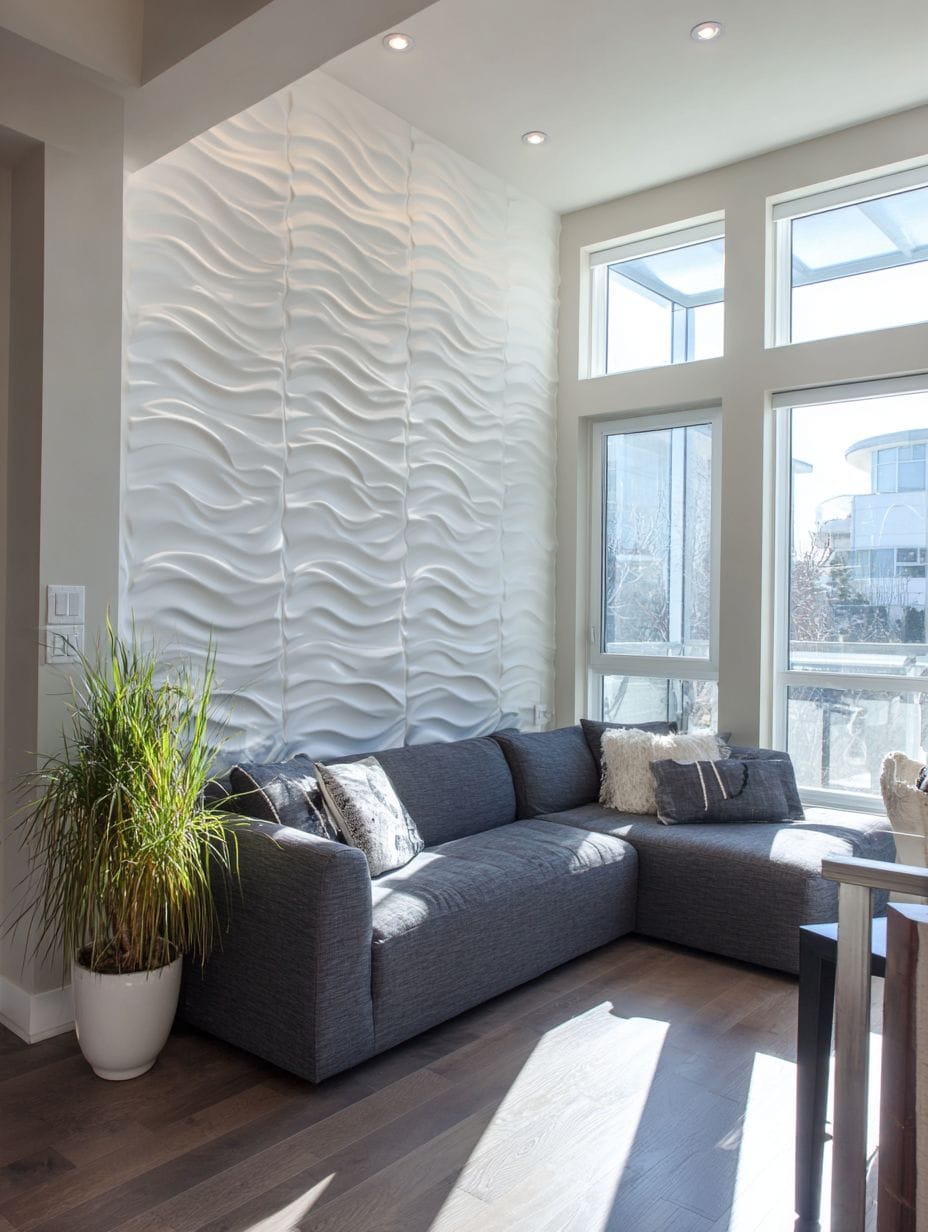
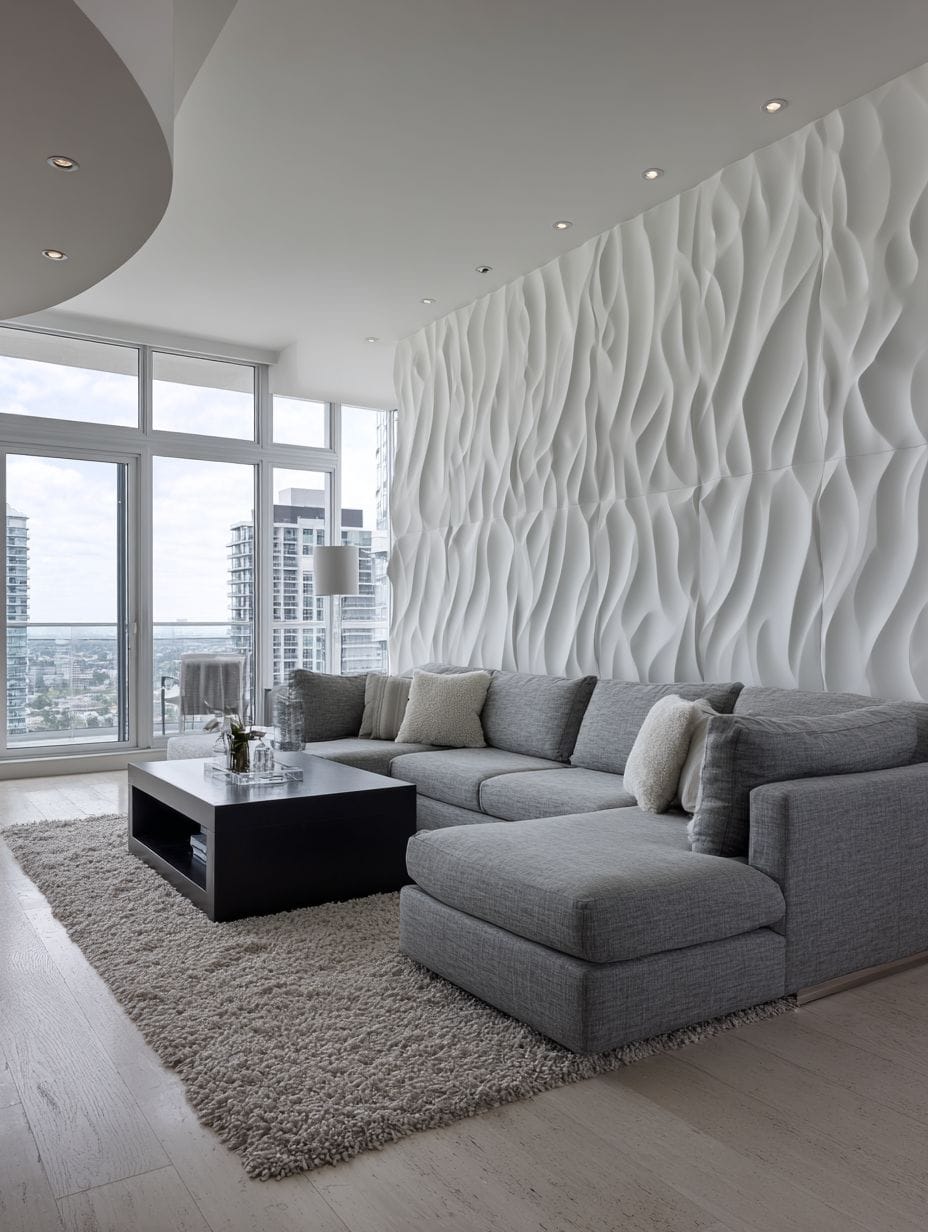
Breaking free from flat wall surfaces, three-dimensional textured panels create a sculptural accent wall that transforms your living room into a modern art installation. These white panels feature a wave-like pattern that ripples across the surface, creating an ever-changing interplay of light and shadow as the sun moves throughout the day. The sculptural quality adds genuine architectural interest without color or pattern, proving that texture alone can create dramatic impact. A contemporary grey sectional positioned to face this feature wall ensures the sculptural surface remains the undeniable focal point of the room.
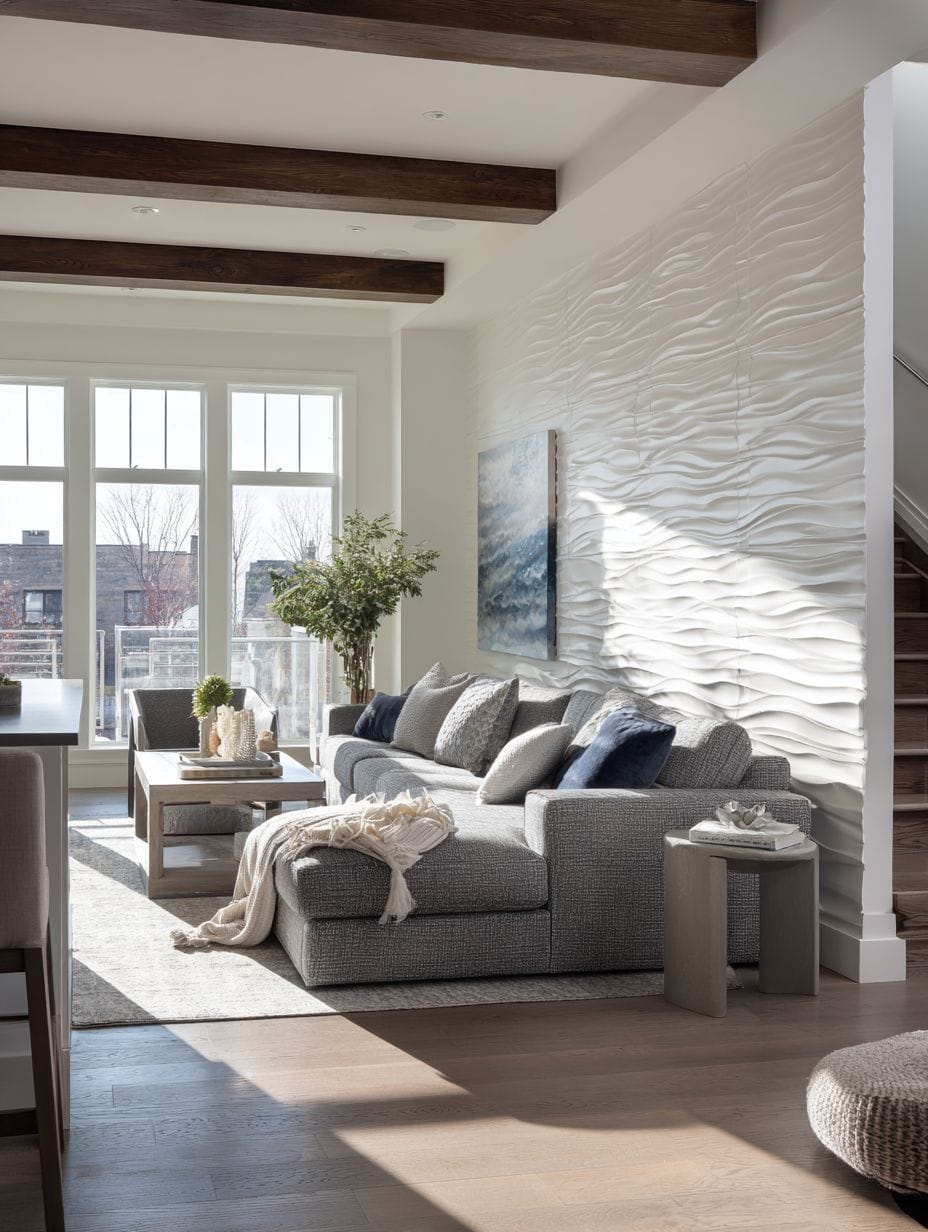
The material of these panels—typically lightweight composite materials designed specifically for wall application—offers the visual drama of plaster or carved wood without the weight or expense. The wave pattern specifically chosen for this design creates gentle, organic movement that feels calming rather than chaotic, making it appropriate for a living space where relaxation is paramount. The white finish maximizes the shadow play while maintaining brightness in the room, reflecting light rather than absorbing it.
Professional architectural photography with side lighting dramatically emphasizes the dimensional texture, showcasing how the panels transform throughout the day from subtle texture to bold sculptural statement. This design approach works particularly well in minimalist or contemporary spaces where decorative objects are limited—the wall itself becomes the art. The panels also provide modest acoustic benefits, helping to reduce echo in rooms with hard flooring and minimal soft furnishings.
- Consider installation complexity: These panels typically require professional installation to ensure proper adhesion and seamless panel alignment.
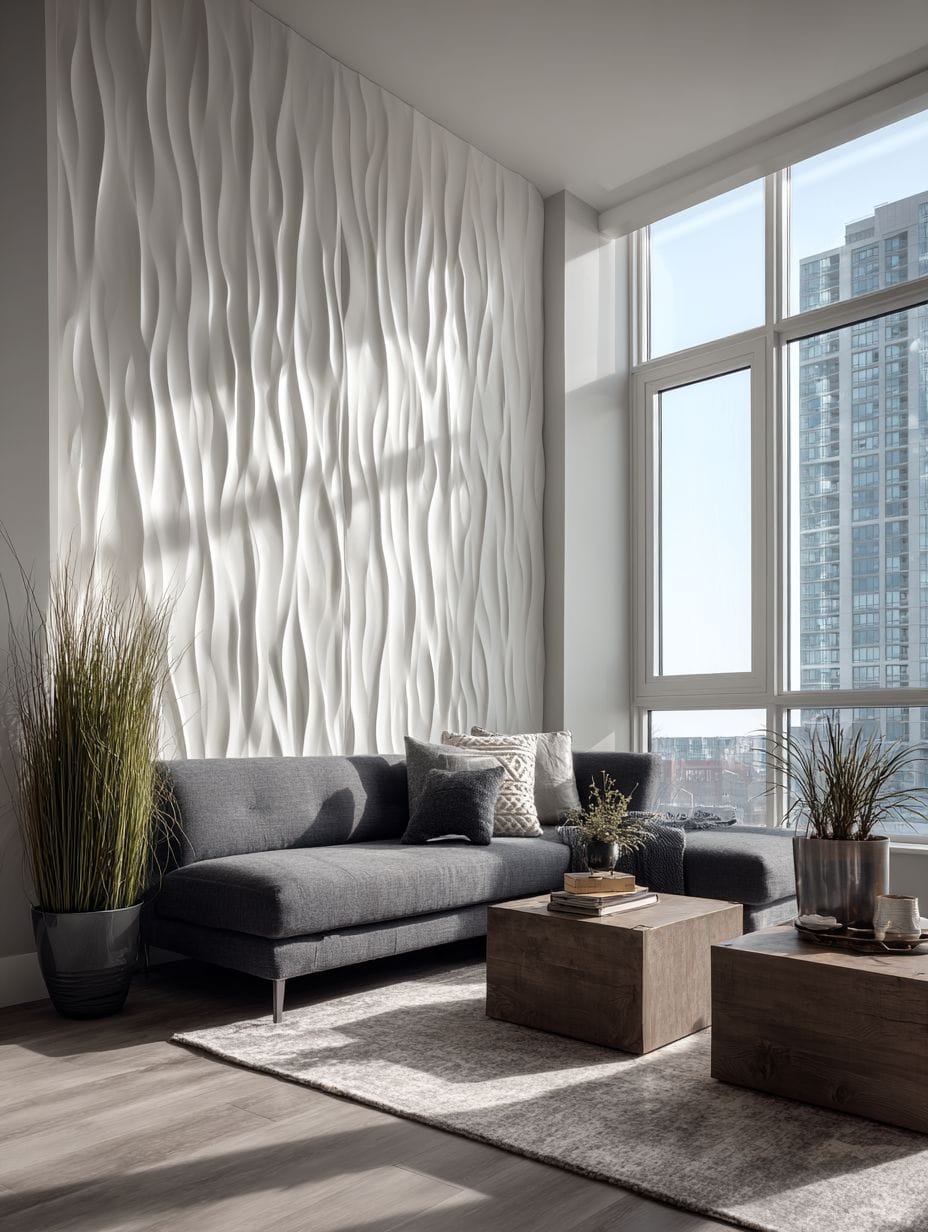
- Plan lighting strategically: Position light sources to one side rather than straight-on to maximize shadow definition and dimensional effect.
- Start with an accent wall: Covering one wall creates impact without overwhelming; full-room application can feel excessive.
- Choose appropriate spaces: Best suited for living rooms, dining rooms, and bedrooms rather than kitchens or bathrooms where moisture is a concern.
- Maintain properly: Dust regularly with a soft brush attachment as the textured surface can collect dust more readily than flat walls.
8. Stunning Stone Veneer Accent Wall with Fireplace
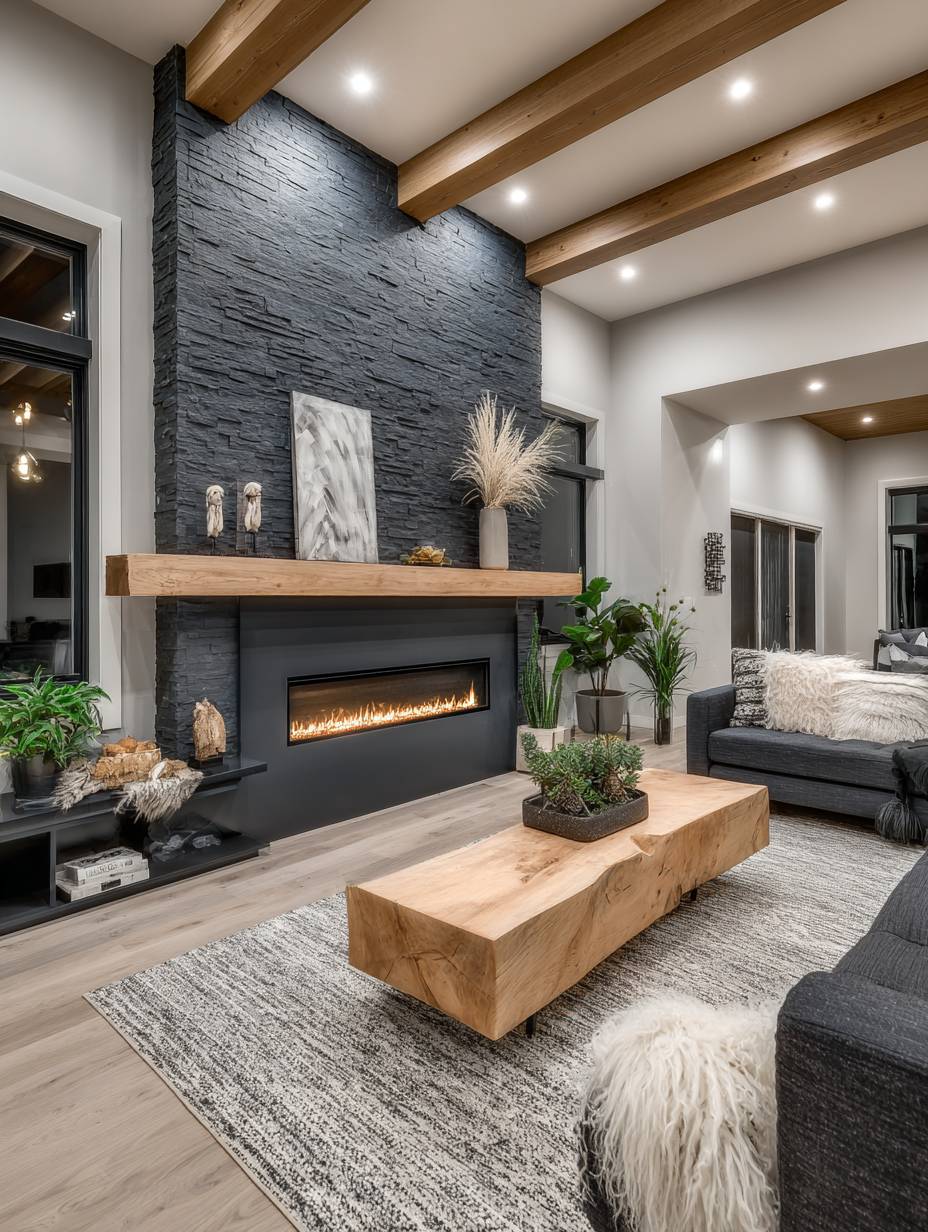
Natural stone veneer creates an accent wall with unparalleled texture, depth, and organic beauty that connects your interior to the natural world outside. This design features stacked slate in authentic earth tones—grey, tan, and rust—creating a richly varied surface that rewards close inspection. The irregular, dimensional nature of natural stone stacking creates deep shadows and highlights that shift constantly with changing light conditions. A linear gas fireplace embedded within the stone wall serves as both functional heating element and visual anchor, its clean horizontal lines providing modern contrast to the organic stone texture.

A floating wooden mantel mounted above the fireplace adds warmth and provides display space without interrupting the flow of the stone. The mantel’s simple design and natural wood grain complement rather than compete with the stone’s complex texture. Surrounding walls painted in warm white create the necessary breathing room, allowing the stone feature wall to command attention without making the space feel heavy or cave-like. This balance between the substantial stone wall and lighter surrounding surfaces creates sophisticated contrast.
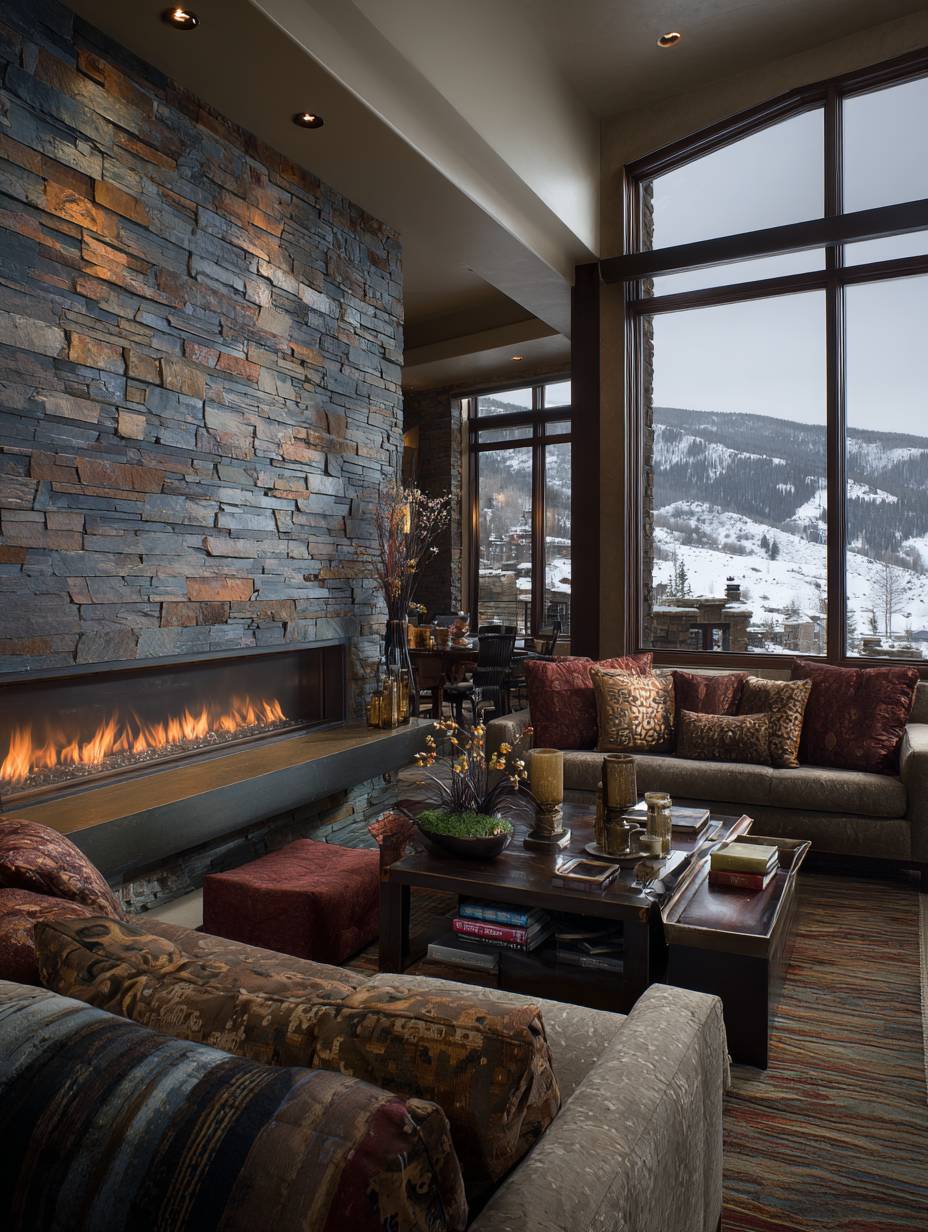
Wide-angle interior photography with carefully balanced lighting captures both the intricate stone texture and the natural color variations inherent in authentic materials. The stone veneer technique provides the aesthetic impact of full-thickness stone at a fraction of the weight and cost, making it practical for both new construction and renovation applications. The thermal mass of the stone also provides energy efficiency benefits, helping to regulate room temperature naturally.
- Choose veneer weight wisely: Select lightweight manufactured stone veneer for easier installation and lower structural requirements without sacrificing appearance.
- Plan for ledge stones: Create a subtle ledge or toe-kick at the floor level to properly anchor the bottom of the stone installation.
- Seal the stone: Apply a penetrating sealer to protect against staining and make cleaning easier while maintaining the natural appearance.
- Hire experienced installers: Stone veneer requires specific expertise to install properly and achieve a natural, random pattern without repetition.
- Coordinate with fireplace early: If integrating a fireplace, plan the stone layout around it for seamless integration rather than treating them as separate elements.
9. Contemporary Shiplap Paneling in Soft Greige
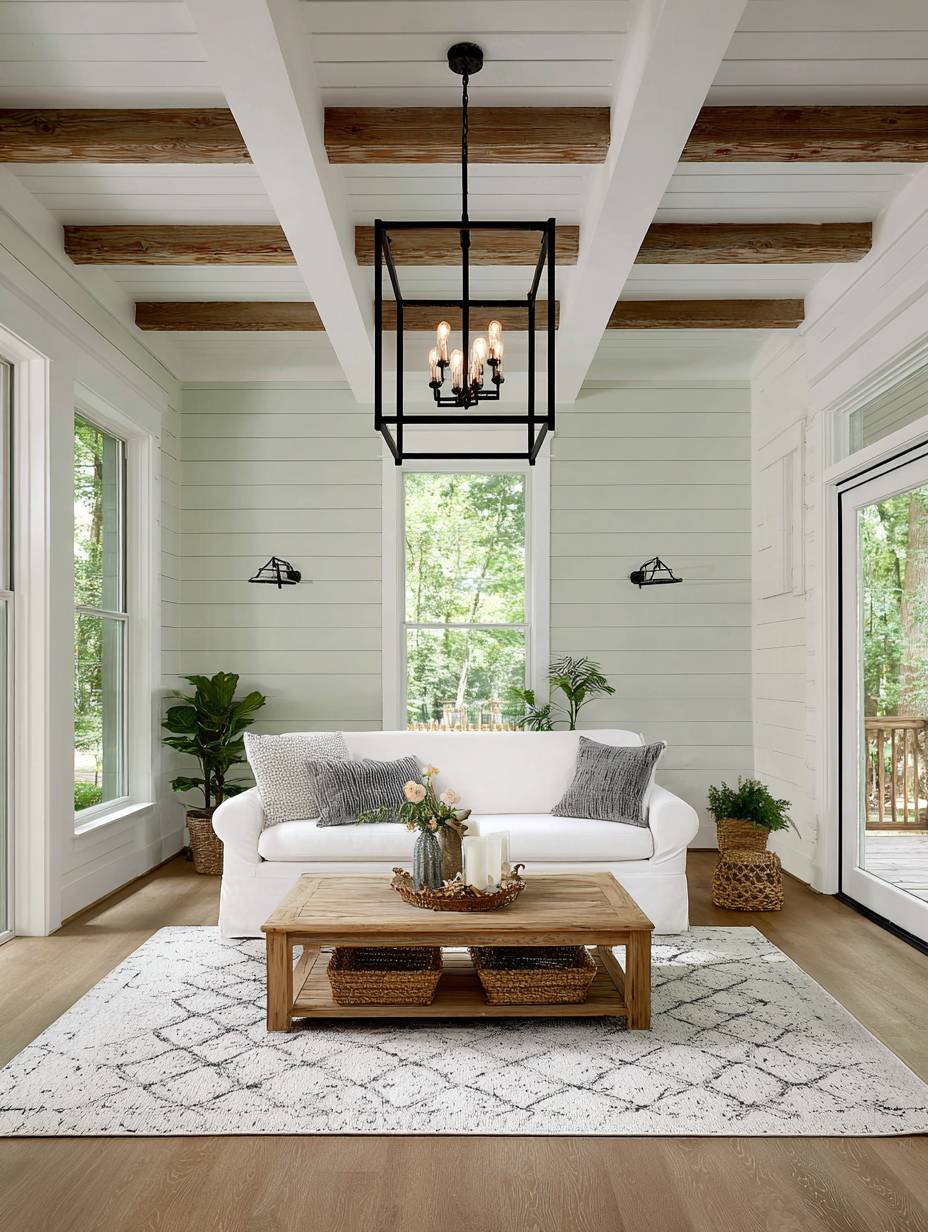
Shiplap has earned its place in contemporary design by offering subtle texture and linear interest without the visual weight of more dramatic wall treatments. This modern interpretation features horizontal shiplap painted in soft greige—a perfect blend of grey and beige—running across all walls rather than just an accent wall. The horizontal lines create a gentle rhythm that guides the eye around the room, making the space feel wider and more expansive. The soft greige color provides warmth without reading as distinctly brown or grey, offering versatile neutrality that works with diverse furniture styles and color palettes.
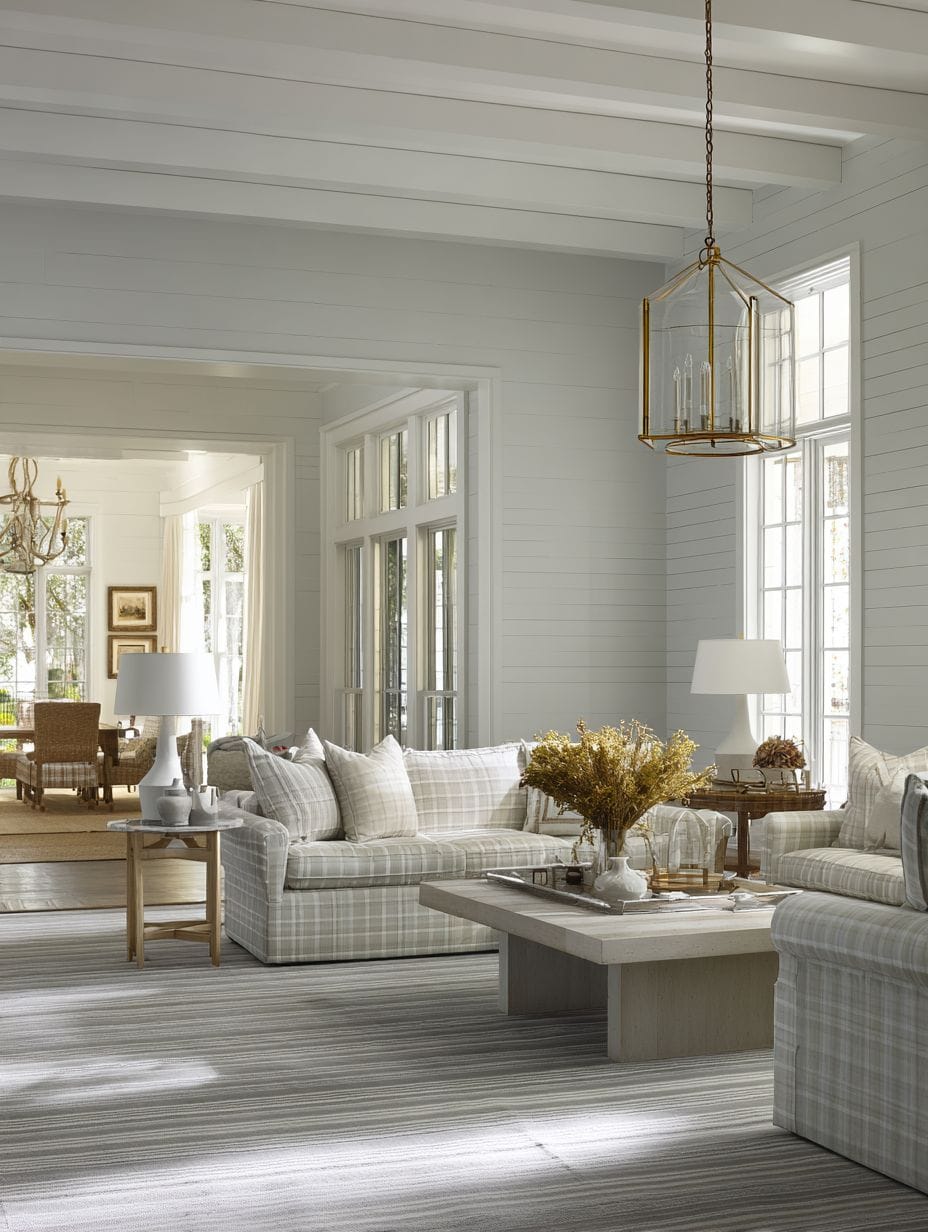
White ceiling beams provide architectural interest and create natural breaks in the expanse of greige walls. The contrast between the warm-toned walls and crisp white beams adds dimension without introducing additional colors into the palette. The subtle linear texture of the shiplap creates gentle shadows between boards, adding dimension that flat drywall cannot achieve. This creates a backdrop that feels finished and intentional while remaining neutral enough to allow furniture and decor to shine.
Professional interior design photography with natural window light emphasizes the gentle shadows between shiplap boards and showcases how the cohesive color palette creates a serene, pulled-together look. The cottage-modern charm of shiplap works equally well in traditional and contemporary spaces, making it one of the most versatile wall treatments available. The horizontal installation also makes ceiling heights appear more generous, an optical illusion that benefits almost any room.
- Use real wood when possible: Authentic wood shiplap offers superior durability and aging characteristics compared to MDF alternatives.
- Mind the gap: Traditional shiplap has a small reveal between boards; use nickel-thickness spacers for consistent gaps during installation.
- Plan for expansion: Leave small gaps at corners and ceiling to allow wood to expand and contract with humidity changes without buckling.
- Paint after installation: Install raw wood and paint in place for the most seamless, professional appearance, allowing you to fill nail holes first.
- Consider orientation carefully: Horizontal shiplap expands spaces visually, while vertical creates height—choose based on your room’s needs.
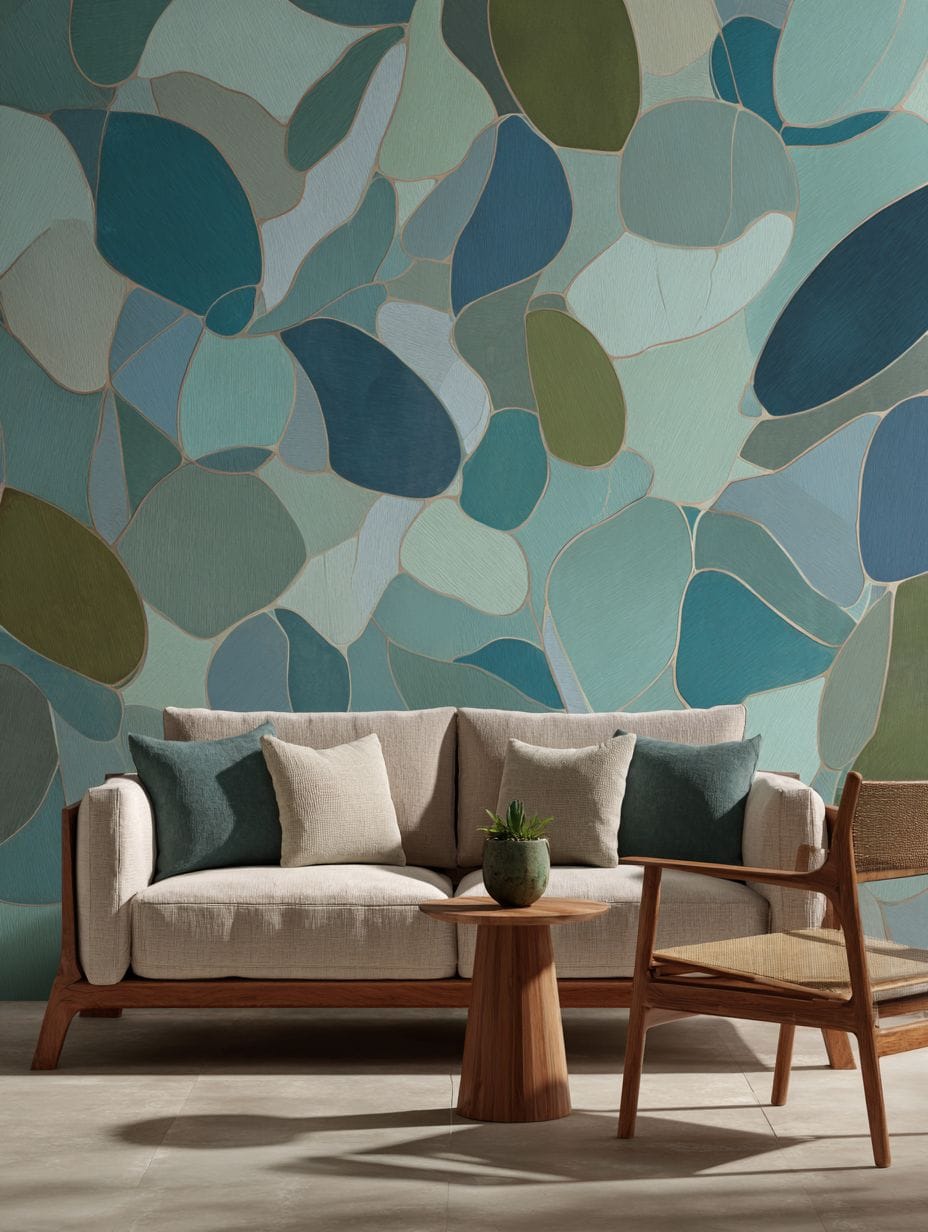
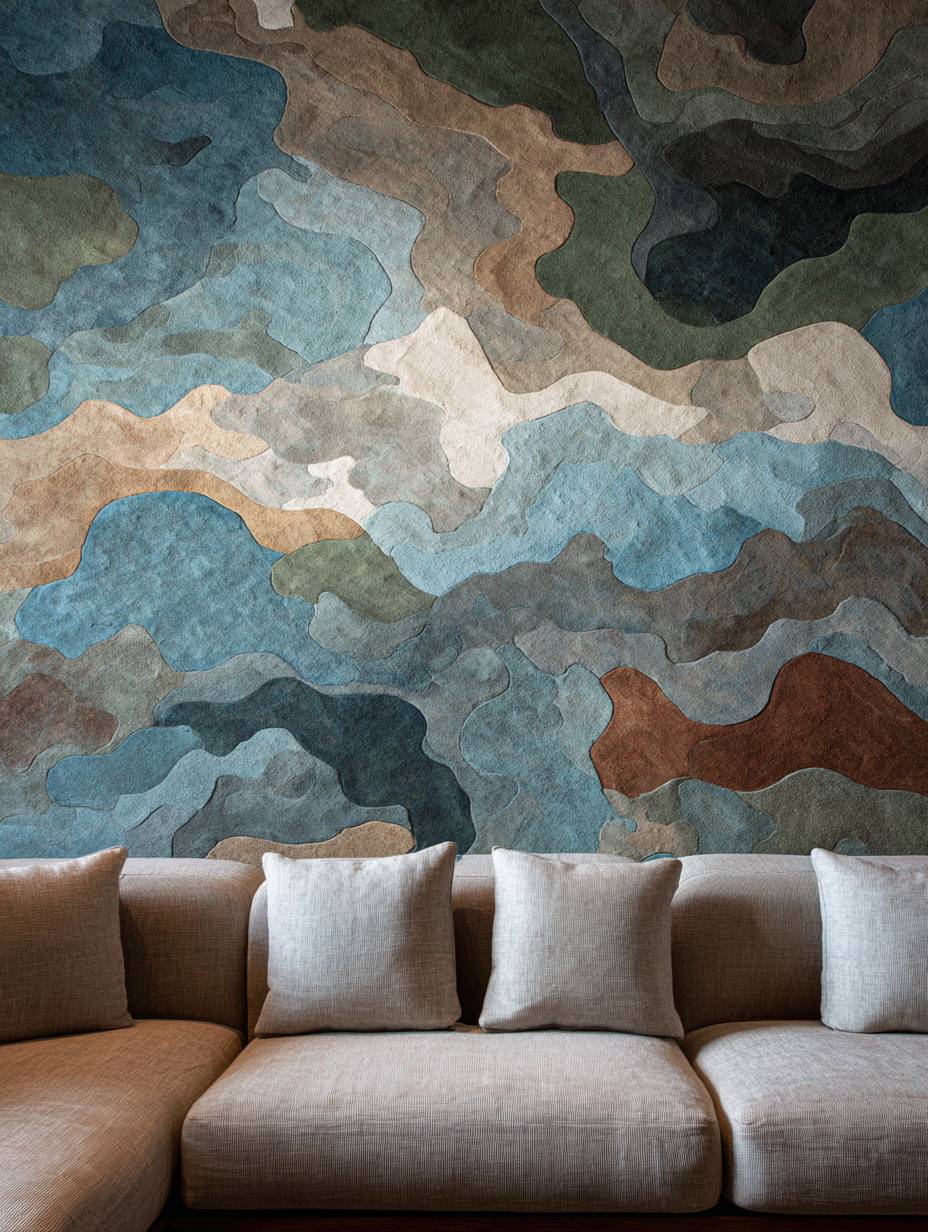
10. Artistic Botanical Mural Accent Wall
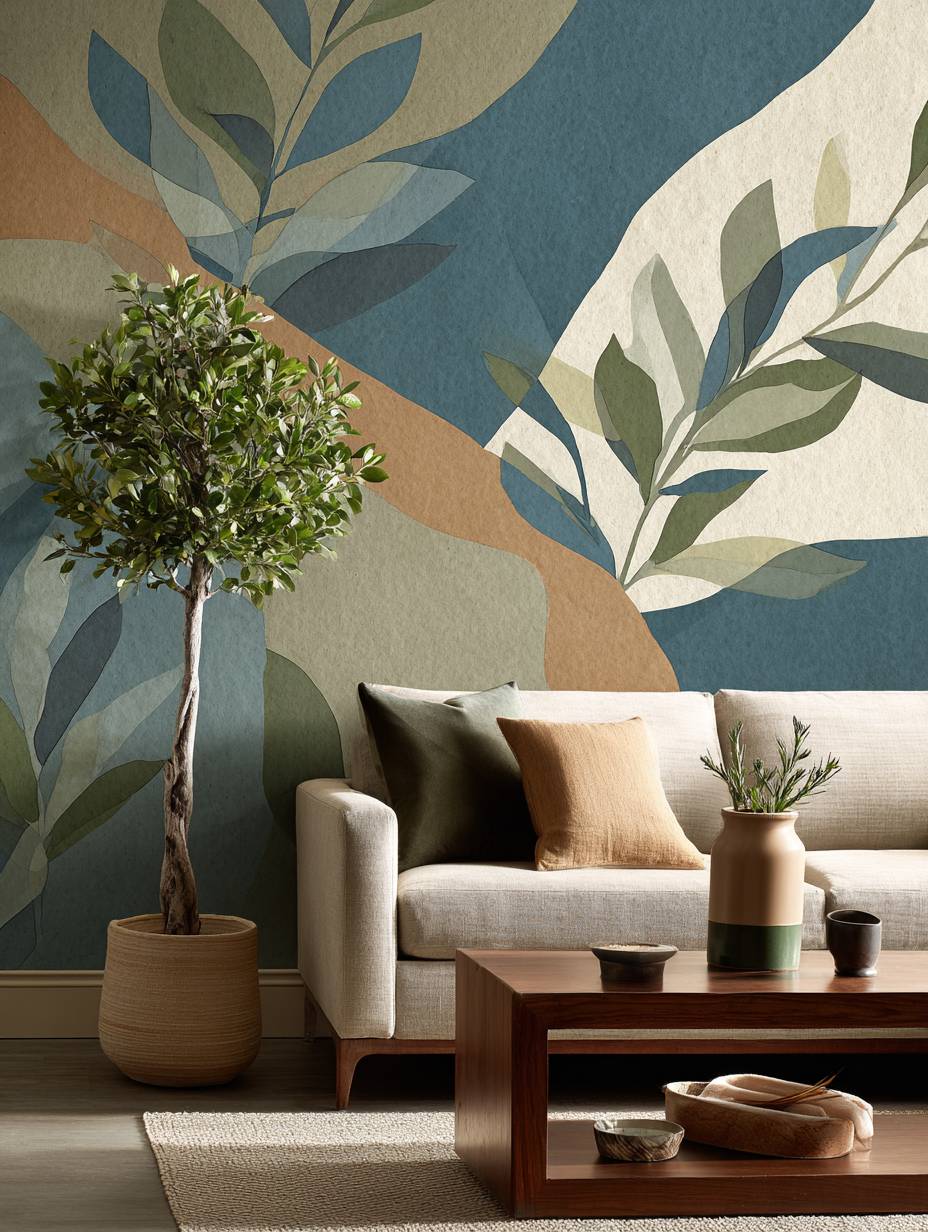
A hand-painted botanical mural transforms a living room wall into a genuine work of art, creating a one-of-a-kind focal point that cannot be replicated. This design features abstract botanical forms rendered in a sophisticated palette of soft blues, greens, and earth tones that flow across the wall in organic shapes without harsh lines or rigid boundaries. The artistic interpretation of natural forms creates movement and life in the space while maintaining enough abstraction to work as sophisticated art rather than literal illustration. The mural serves as a stunning backdrop behind a neutral linen sofa, allowing the soft furniture to complement rather than compete with the wall art.
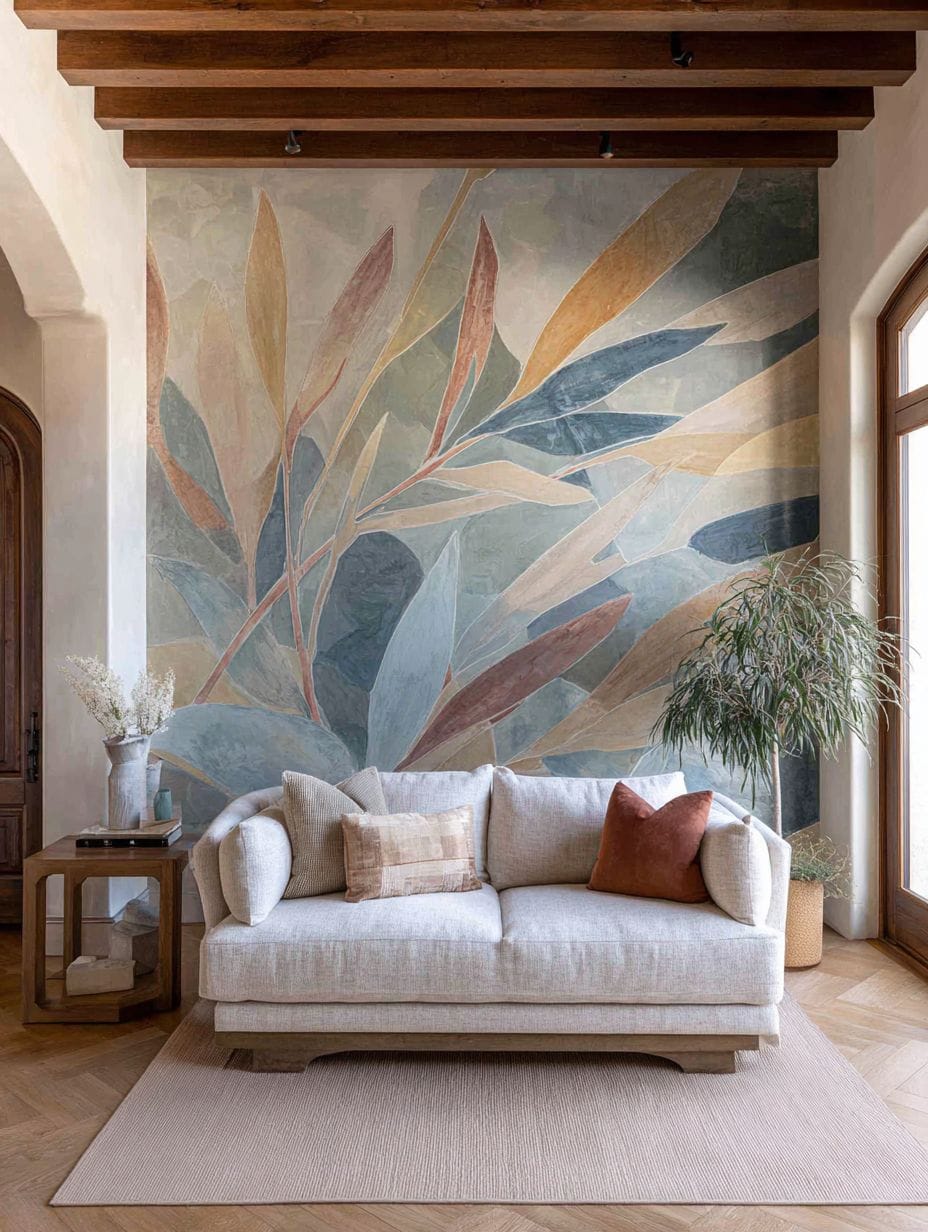
The beauty of a hand-painted mural lies in its ability to be completely customized to your specific space, color preferences, and style. The organic flow of the botanical shapes can navigate around architectural features like windows, doors, or built-ins, making the mural feel integral to the room rather than applied to it. The soft, blended colors create subtle variations that give depth and prevent the flat appearance that can plague printed wall murals or decals.
Interior photography capturing the full artistic composition with even lighting reveals paint texture details and color subtleties that add to the mural’s handcrafted quality. This approach works particularly well for those seeking a truly unique living room that reflects personal style—no two hand-painted murals are ever exactly alike. The investment in commissioning an artist creates lasting value and a conversation piece that grows more beloved over time.
- Hire experienced muralists: Review portfolios carefully and choose artists with specific experience in interior residential murals.
- Prepare walls properly: Ensure walls are smooth, primed, and in excellent condition before the artist begins for optimal results.
- Discuss protection options: Ask about sealing or protective coatings that allow gentle cleaning without damaging the artwork.
- Plan the composition: Work with the artist to create a design that works with your furniture placement and room flow.
- Document the process: Take photos during creation as the making of your mural becomes part of its story and value.
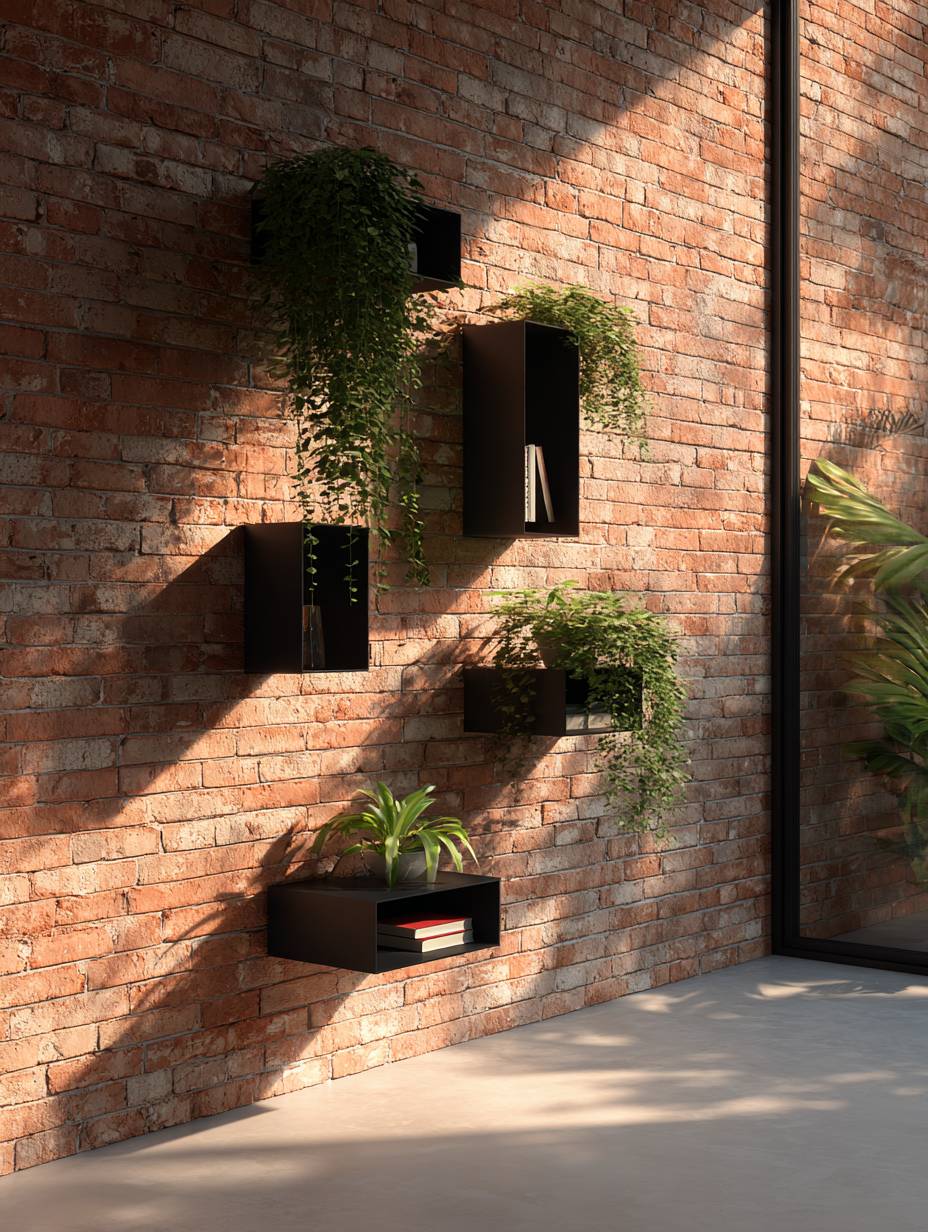
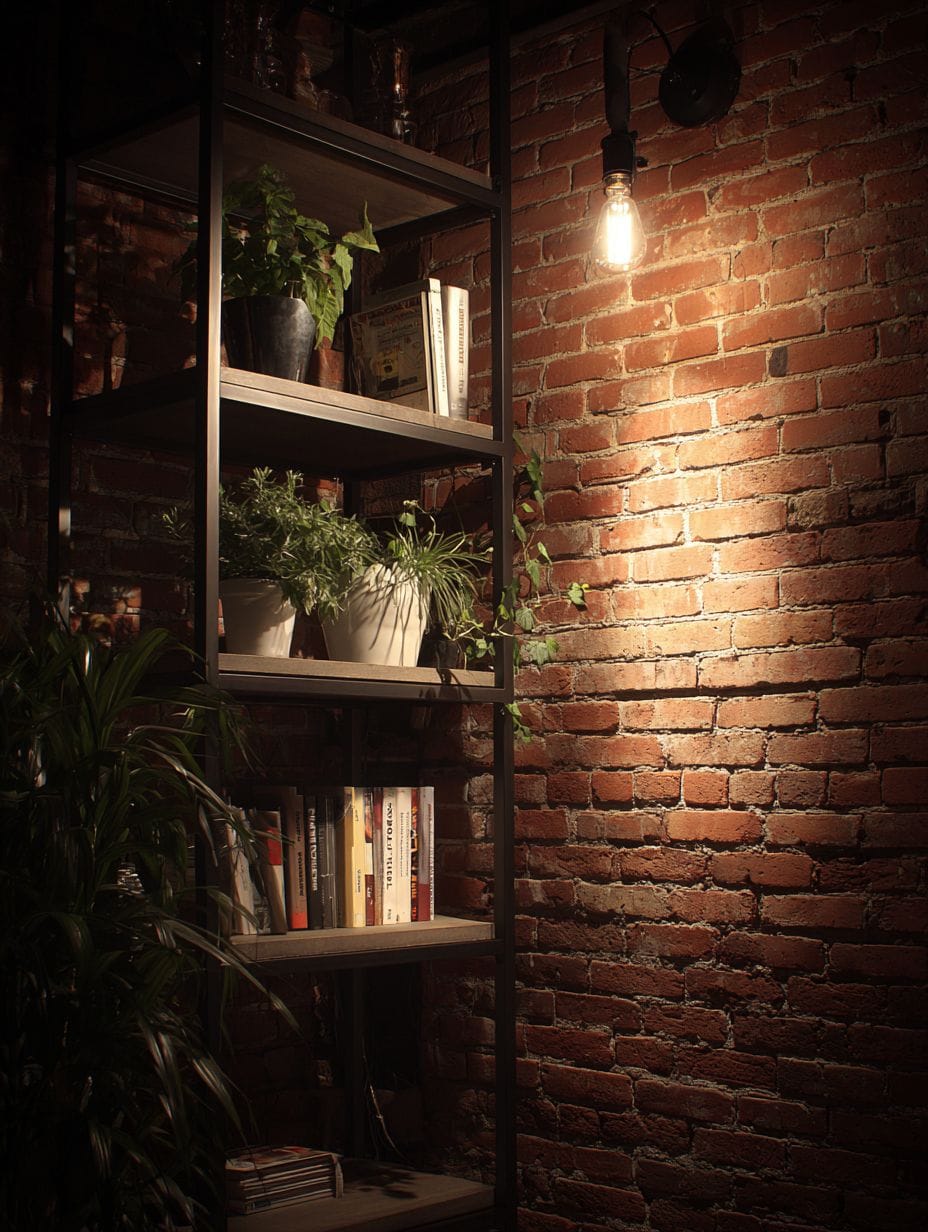
11. Industrial Exposed Brick Accent Wall
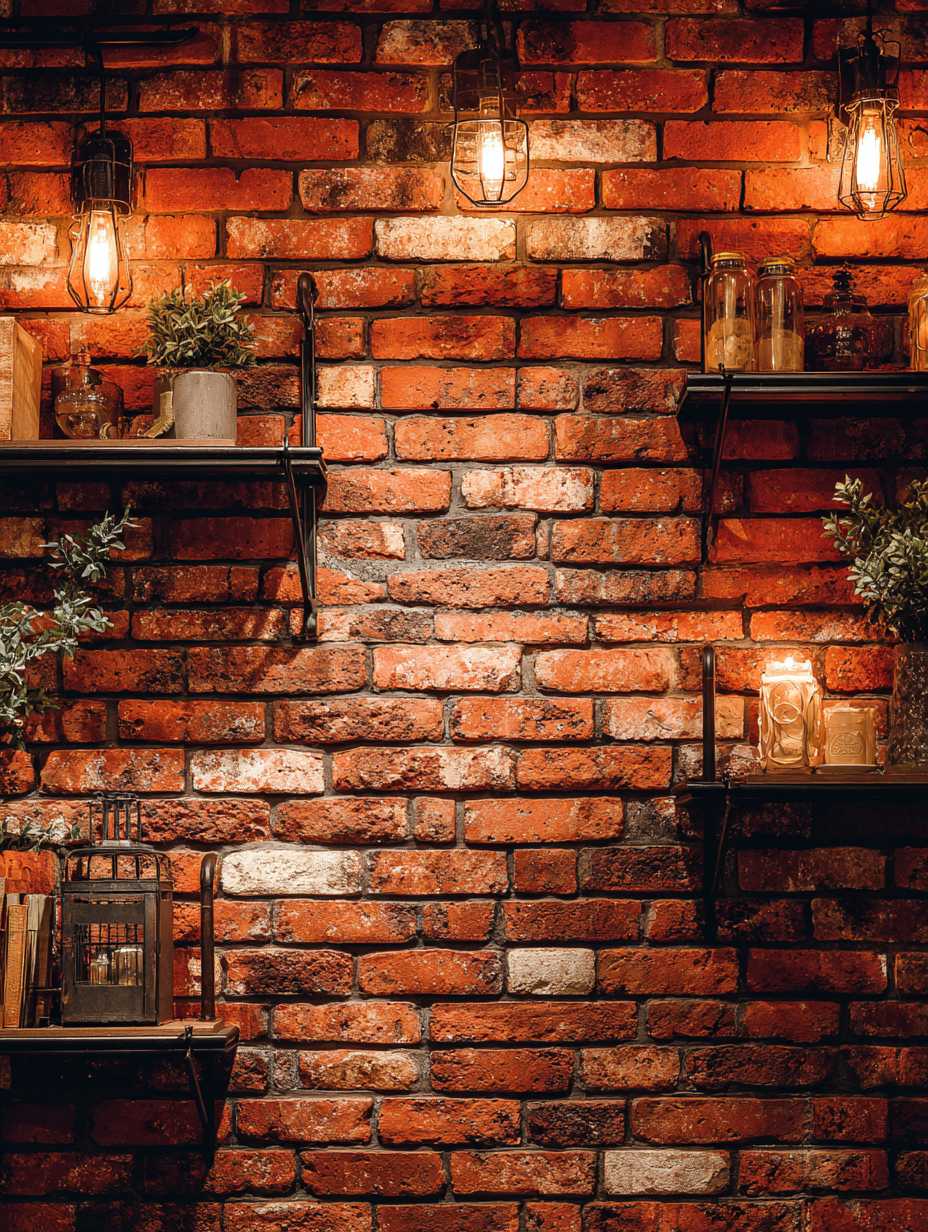
Exposed brick represents the ultimate in authentic architectural character, bringing raw, industrial charm and centuries-old construction techniques into modern living spaces. This design showcases original red-orange clay bricks with natural age patina, visible mortar texture, and the irregular surface that comes from handmade materials and time. The authentic wear and color variations in aged brick cannot be replicated by manufactured alternatives—each brick tells its own story through chips, stains, and weathering. Black metal floating shelves mounted at varying heights provide functional storage and display space while reinforcing the industrial aesthetic.
Edison bulb wall sconces flanking the brick wall provide ambient lighting that celebrates the vintage aesthetic while offering practical illumination. The exposed filament bulbs cast warm light across the textured brick surface, emphasizing the dimensional quality and creating dramatic shadows in the mortar joints. This interplay between light and texture transforms throughout the evening, giving the wall dynamic visual interest that changes with the light levels.
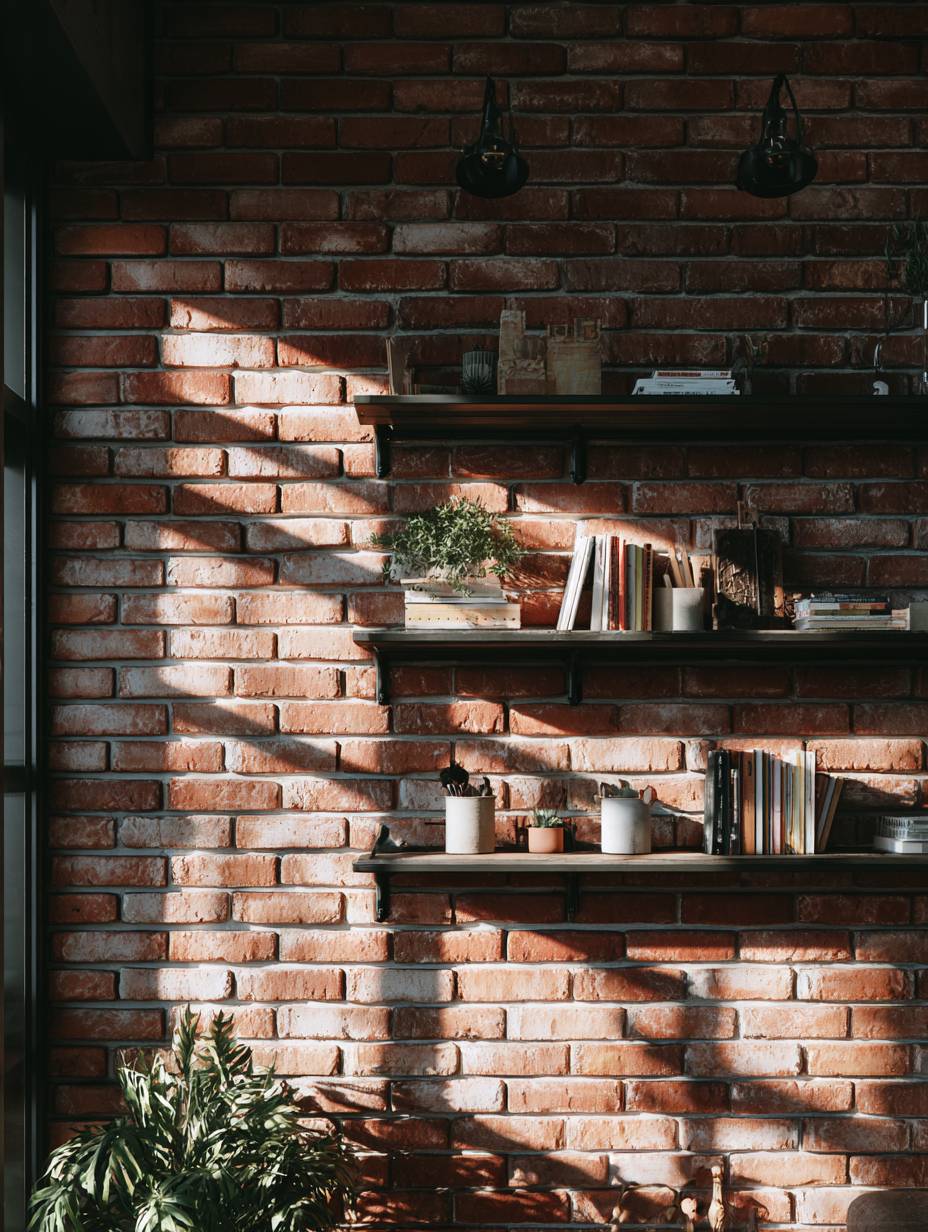
Architectural photography highlighting the authentic brick texture uses both natural and artificial light sources to create dimensional shadows between bricks, showcasing the honest materiality that makes exposed brick so appealing. This treatment works particularly well in lofts, converted industrial spaces, or older homes where brick may already exist behind drywall or plaster. The brick provides excellent thermal mass, helping to regulate room temperature naturally while also offering modest sound absorption properties.
- Assess structural integrity: Have brick professionally inspected to ensure it can be safely exposed and doesn’t require the support of covering materials.
- Seal properly: Apply a breathable masonry sealer to prevent dust and crumbling while allowing moisture to escape naturally.
- Consider cleaning methods: Gentle cleaning with soft brushes preserves patina better than pressure washing or harsh chemicals.
- Add insulation behind: If the brick is an exterior wall, ensure adequate insulation exists behind it for energy efficiency.
- Embrace imperfection: The beauty of authentic exposed brick lies in its irregularities—resist the urge to make it too perfect or uniform.
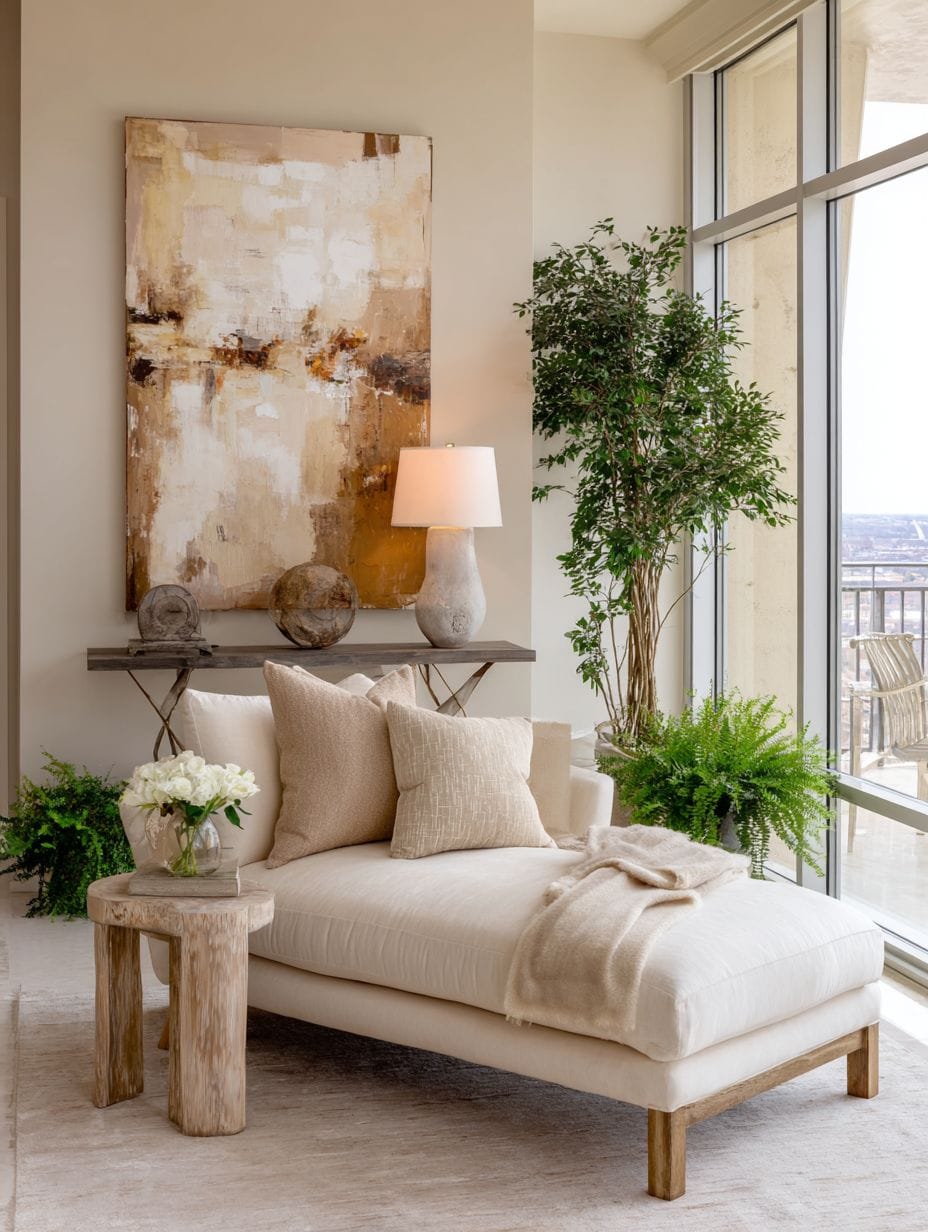
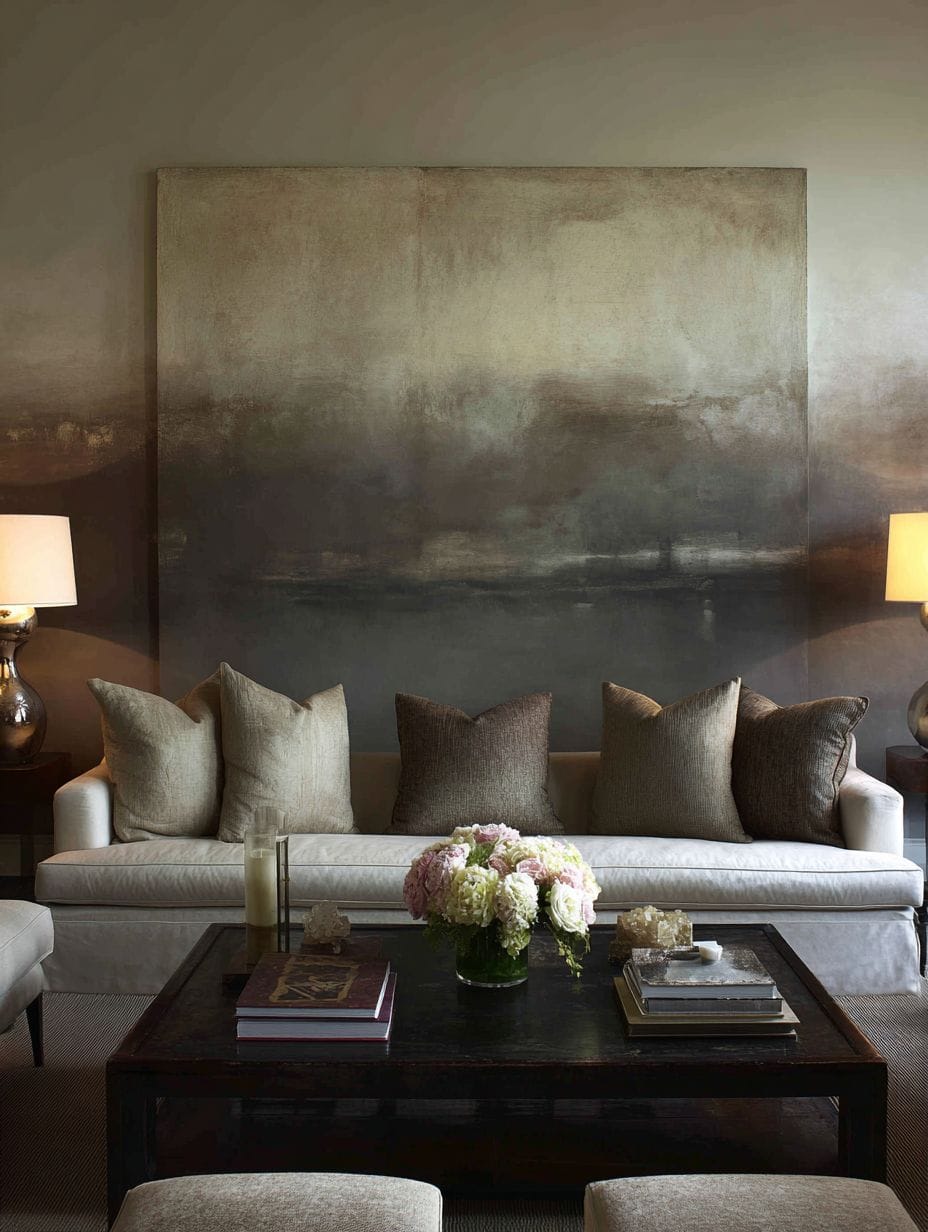
12. Minimalist Large-Scale Abstract Canvas
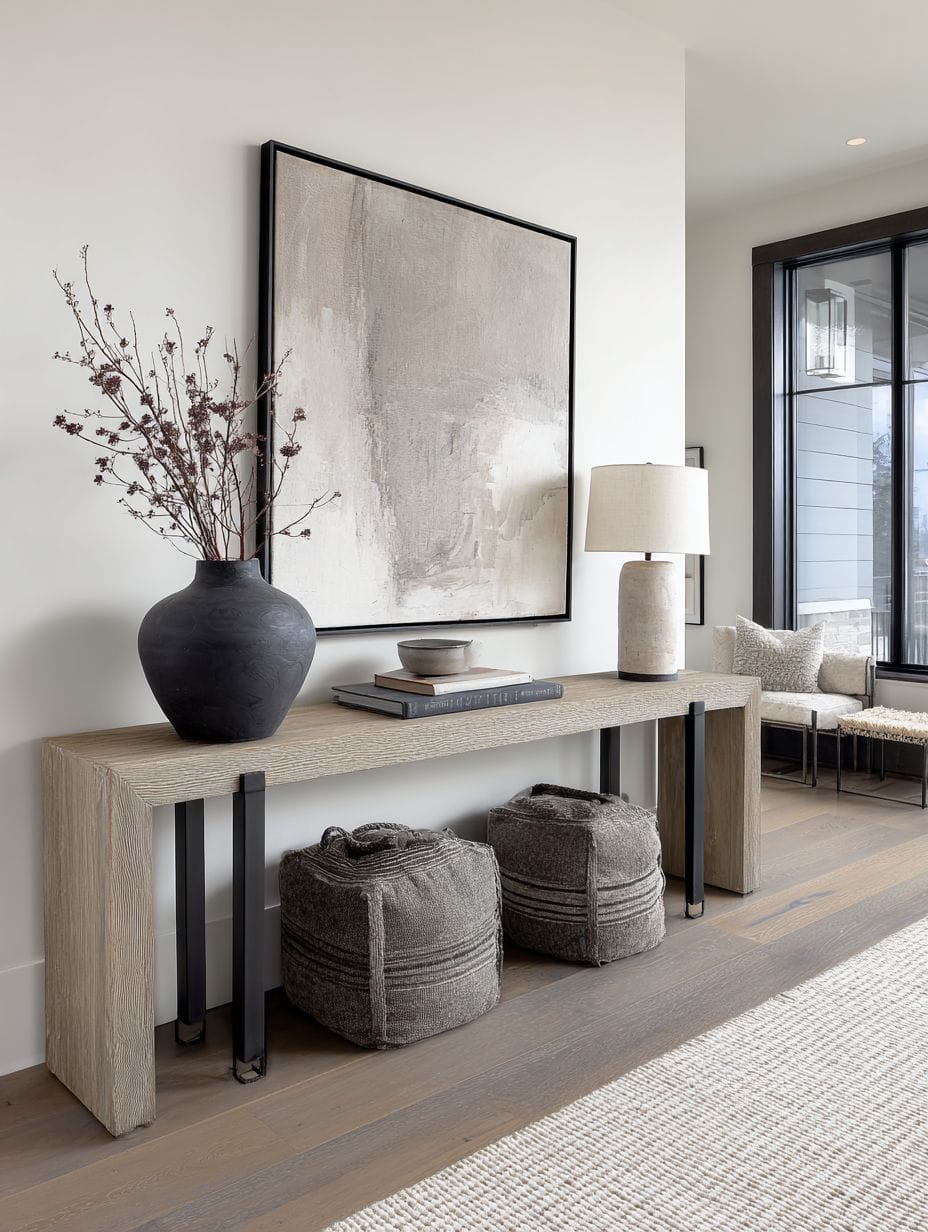
Sometimes the most powerful statement comes from restraint and simplicity, and this minimalist approach proves that a single large-scale artwork can transform a wall more effectively than multiple smaller pieces. A substantial abstract canvas measuring 6 feet by 4 feet commands attention through sheer scale, its muted earth tones providing sophisticated color without overwhelming the space. Centered on a pristine white wall with generous negative space surrounding it, the artwork becomes a genuine focal point that draws the eye immediately upon entering the room. A low-profile console table positioned beneath anchors the composition without competing for attention.
The minimalist approach celebrates quality over quantity, allowing you to invest in a single meaningful piece of art rather than filling walls with multiple smaller items. The large scale makes a bold statement while the earth-tone palette maintains tranquility and sophistication. The abundance of white wall space surrounding the artwork creates a gallery-like presentation that elevates the art itself, treating it with the respect and space it deserves. This approach particularly suits contemporary and modern interiors where clean lines and uncluttered spaces reign supreme.
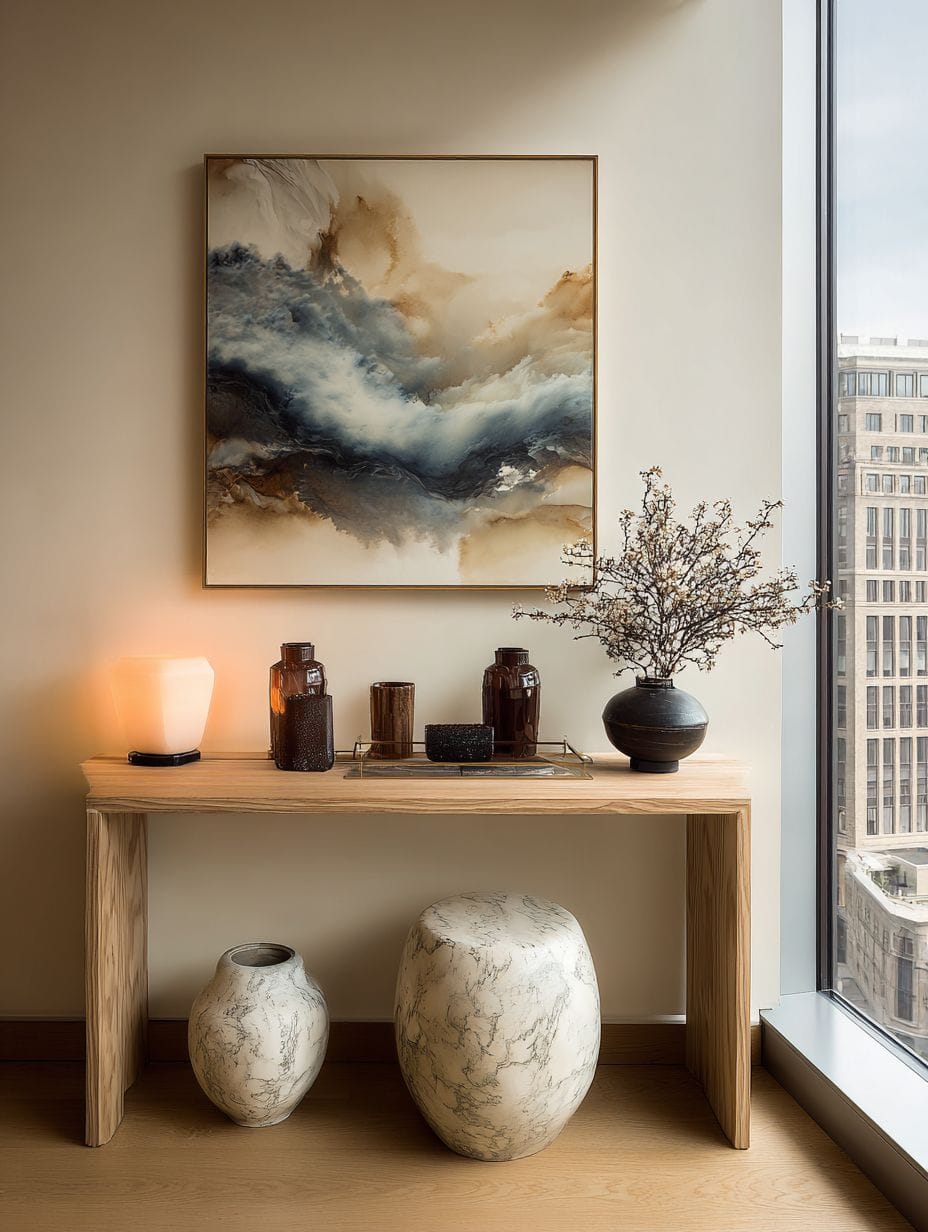
Professional interior photography employs gallery-style lighting that illuminates the artwork without creating glare or hot spots, maintaining the clean composition while ensuring the art receives proper emphasis. The negative space becomes as important as the artwork itself, creating breathing room that prevents visual overwhelm and allows the mind to rest. This design philosophy demonstrates that more isn’t always better—sometimes a single perfect element creates more impact than a dozen competing ones.
- Scale appropriately: Large art works best on walls at least 1.5 times wider than the artwork itself to maintain proper proportions.
- Hang at proper height: Center the artwork at eye level (57-60 inches to the center) for optimal viewing and professional presentation.
- Invest in quality: A single high-quality piece creates more impact than multiple mediocre ones—buy the best you can afford.
- Light it properly: Use adjustable picture lights or track lighting to highlight the artwork without creating glare on the surface.
- Consider the room’s scale: Artwork should be proportional to both wall size and furniture scale to maintain visual balance.
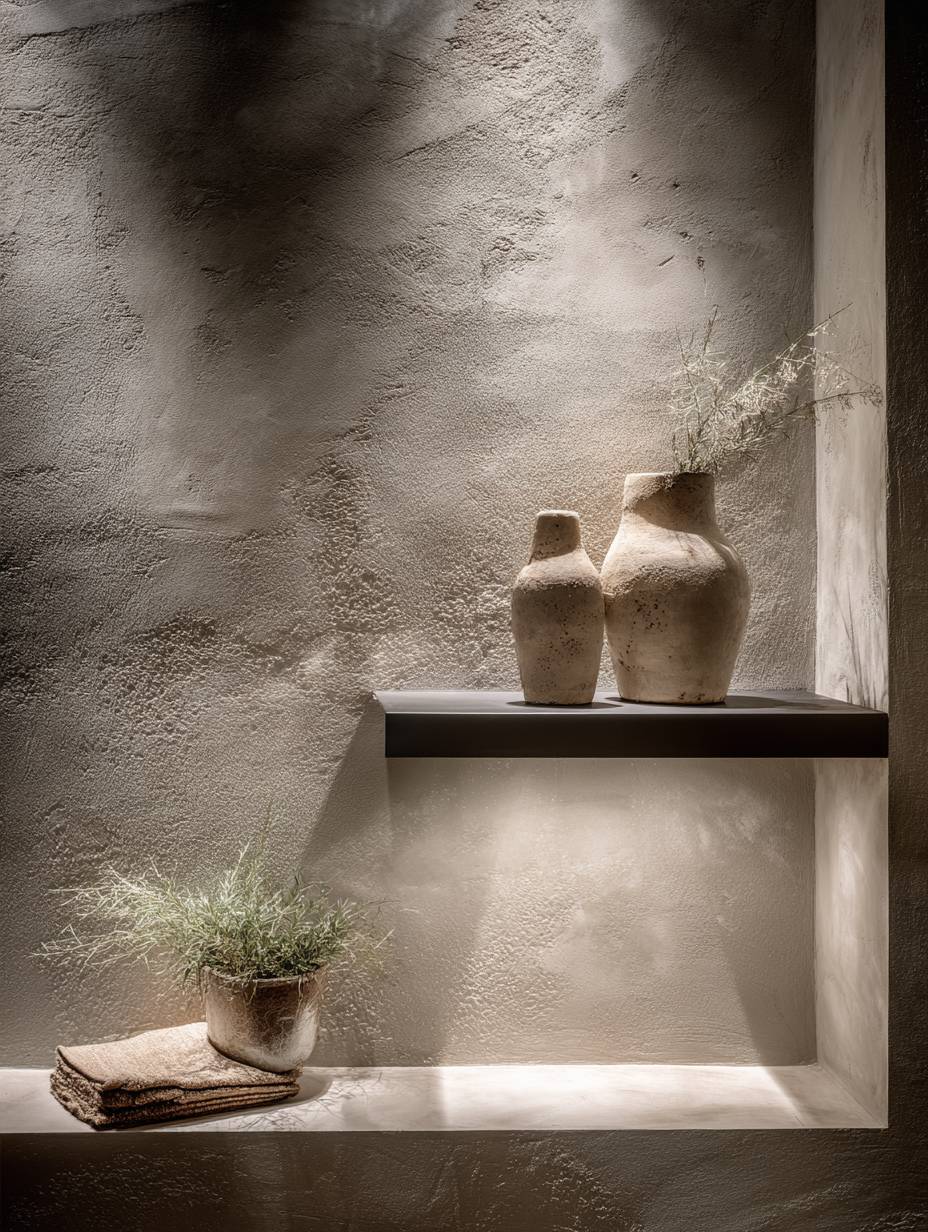
13. Elegant Venetian Plaster Finish
Venetian plaster represents one of the most sophisticated wall finishes available, creating a luminous, organic surface with depth and subtle movement that paint alone cannot achieve. This luxurious treatment in warm taupe covers all walls rather than serving as a single accent, creating a cohesive, enveloping atmosphere that feels both elegant and intimate. The plaster’s subtle sheen catches light without appearing glossy, creating a gentle glow that shifts throughout the day. Organic texture variations inherent in hand-applied plaster add visual interest at close range while reading as smooth and elegant from across the room.
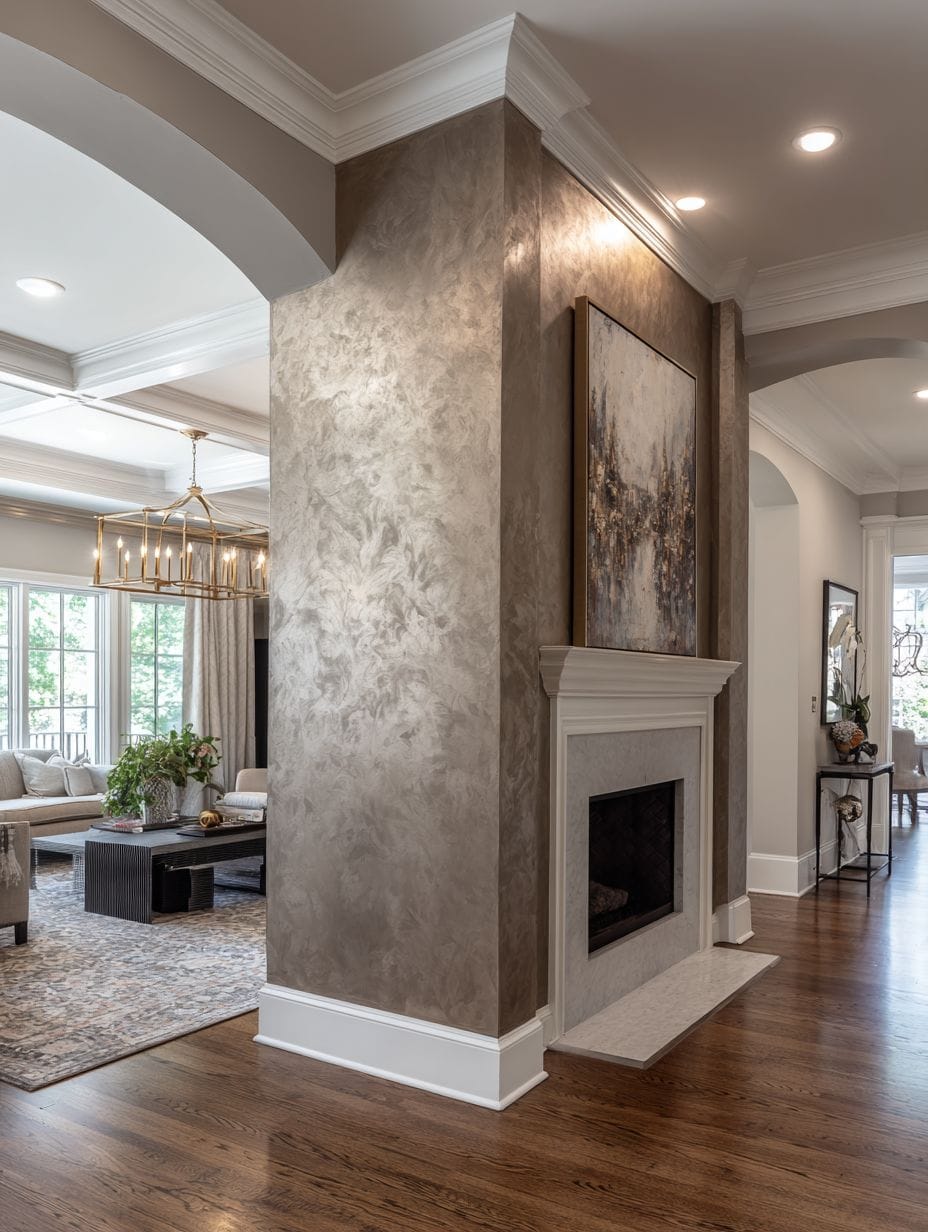
The beauty of Venetian plaster lies in its depth—unlike paint which sits on the surface, plaster creates a finish with genuine dimensionality. The hand-troweling technique creates subtle variations and occasional imperfections that add character and prove the material’s artisanal application. Natural light streaming through windows reveals the plaster’s depth and the subtle color shifts created by varying thickness and trowel techniques. The warm taupe color provides sophisticated neutrality that works as a backdrop for diverse furniture styles and decorative objects.
Interior design photography with soft diffused lighting captures the material’s organic texture and gentle luster without creating harsh reflections that would misrepresent the finish. The investment in Venetian plaster pays dividends in longevity and timeless appeal—properly applied plaster can last decades and never feels dated. The finish also provides practical benefits including durability superior to paint, moisture resistance, and natural antibacterial properties.
- Hire skilled artisans: Venetian plaster requires specialized training and experience—this is not a DIY-appropriate project for most homeowners.
- Prepare surfaces meticulously: Walls must be perfectly smooth and properly primed as any imperfections will show through the translucent plaster.
- Understand the process: Application typically requires multiple coats applied and burnished over several days—plan accordingly for timeline and access.
- Choose colors thoughtfully: Plaster colors appear different than paint chips due to translucency and texture—request samples on your actual walls.
- Protect during curing: Allow full curing time (typically 30 days) before cleaning or placing furniture against walls to ensure proper hardening.
14. Bold Geometric Color-Blocked Wall
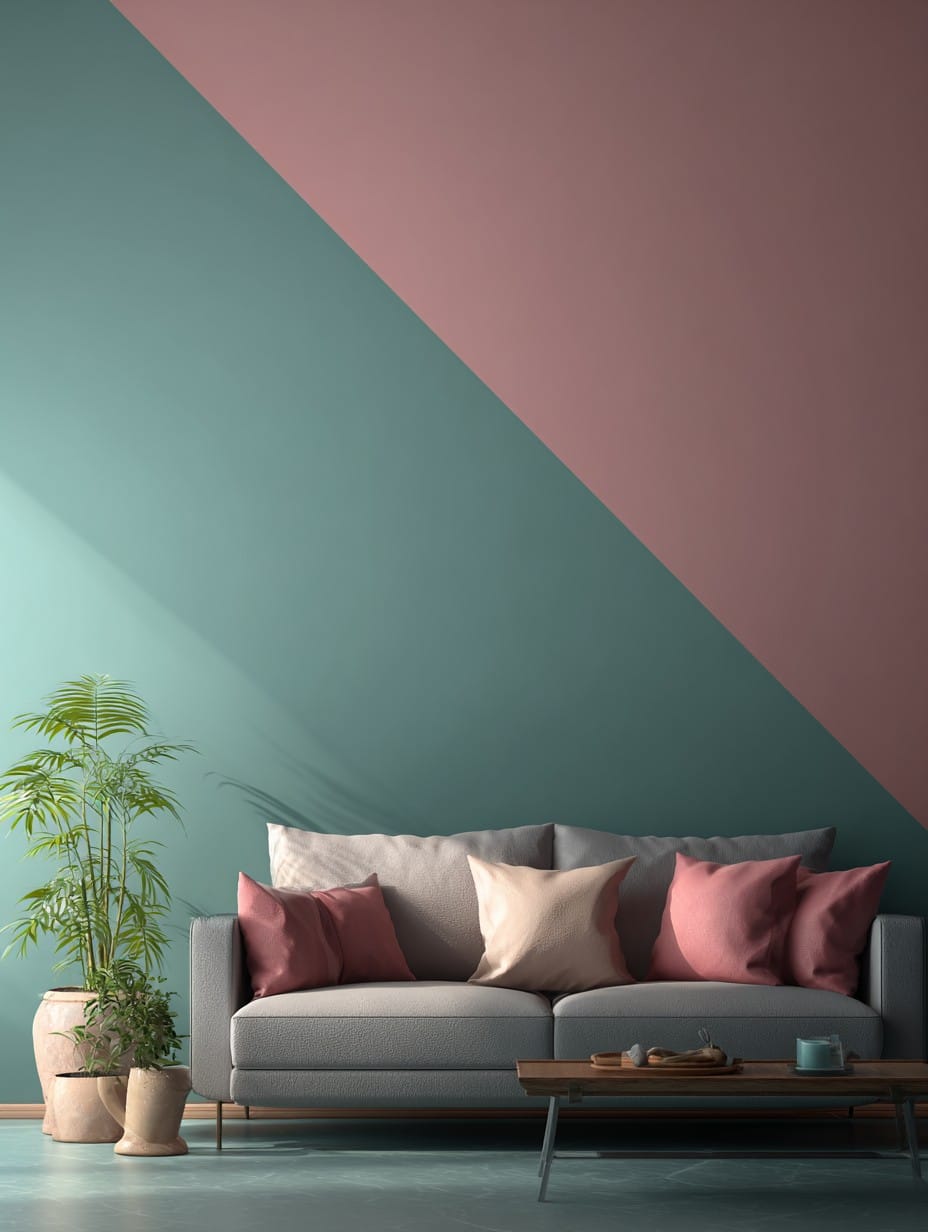
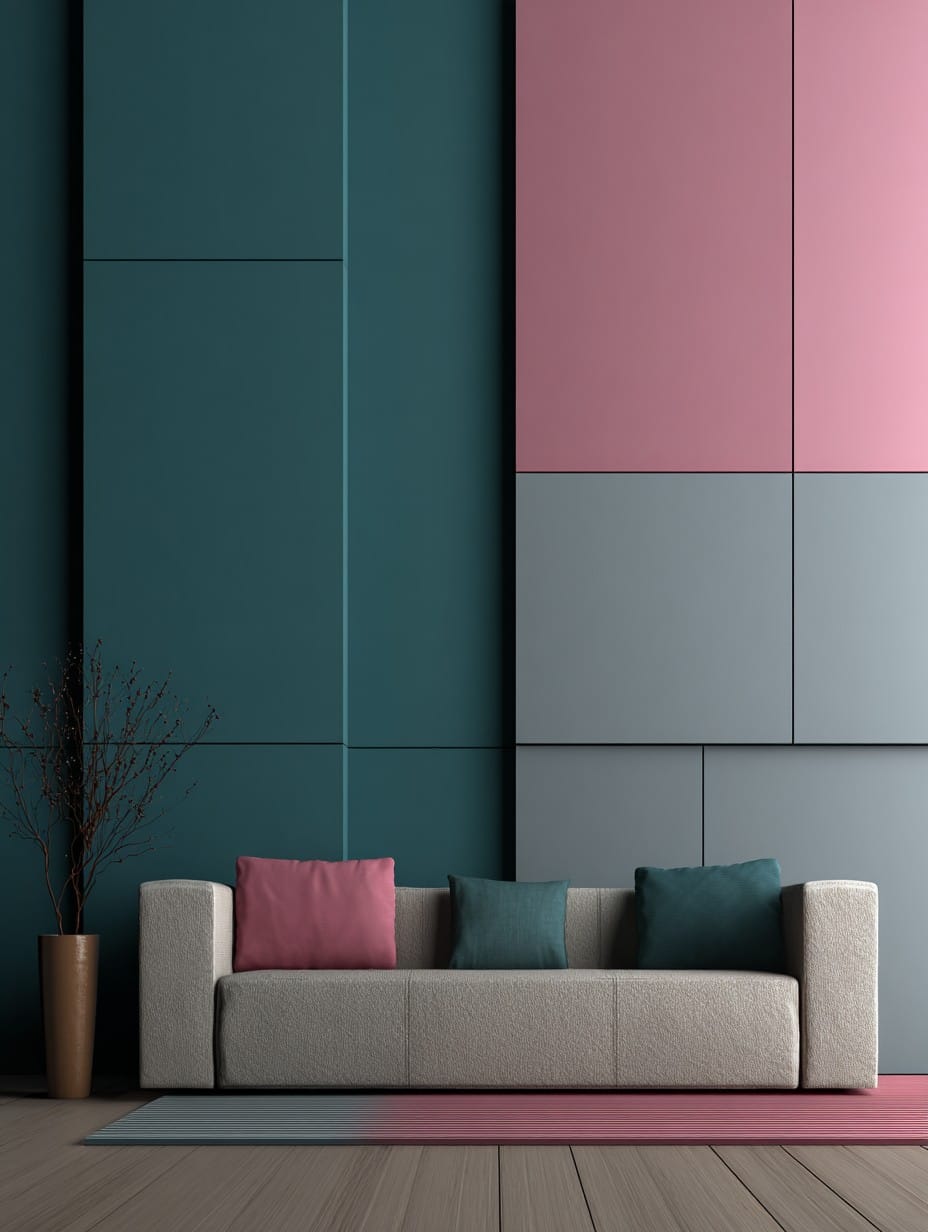
Color-blocking brings graphic design principles into interior architecture, creating bold visual statements through strategic use of color and geometry. This dynamic design features a horizontal division that places deep teal across the lower two-thirds of the wall and soft blush pink in the upper third, creating an unexpected yet harmonious color combination. The clean horizontal line dividing the colors reads as intentional and precise, demonstrating control and confidence in the design choice. Modern furniture in neutral tones provides visual rest areas and allows the color-blocked wall to serve as the room’s undeniable focal point.
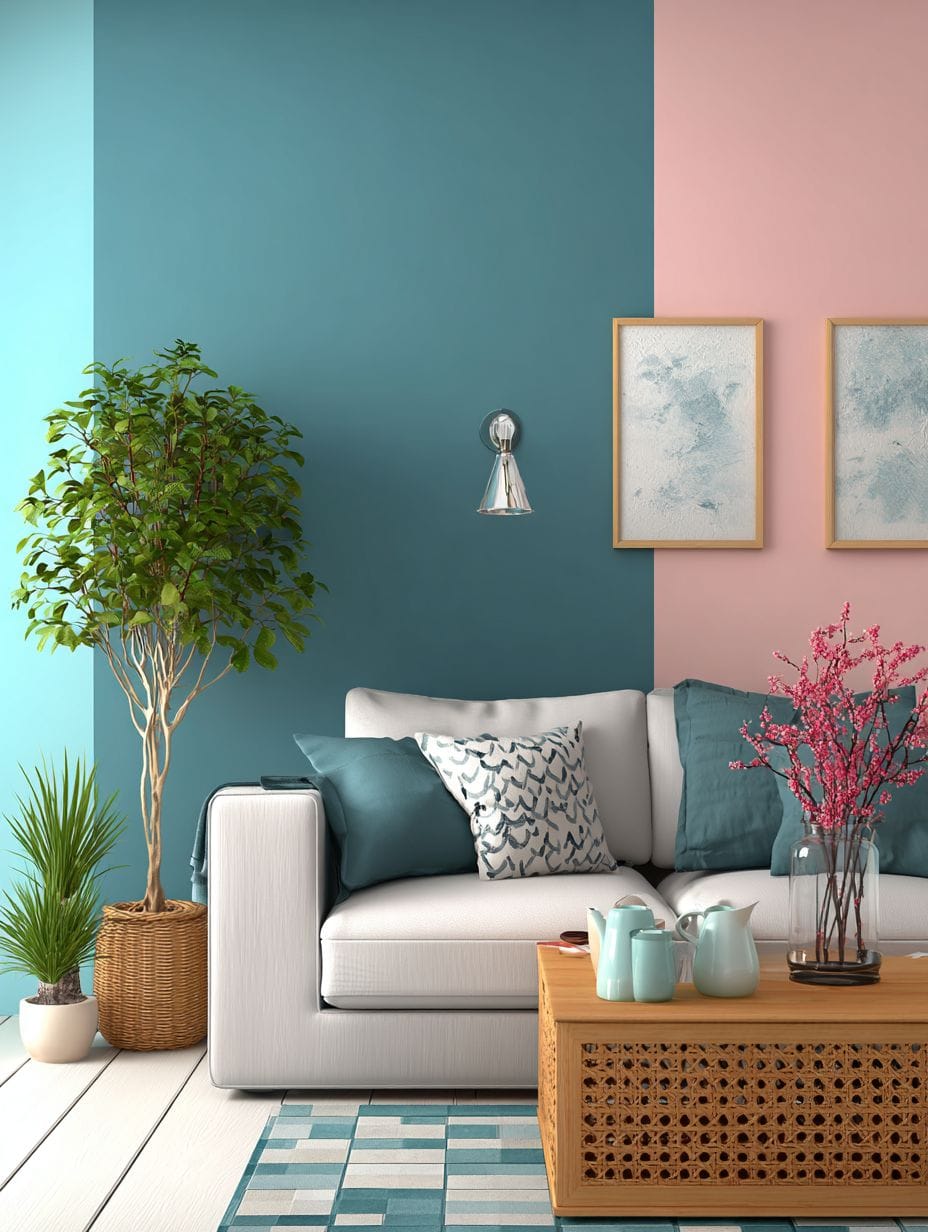
The color choices demonstrate sophisticated understanding of color theory—teal and blush pink sit on opposite sides of the color wheel, creating pleasing contrast without harsh conflict. The proportions also matter significantly: the two-thirds/one-third division creates more interesting visual balance than a simple half-and-half split would achieve. The teal grounding the lower portion of the wall creates stability and anchors the eye, while the softer blush above provides lift and prevents the darker color from feeling heavy.
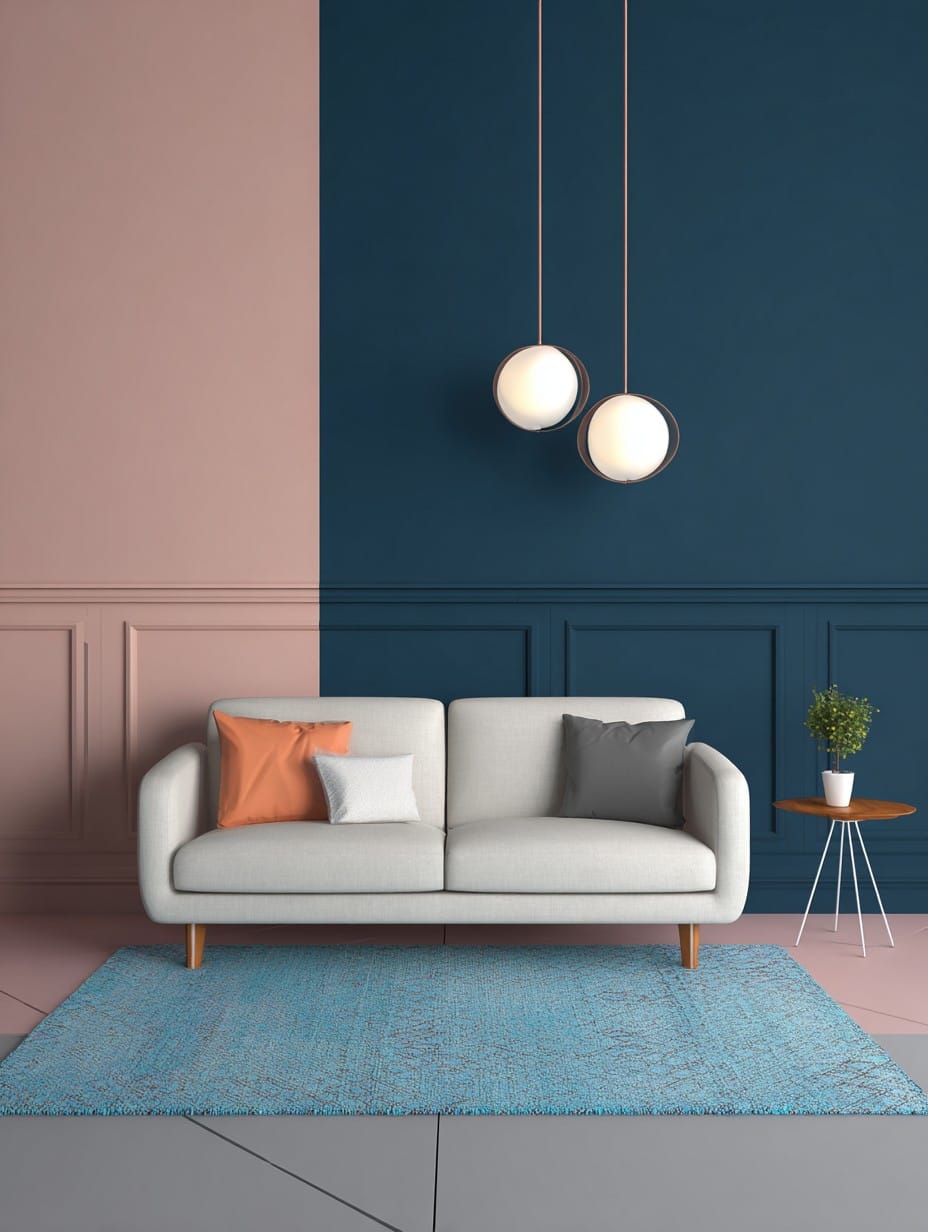
Wide-angle photography with balanced exposure showcases the precision of the paint application and the sophisticated color interaction. This treatment works particularly well in contemporary and modern spaces where bold design choices feel appropriate and expected. The technique offers drama and personality at a relatively low cost—quality paint and careful application can transform a room for hundreds rather than thousands of dollars.
- Use painter’s tape strategically: Invest in high-quality painter’s tape and burnish edges thoroughly for the cleanest possible line between colors.
- Paint the lighter color first: Apply the lighter shade across the entire wall, then tape and paint the darker color over it for the best coverage.
- Consider room proportions: Adapt the division ratio to your ceiling height—taller ceilings can handle more of the darker color below.
- Test colors together: Paint large samples of both colors on your wall and view them together for several days before committing to full application.
- Extend to trim thoughtfully: Decide whether to paint trim/molding in one of your colors or keep it neutral to frame the color-blocked wall.
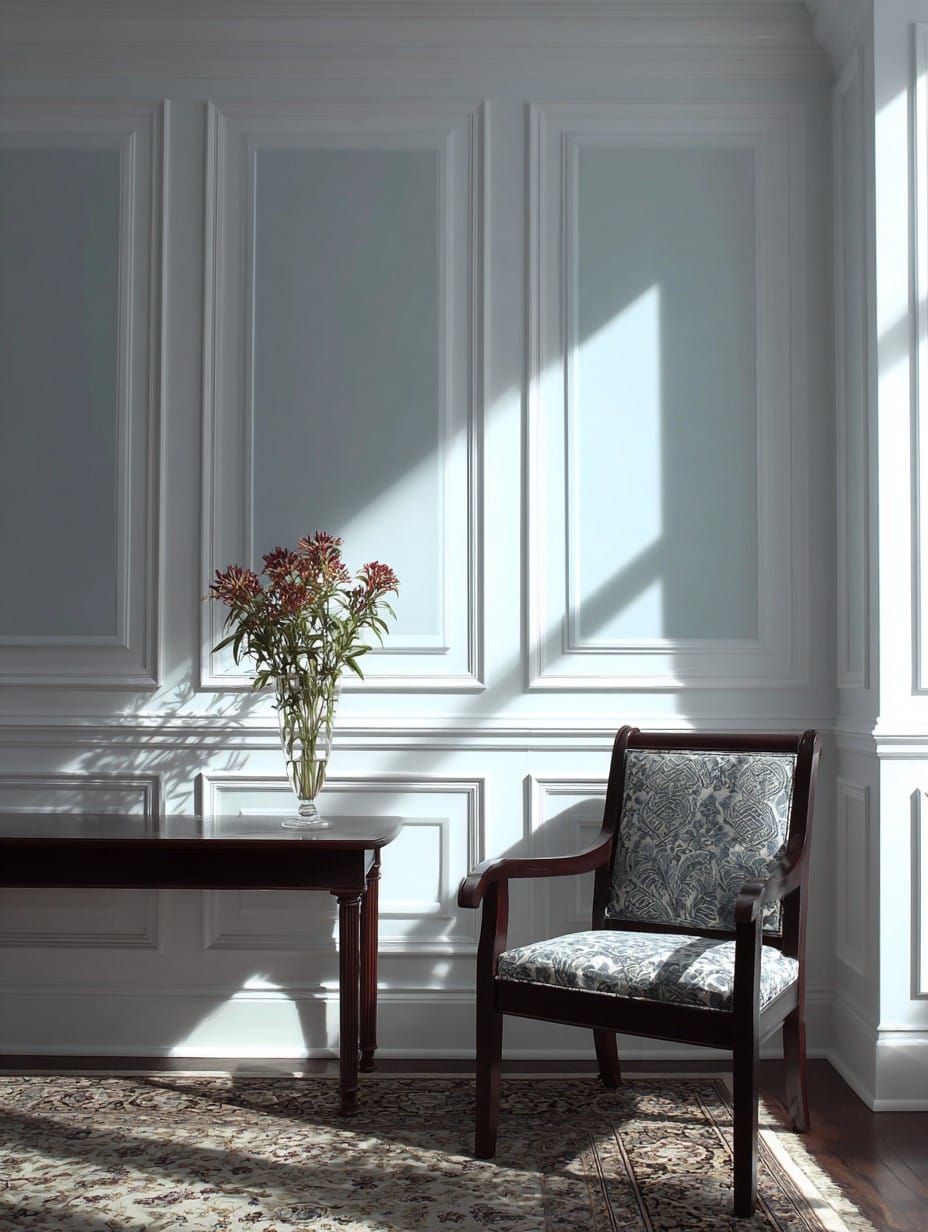
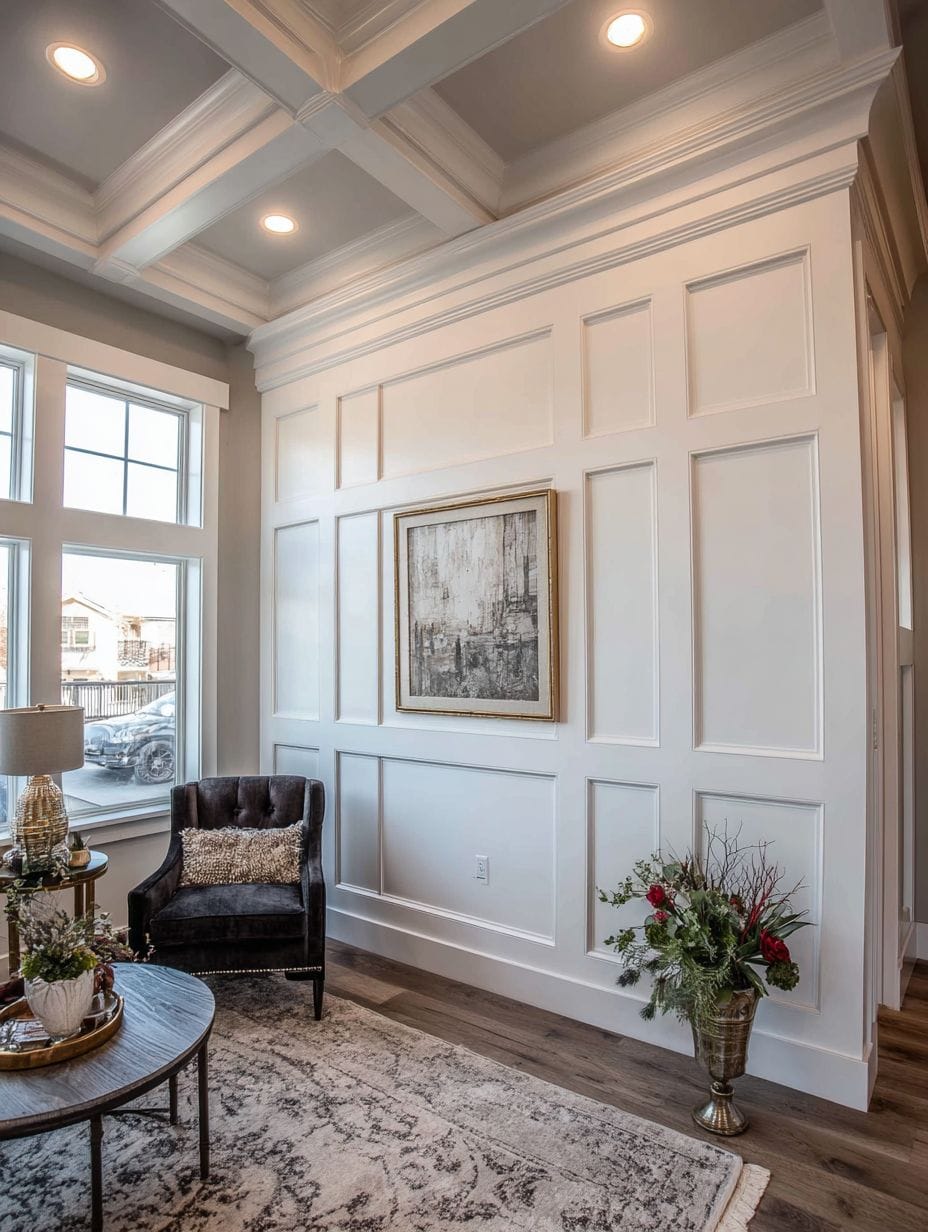
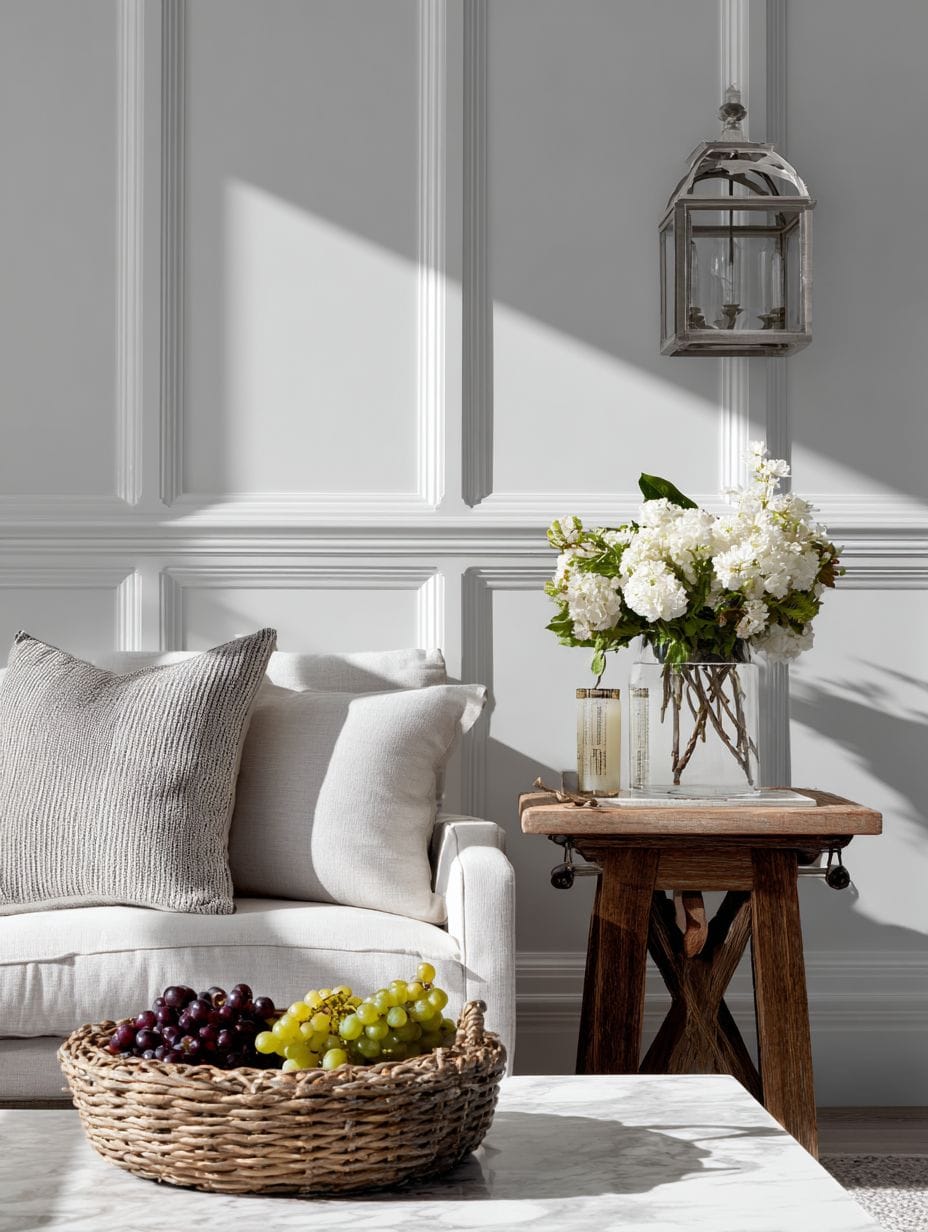
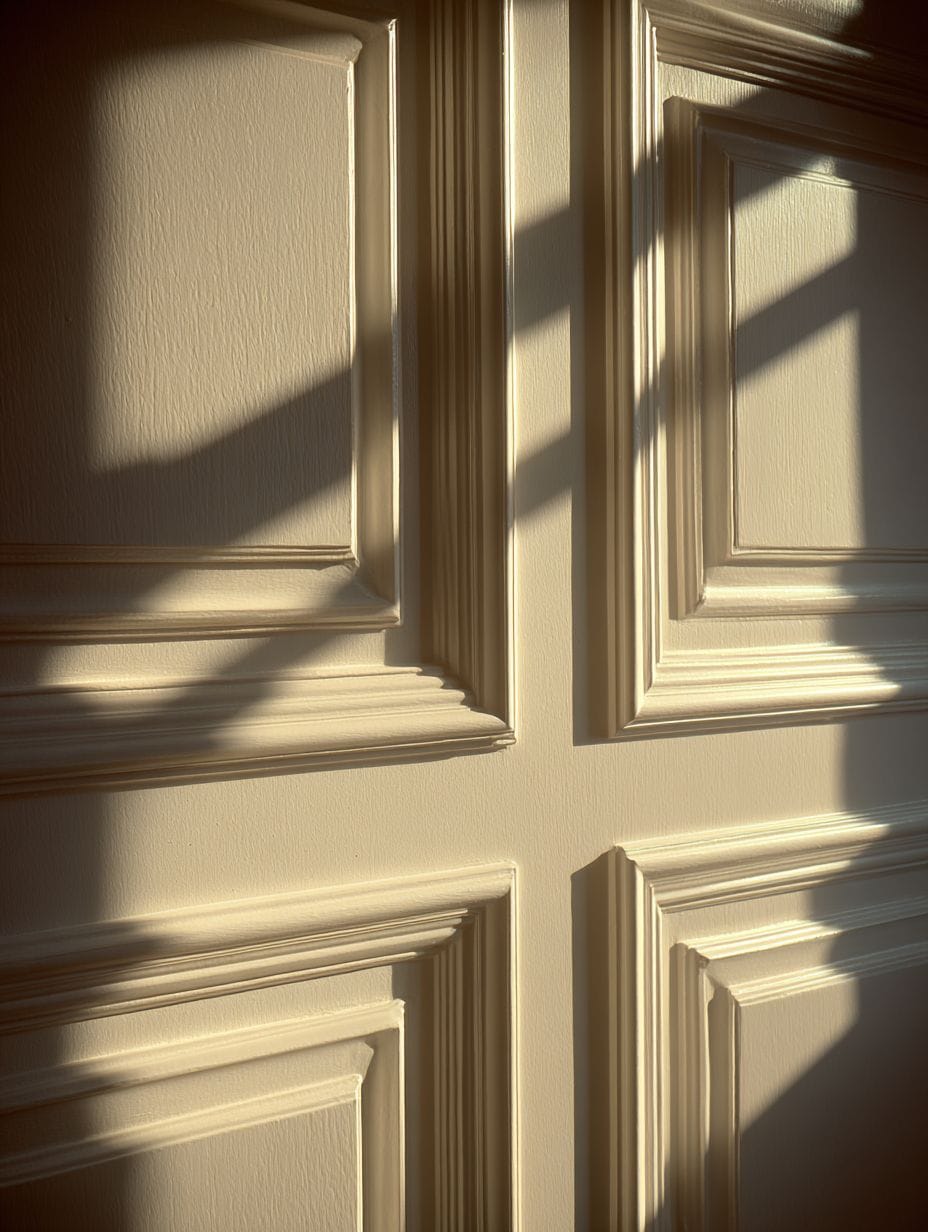
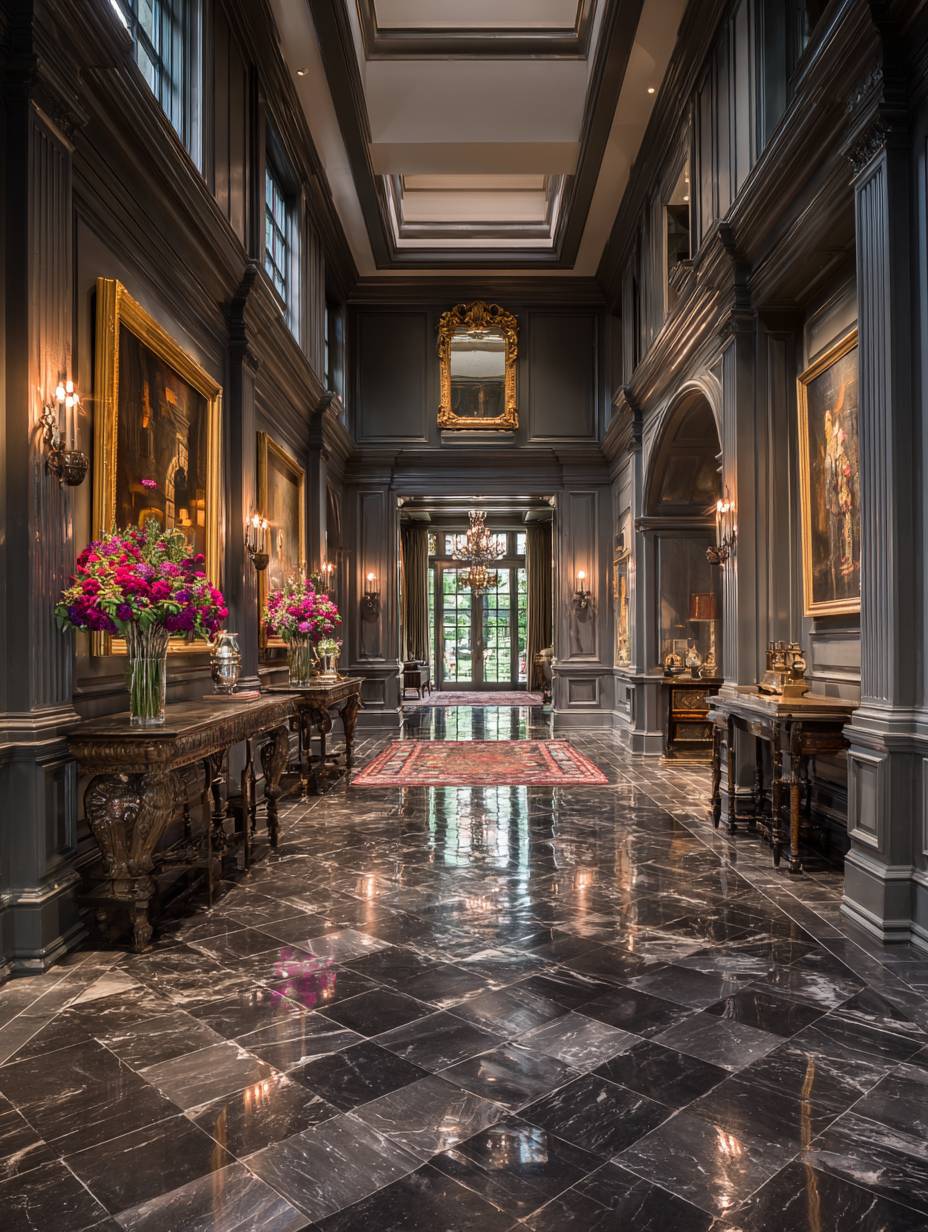
15. Classic Picture Frame Molding
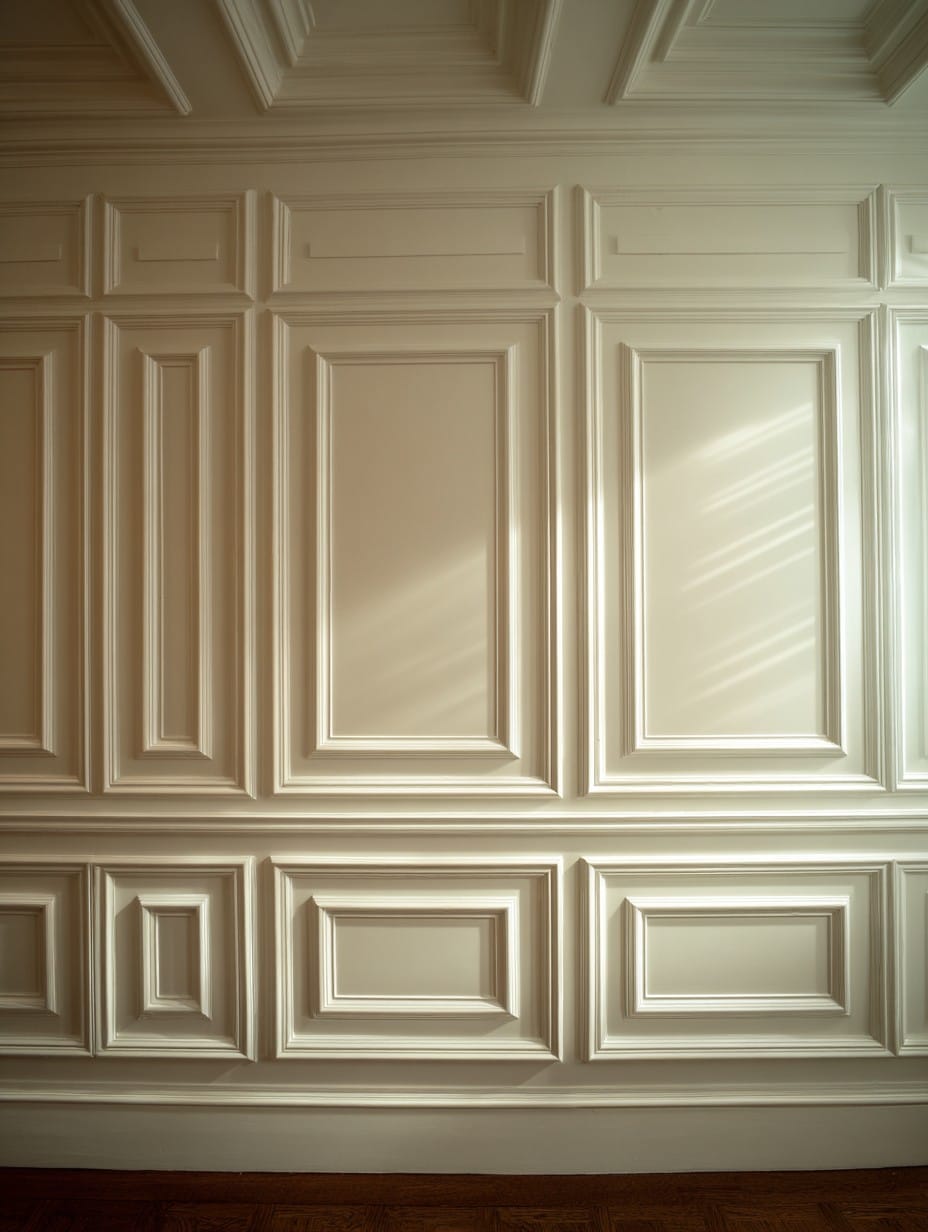
Picture frame molding creates elegant architectural detail that has graced fine homes for centuries, proving that some design techniques remain timelessly appealing. This sophisticated treatment uses decorative molding to create rectangular panels across the walls, each panel outlined with raised trim that catches light and creates subtle shadows. Painted entirely in traditional white, the molding creates dimensional interest without color contrast, allowing the architectural detail itself to provide all the visual interest needed. Crown molding at the ceiling and substantial baseboards at the floor complete the refined, polished look.
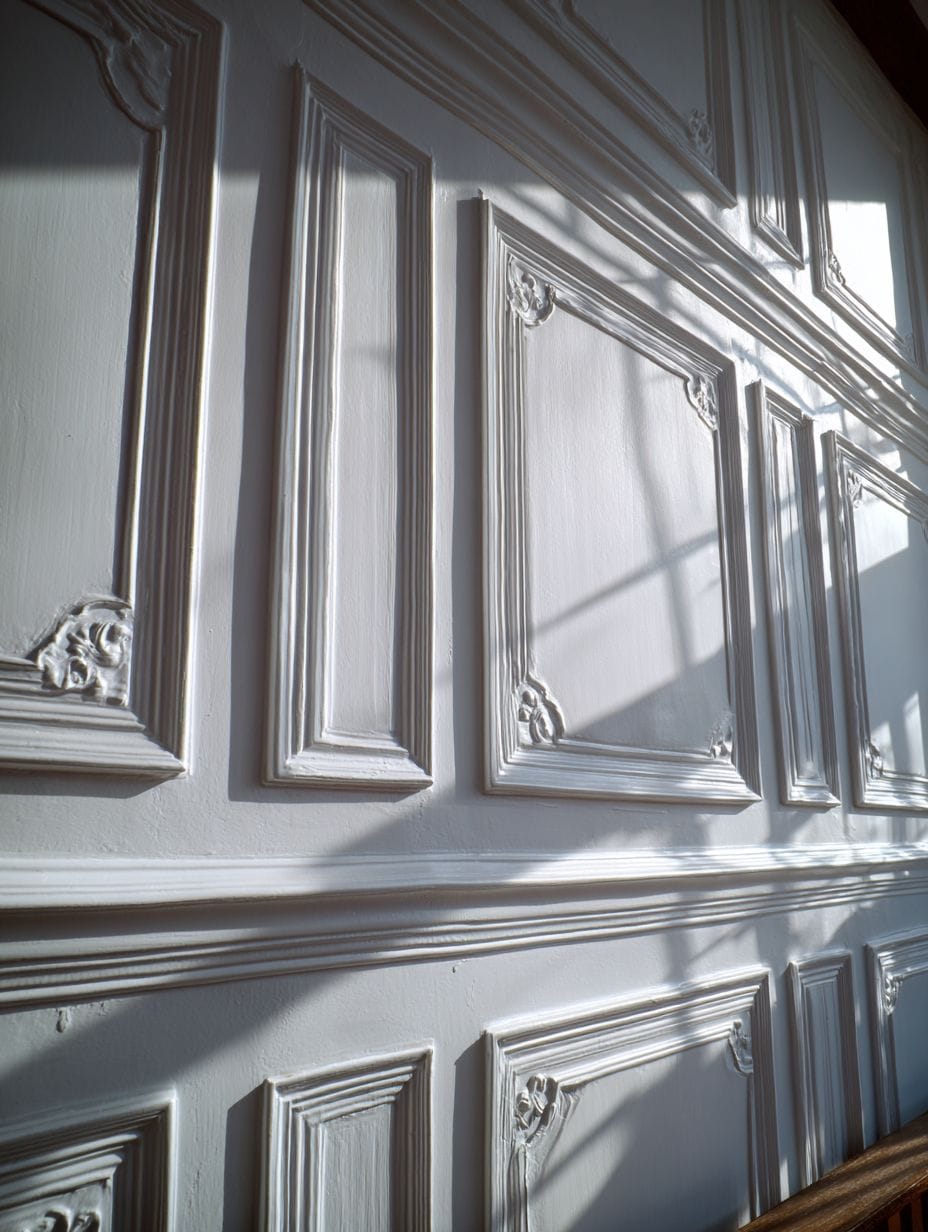
The rectangular panels create rhythm and structure on what would otherwise be blank walls, dividing large expanses into more manageable, human-scaled sections. The three-dimensional quality of the raised molding makes walls feel more substantial and architecturally significant, adding perceived value to the home. The crisp white finish maximizes light reflection, helping to brighten the room while the shadows created by the molding add subtle dimension that prevents the white-on-white treatment from appearing flat.
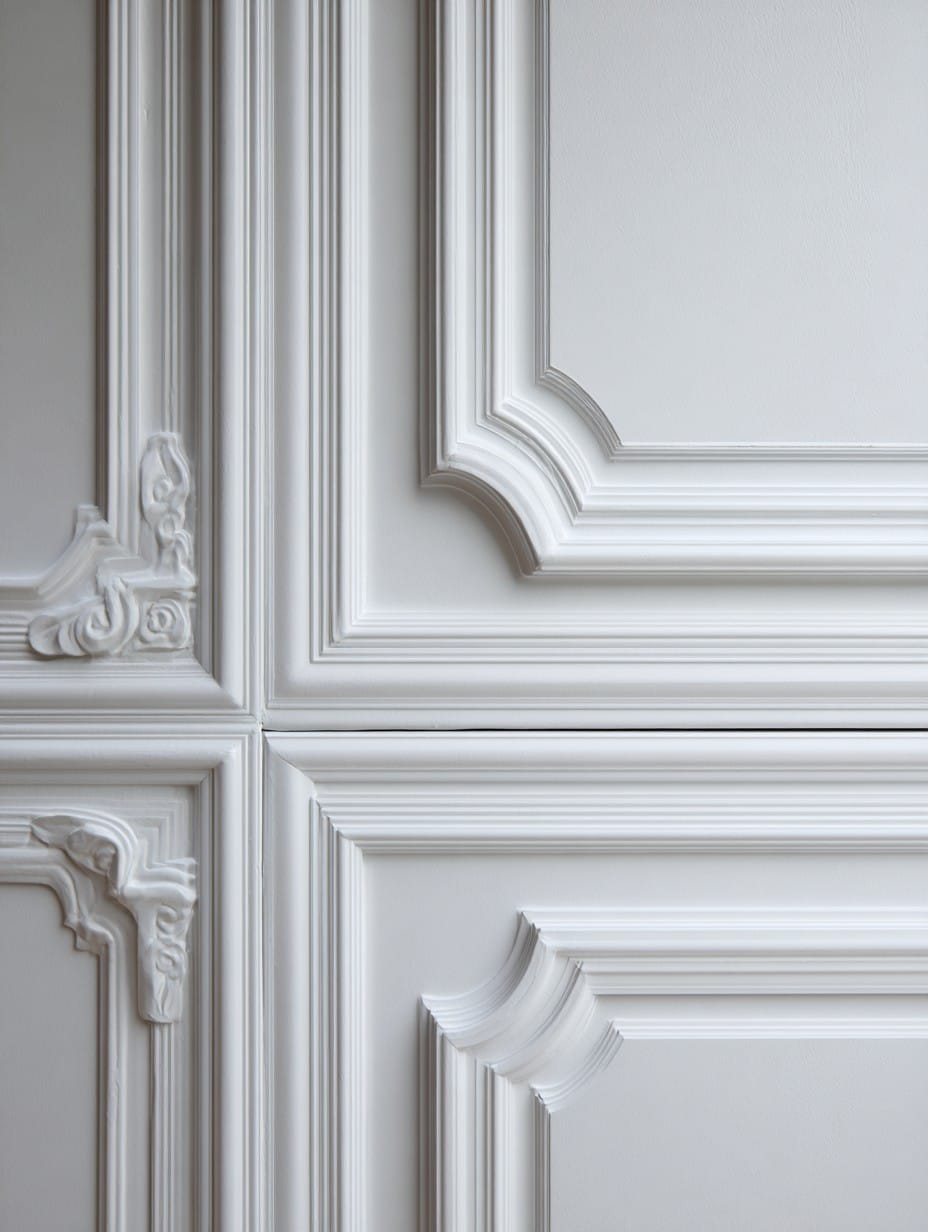
Professional interior photography with natural light emphasizes the dimensional shadows cast by the raised molding details, showcasing how simple architectural elements can create sophisticated visual interest. This treatment suits traditional, transitional, and even contemporary spaces when executed with clean, simple molding profiles. The technique works particularly well in formal living rooms, dining rooms, and entryways where architectural gravitas feels appropriate.
- Plan panel proportions: Traditional panels are typically 1.5 to 2 times taller than they are wide for pleasing proportions.
- Maintain consistent spacing: Keep equal spacing between panels and equal margins at ceilings, corners, and floors for professional symmetry.
- Choose appropriate molding: Select profiles substantial enough to create real shadows but not so ornate they overwhelm the space.
- Account for switches and outlets: Plan panel placement to avoid awkwardly bisecting electrical elements when possible.
- Miter corners precisely: Take time to cut perfect 45-degree miters for seamless corners that appear professionally crafted.
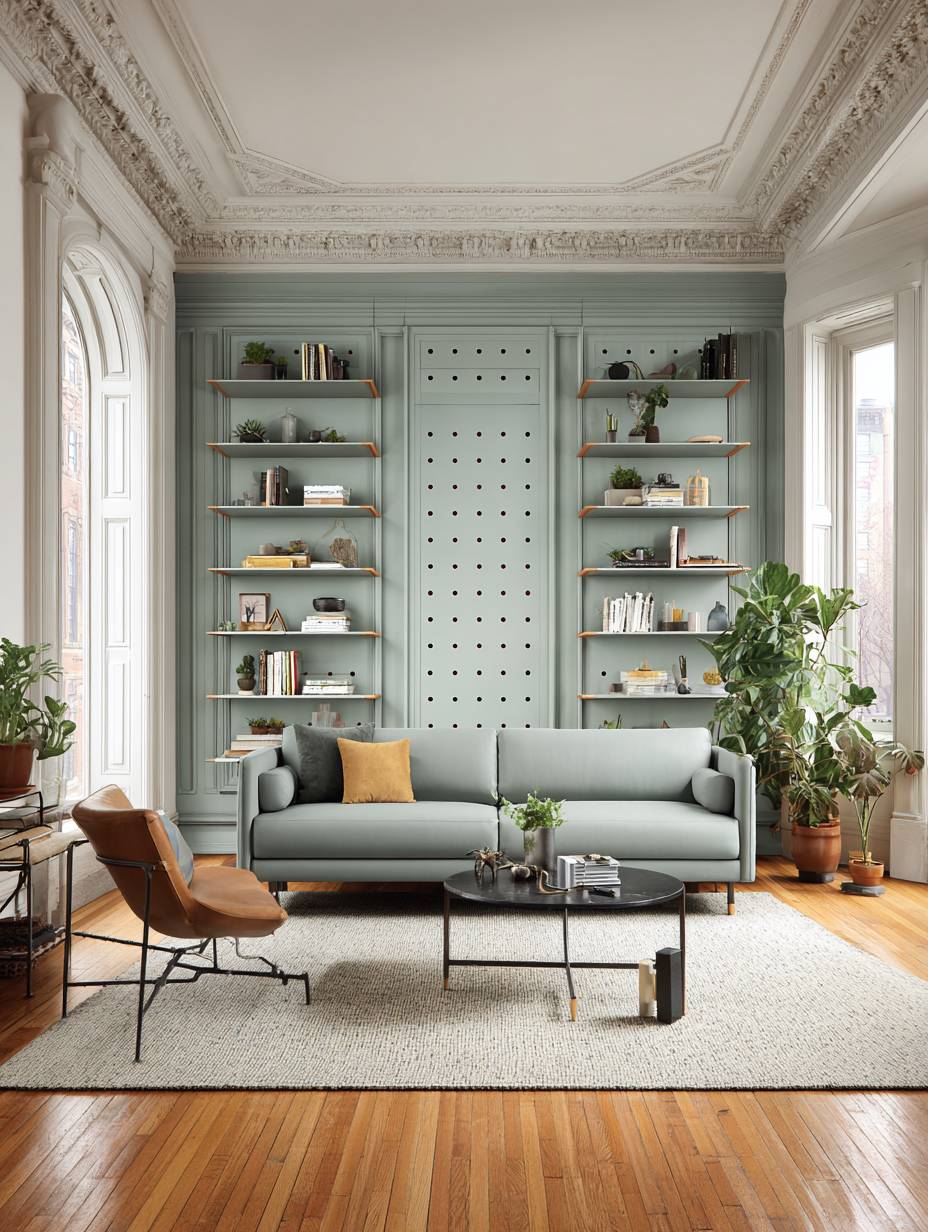
16. Contemporary Peg Wall System
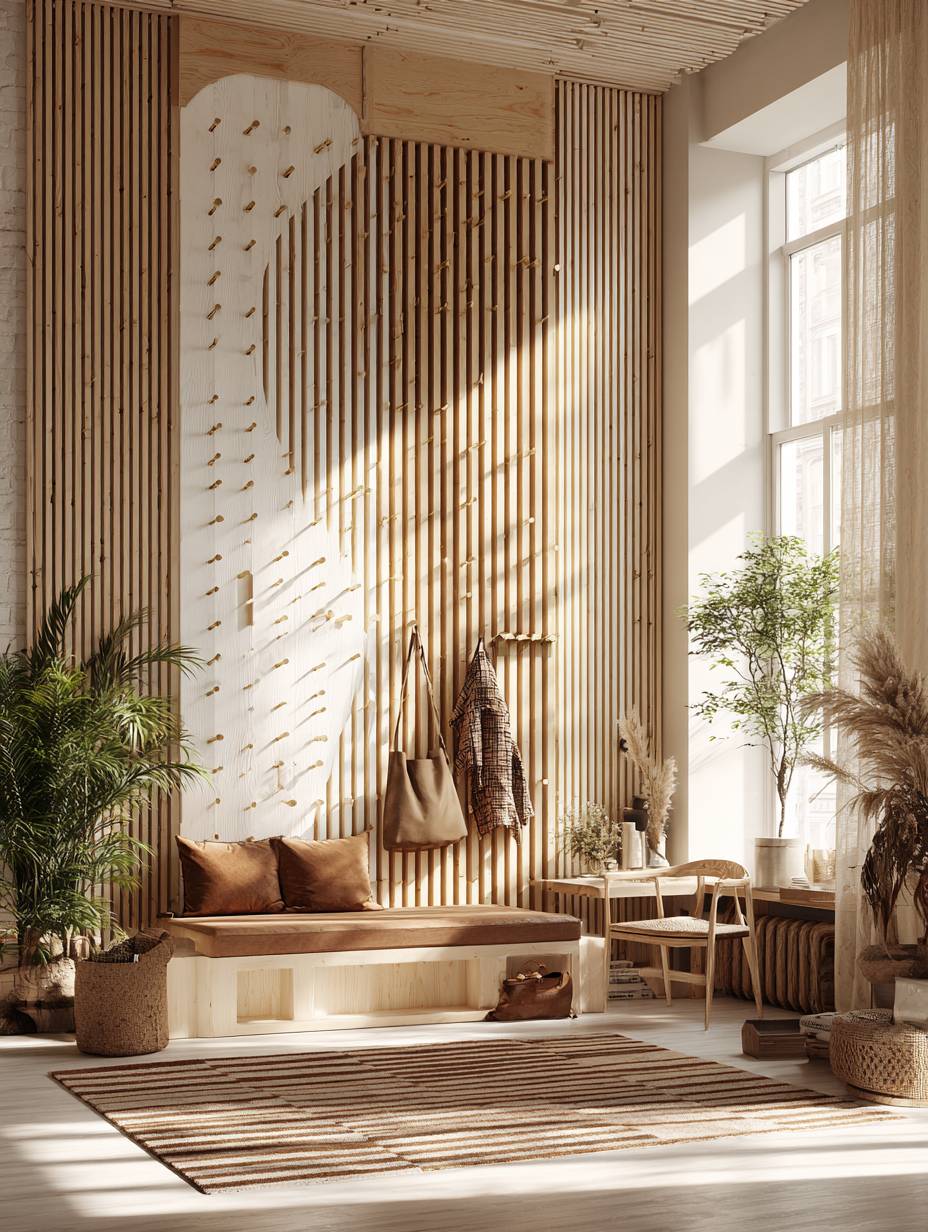
The modern peg wall reimagines traditional Shaker peg boards as contemporary design elements, combining function and aesthetics in an innovative wall treatment. This design features natural oak planks with brass pegs arranged in an organic, non-linear pattern that reads as both practical storage solution and modern art installation. The pegs display coats, bags, hats, and decorative items, transforming everyday objects into a dynamic, changeable display. The white wall background allows the natural oak wood grain to stand out while the brass pegs add warm metallic accents that catch light throughout the day.
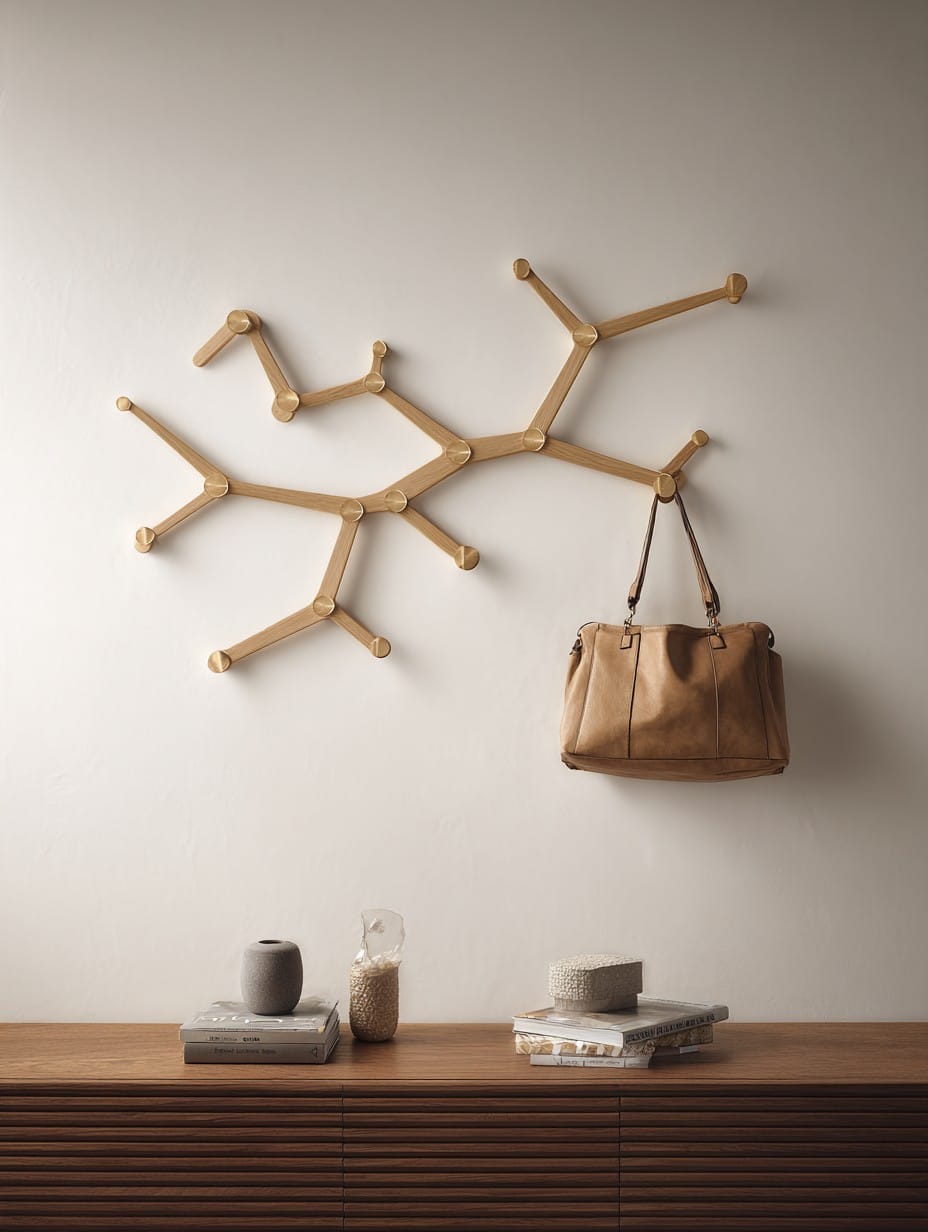
The beauty of this system lies in its flexibility—the arrangement can change daily based on needs and whims, making your wall a living, evolving design element rather than a static treatment. The non-linear peg arrangement prevents the utilitarian appearance of traditional mudroom hooks, instead creating an artistic composition that happens to serve a practical purpose. The visible grain in the natural oak adds organic warmth and texture, while the brass pegs provide jewel-like accents that elevate the simple concept into sophisticated design.
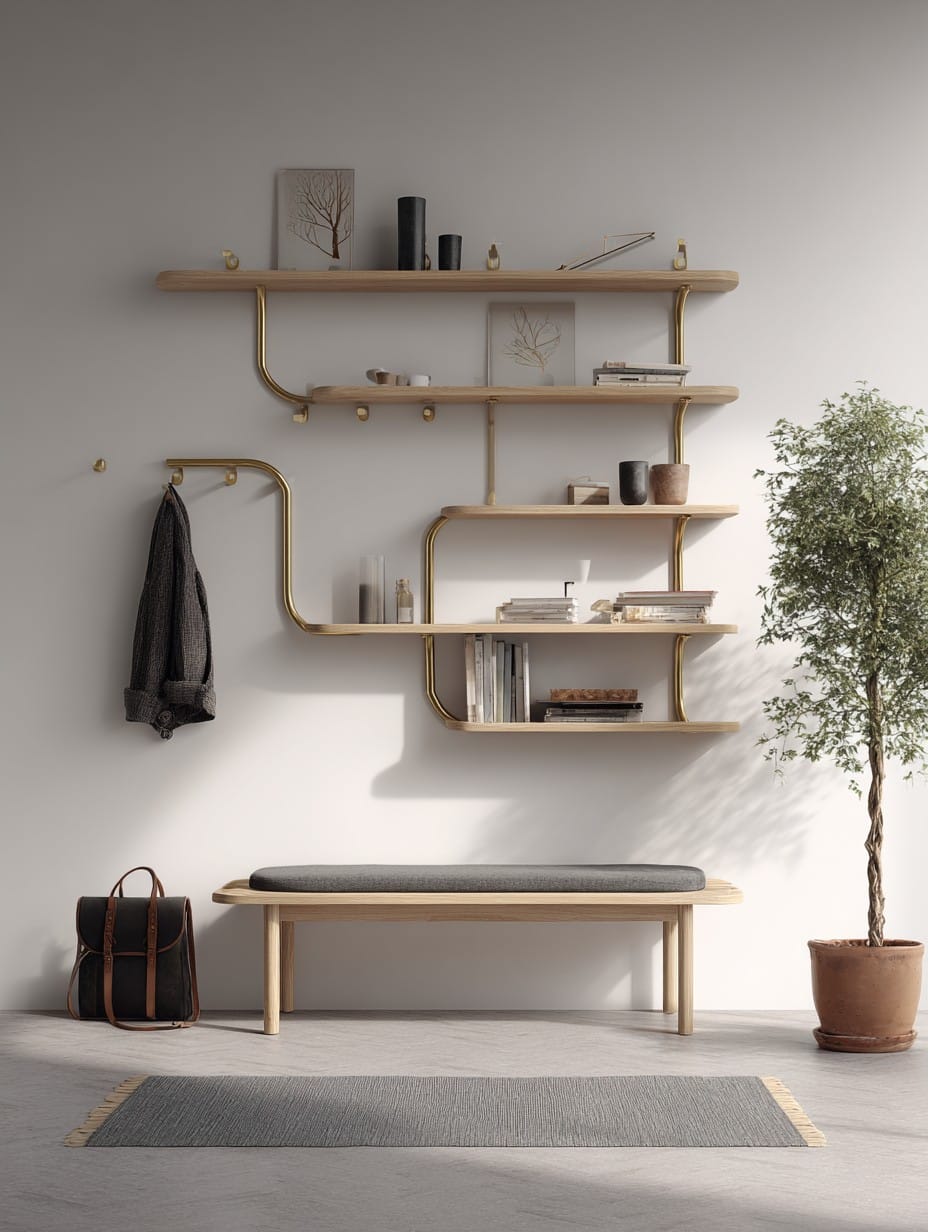
Interior design photography captures the practical beauty with natural lighting that highlights wood texture and brass details, showcasing how functional elements can serve aesthetic purposes when thoughtfully designed. This treatment works particularly well in entryways, casual living spaces, and anywhere you need accessible storage that doesn’t sacrifice style. The modular nature means you can expand the system over time or reconfigure it as needs change.
- Plan peg placement thoughtfully: Create visual rhythm through spacing while ensuring pegs are positioned where you’ll actually use them.
- Install into studs: Locate wall studs and install backing boards securely to support the weight of coats, bags, and other items.
- Choose appropriate peg length: Select pegs 3-4 inches long to accommodate thick coats and multiple items without things sliding off.
- Consider height variation: Install some pegs at different heights for visual interest and to accommodate items of varying sizes.
- Quality matters: Invest in solid wood and solid brass rather than veneers and plated finishes for durability and aging beauty.
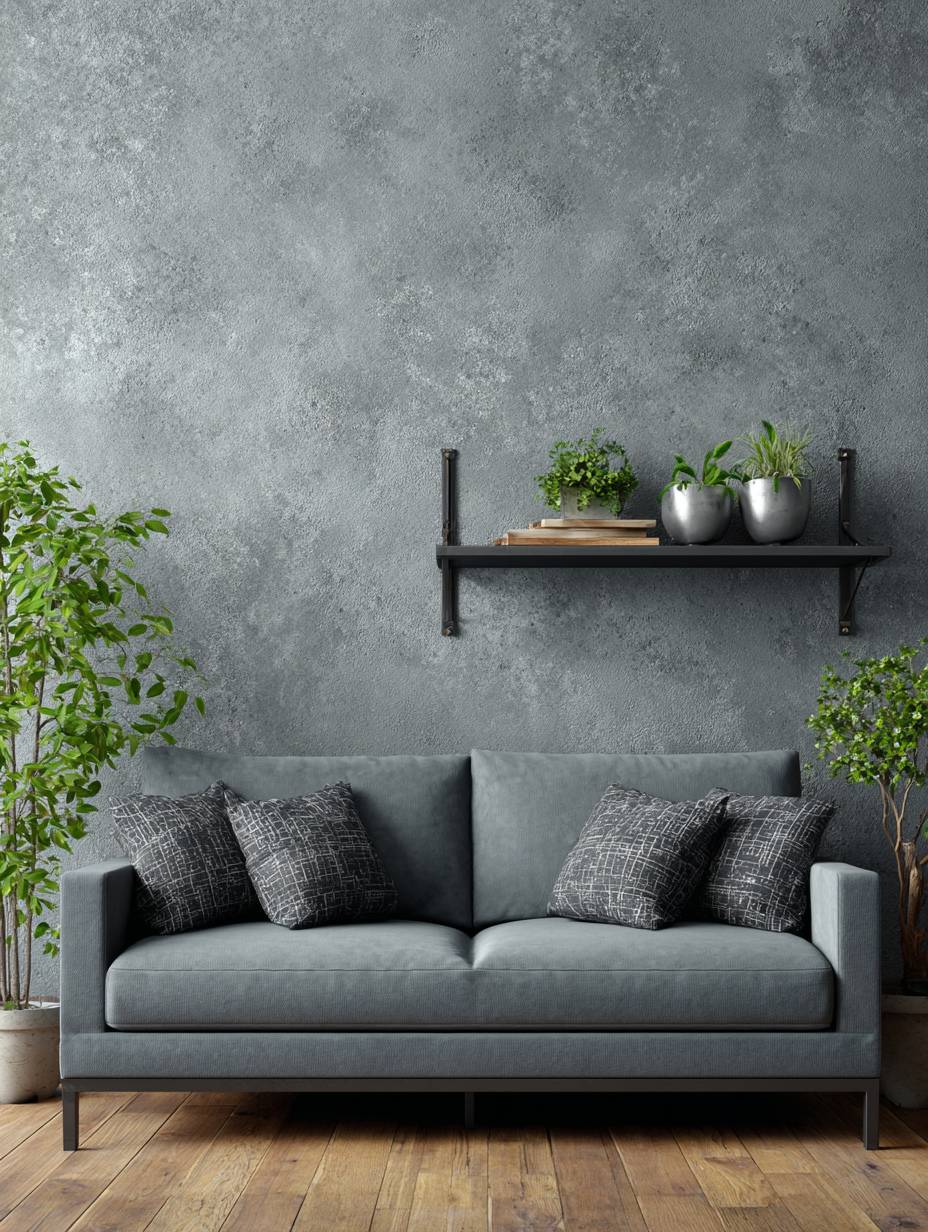
17. Dramatic Dark Charcoal Statement Wall
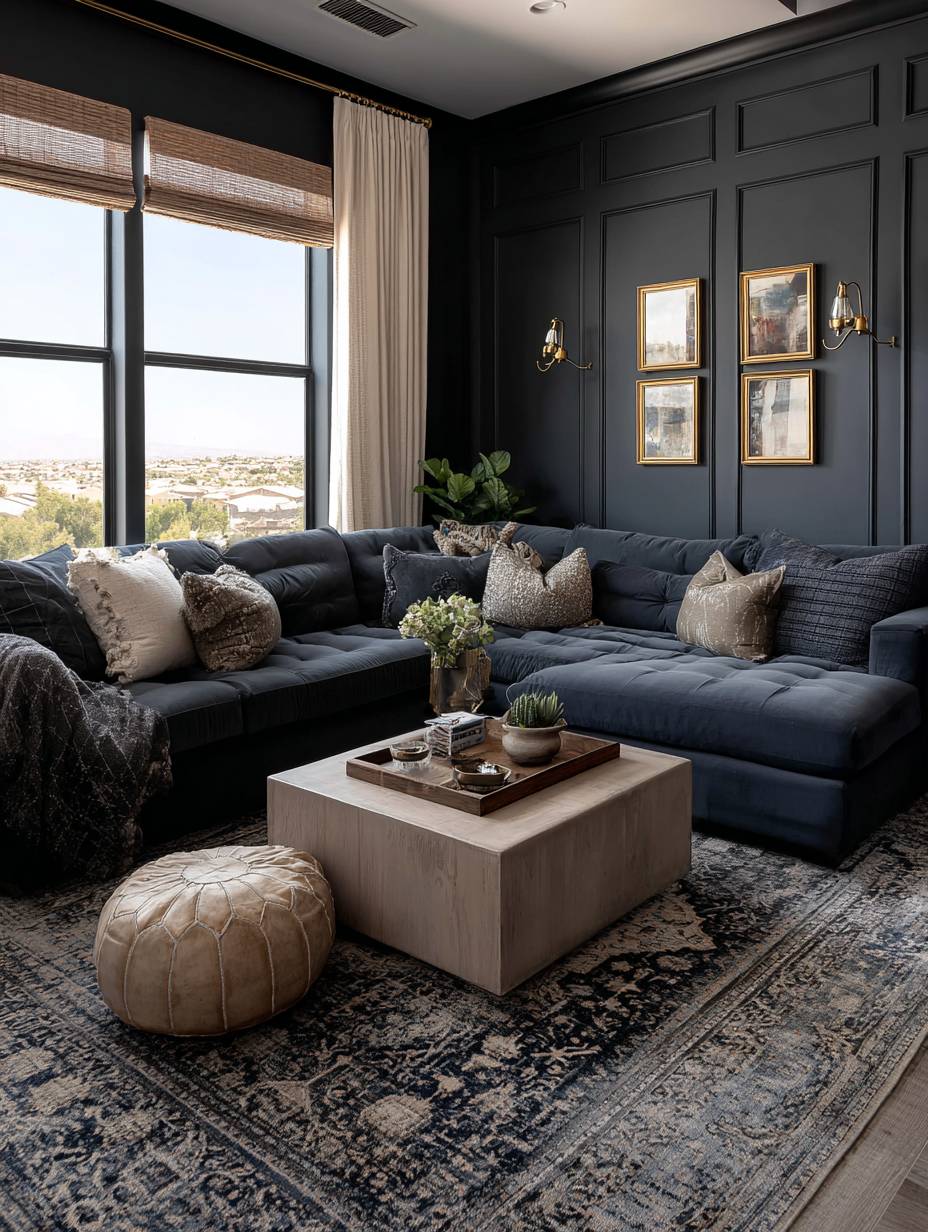
Dark walls require confidence, but when executed properly they create sophisticated, moody spaces with undeniable drama and presence. This bold design features a floor-to-ceiling dark charcoal grey accent wall that immediately commands attention and creates depth. The rich, dark color provides dramatic contrast in the room while serving as an elegant backdrop for metallic accents. A gold-framed mirror and coordinating wall sconces mounted against the charcoal wall create striking contrast, their warm metallic finishes glowing against the deep background. Surrounding walls in soft cream provide essential balance, preventing the dark accent wall from making the space feel closed-in or cave-like.
The key to successful dark wall application lies in proper lighting—the room must have adequate natural and artificial light to prevent the dark color from feeling oppressive. The charcoal shade chosen for this design includes subtle brown undertones that add warmth, preventing the cool grey from feeling cold or institutional. The dark wall actually makes the room feel more spacious by creating depth perception, pushing the wall visually backward rather than closing in the space as one might expect.
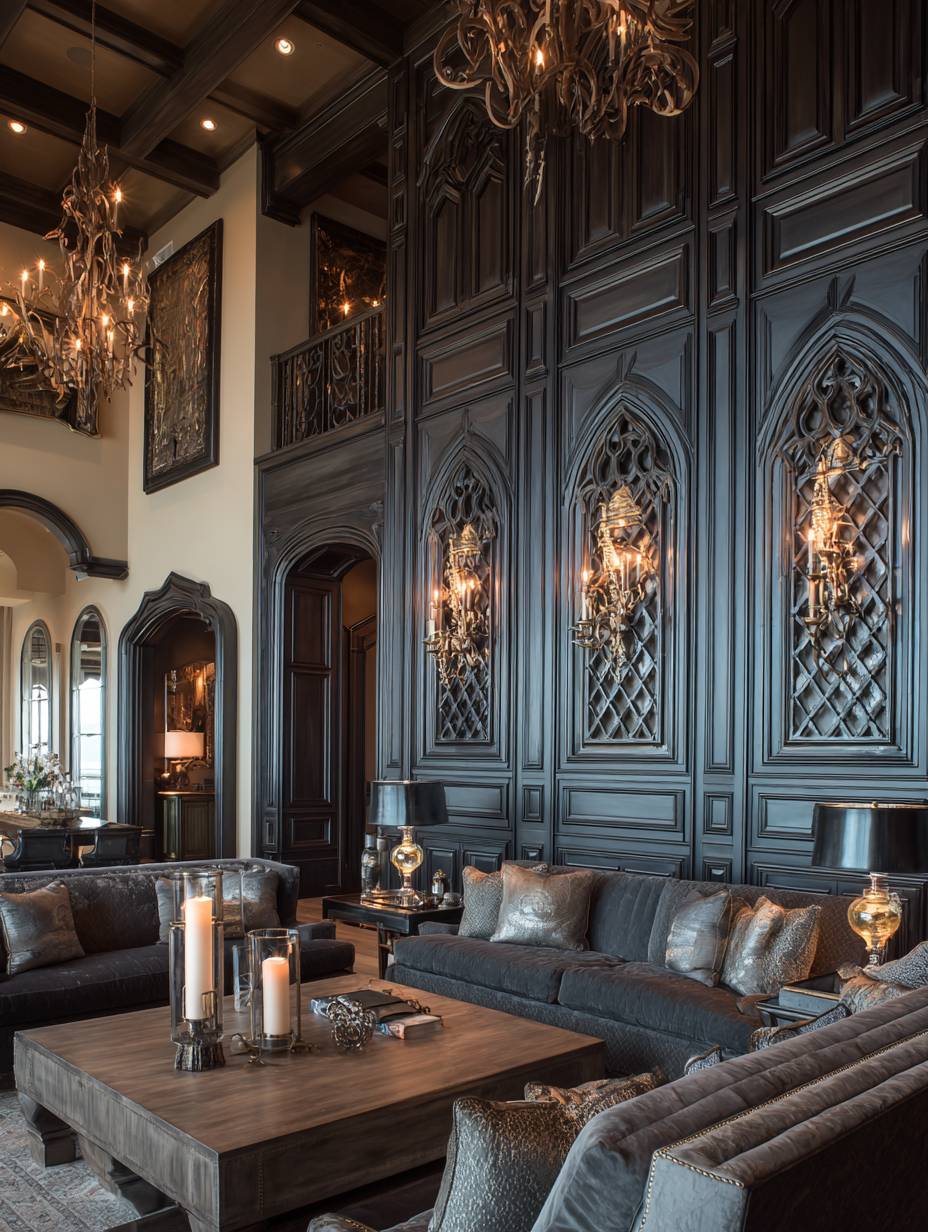
Architectural photography with carefully balanced lighting demonstrates the rich depth of the dark color while showing how the space maintains brightness and doesn’t feel gloomy despite the bold choice. The dark wall provides magnificent contrast for artwork, mirrors, and decorative objects, making them appear to pop from the wall with enhanced visibility. This treatment works particularly well in rooms with good natural light and high ceilings where the dramatic choice won’t overwhelm.
- Test extensively: Paint large samples and observe them at different times of day—dark colors look dramatically different in varying light conditions.
- Use quality paint: Invest in premium paint with excellent coverage and depth for the richest possible color without streaking.
- Layer your lighting: Combine natural light with multiple artificial sources (ceiling, walls, lamps) to prevent dark walls from creating gloomy spaces.
- Balance with light elements: Use light-colored furniture, rugs, and accessories to create contrast and visual breathing room.
- Consider the ceiling color: White or light ceilings help reflect light downward, essential when working with dark walls.
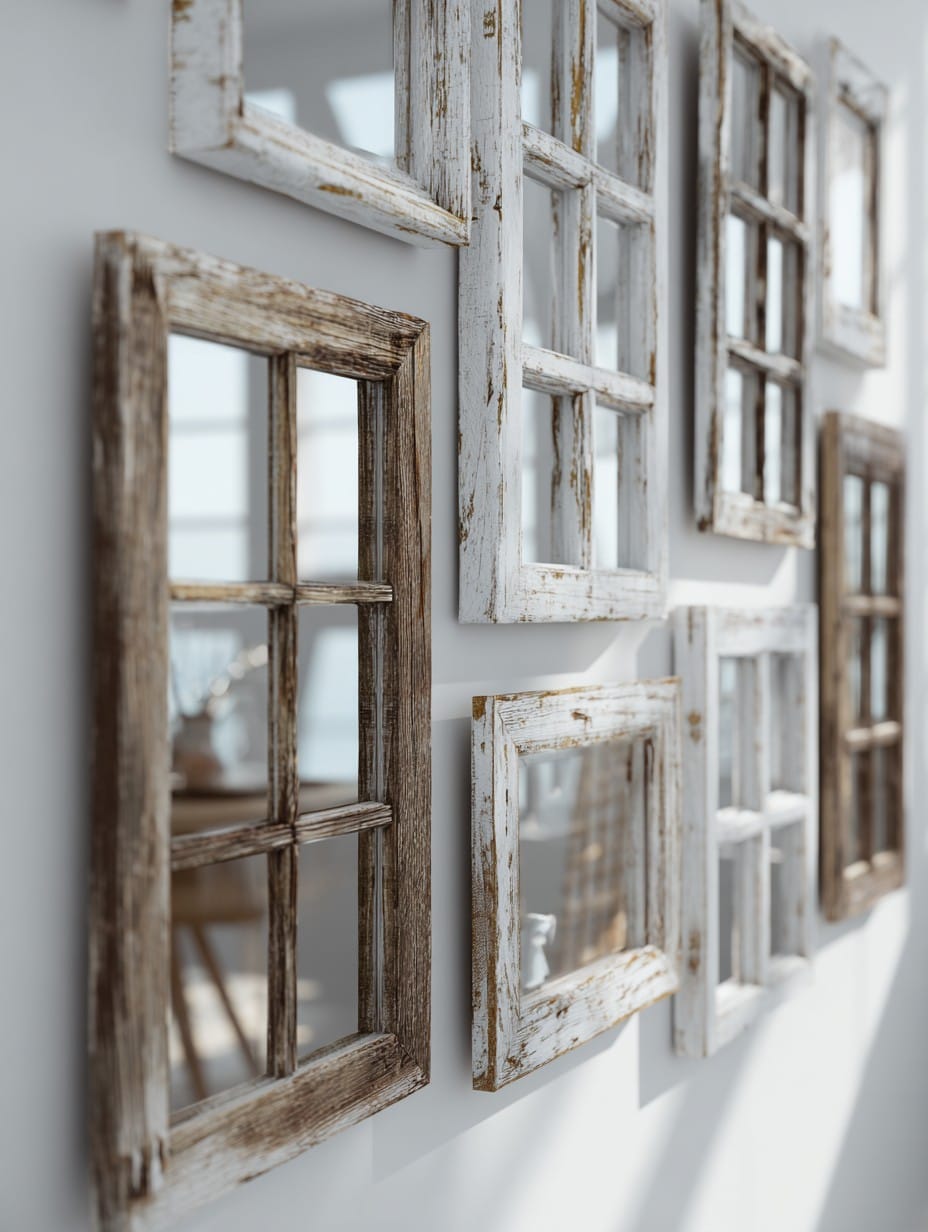
18. Eclectic Vintage Window Frame Collection
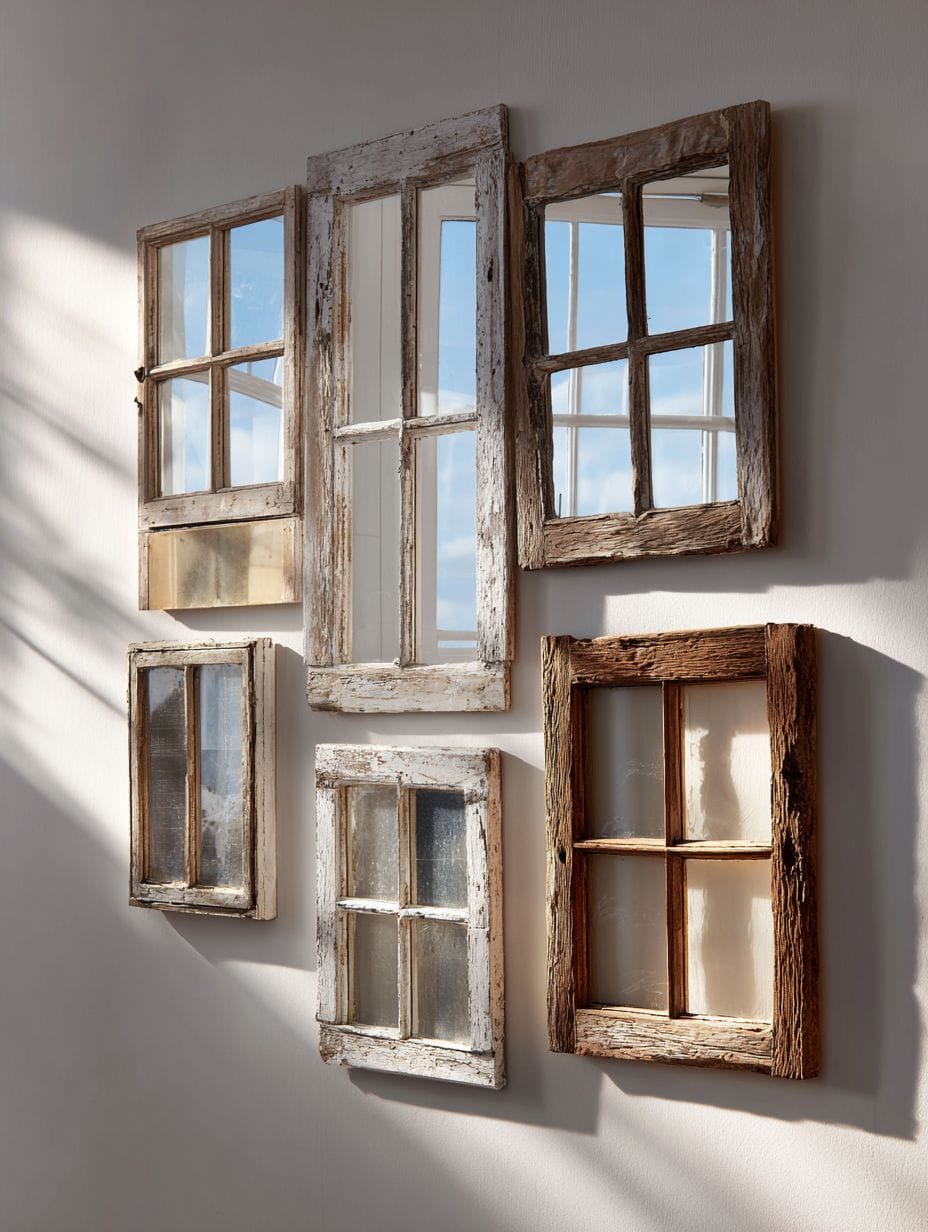
Repurposed architectural elements bring history, character, and three-dimensional interest to walls in ways that flat artwork cannot achieve. This creative design features six weathered vintage window frames in various sizes and finishes collected over time, mounted as an architectural installation on a soft white background. The frames exhibit authentic age patina—peeling paint, worn wood, original hardware—that speaks to their previous lives in actual buildings. Some frames hold vintage glass that creates reflective surfaces and catches light, others contain mirrors that add functional benefit to the decorative display, and still others remain empty, emphasizing their architectural forms.
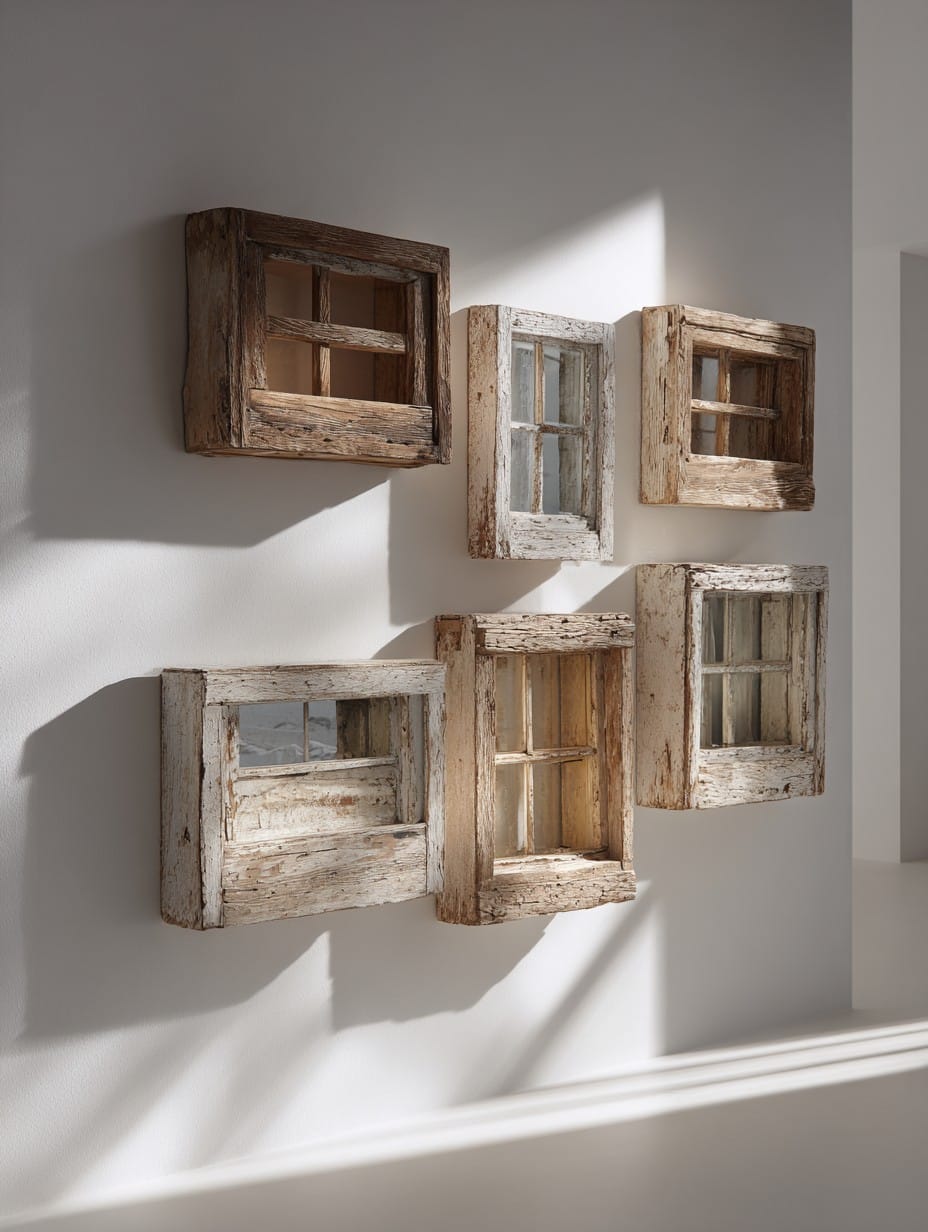
The varying sizes and configurations of the windows create visual interest through diversity while the shared architectural purpose creates thematic unity. The arrangement balances the frames’ weights and visual impacts, creating an overall composition that feels intentional despite the found-object nature of the materials. The white wall background allows the weathered finishes and architectural details of the frames to stand as the focal points without visual competition.
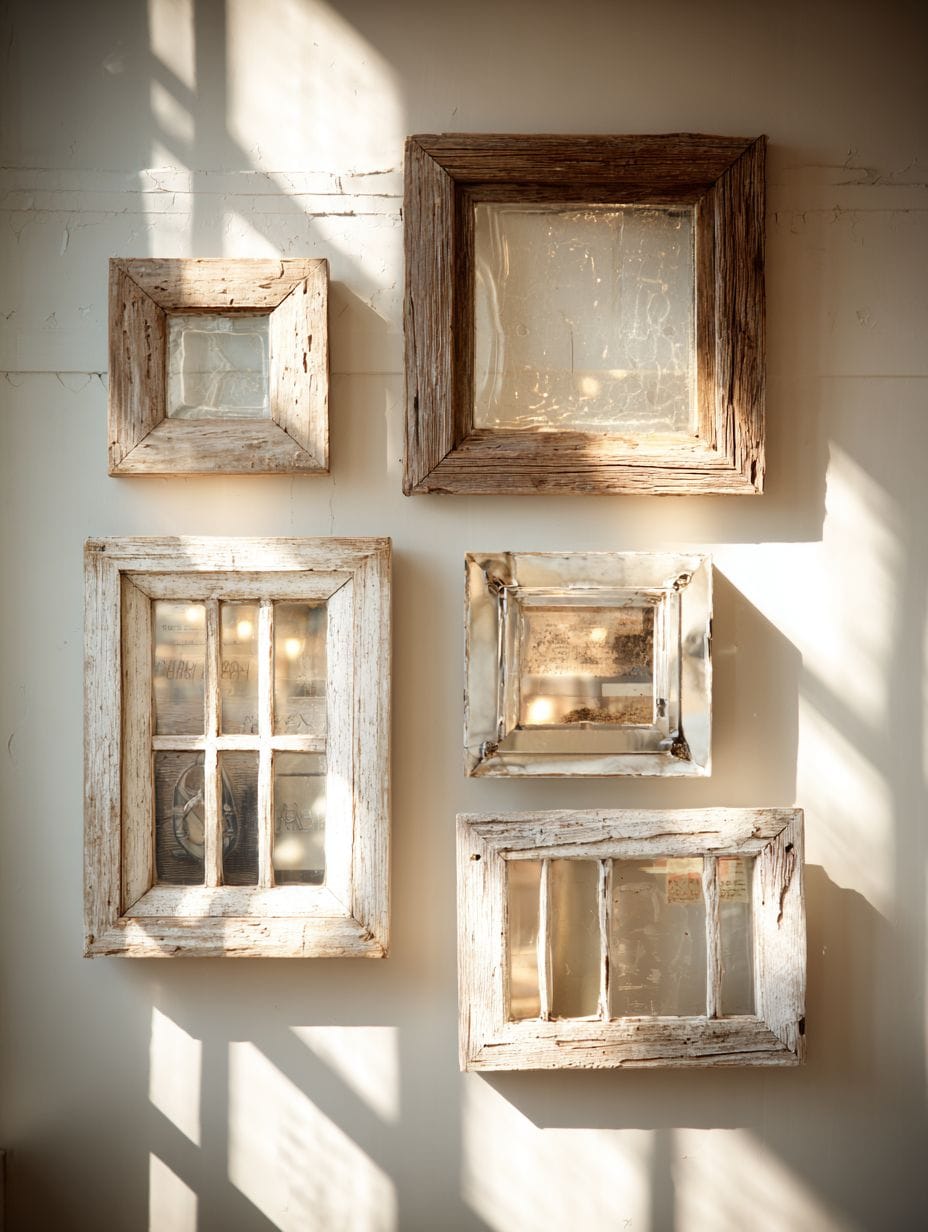
Interior photography showcases the creative repurposing with natural light playing through the glass elements and highlighting aged wood patina, demonstrating how authentic vintage materials add character impossible to replicate with new items. This approach works particularly well in spaces with farmhouse, cottage, or eclectic style where mixing old and new feels appropriate and celebrated. The three-dimensional nature of actual window frames adds genuine architectural depth to the wall.
- Source authentically: Shop architectural salvage yards, estate sales, and antique stores for genuine vintage windows with real character.
- Clean and stabilize: Gently clean windows and stabilize loose elements, but preserve patina rather than over-restoring them.
- Plan the arrangement: Lay frames on the floor and experiment with arrangements before committing to wall placement.
- Secure properly: Use appropriate anchors and hanging methods for the weight of actual window frames with glass.
- Consider safety: Ensure glass is stable and secure, especially in homes with children or high-traffic areas.
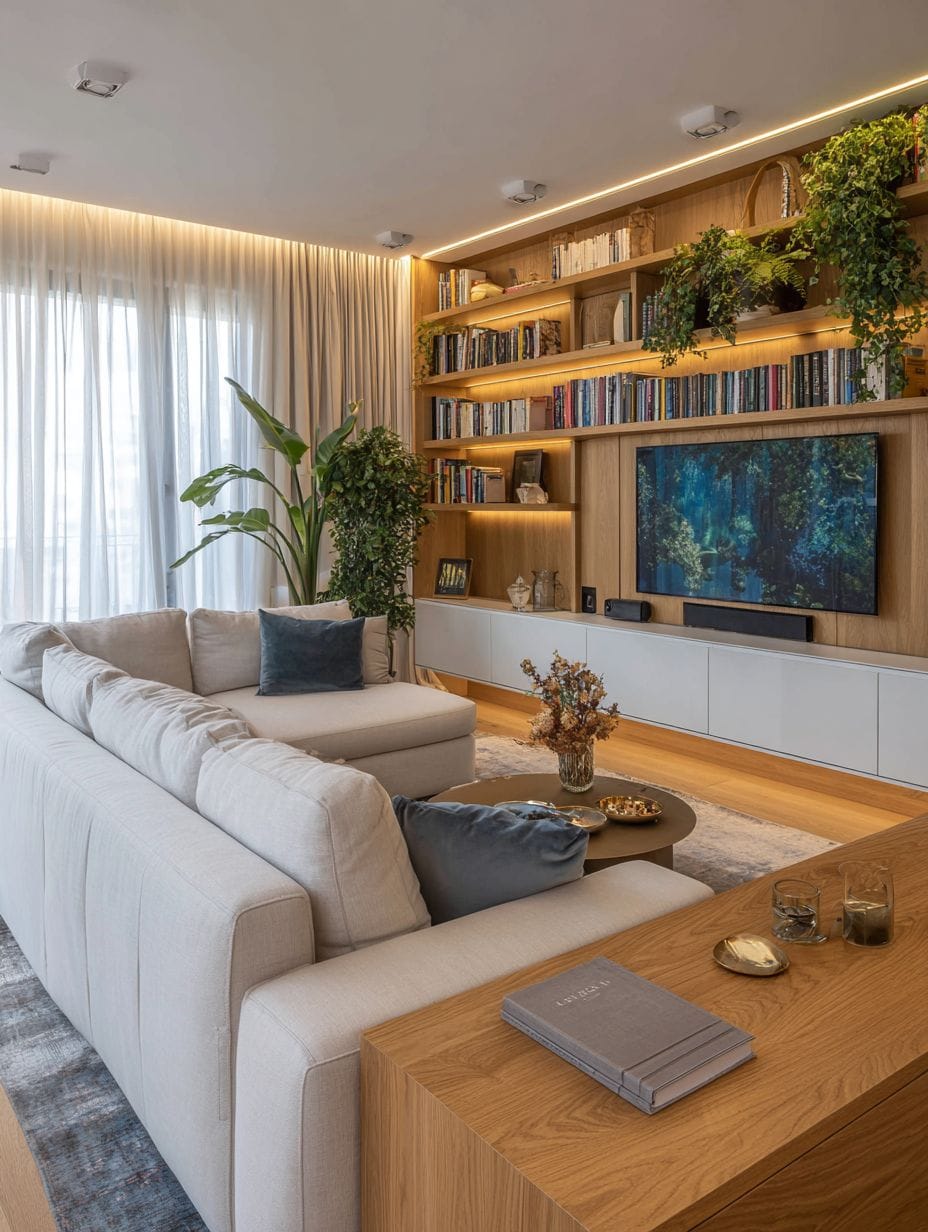
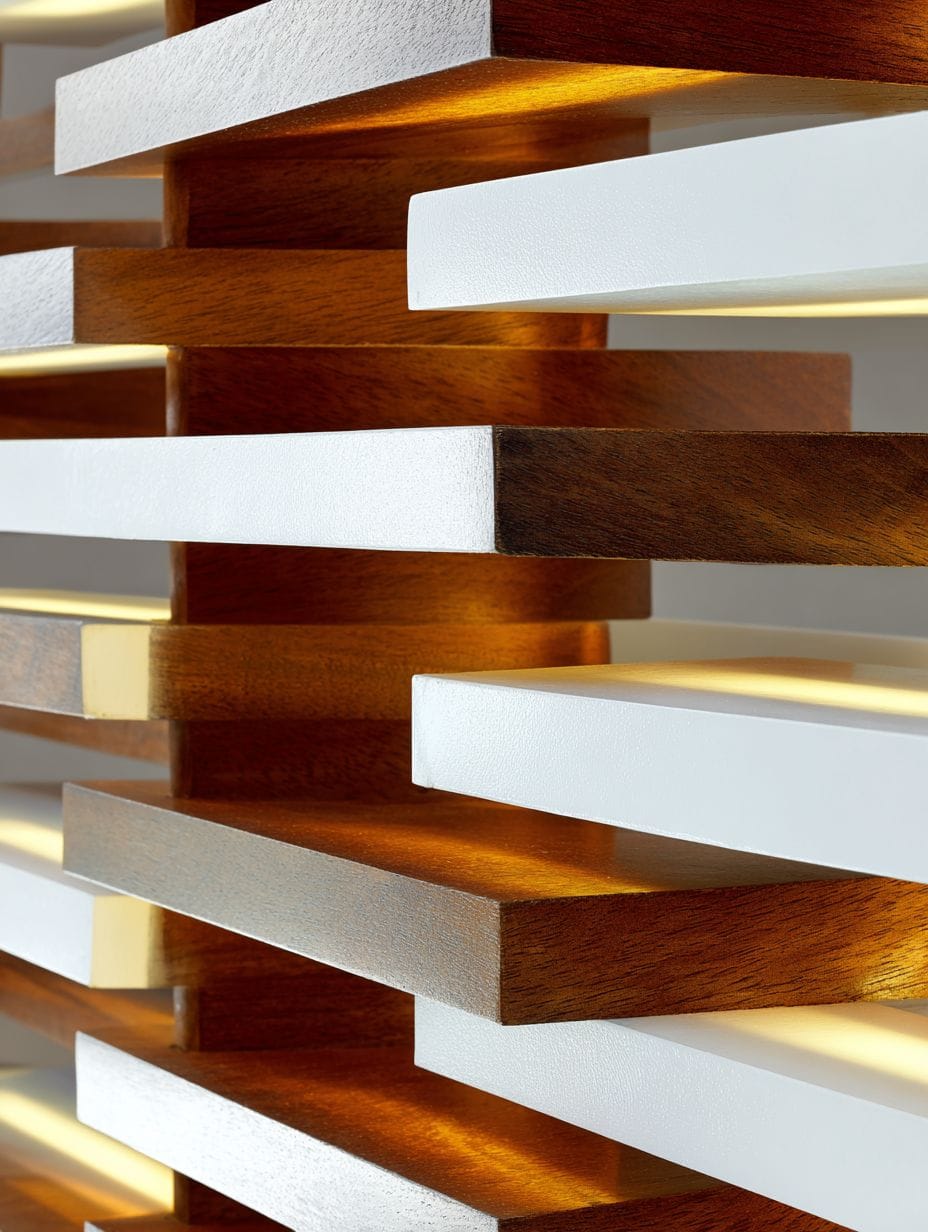
19. Modern Horizontal Wood Slat Wall

Horizontal wood slat walls bring organic warmth and linear rhythm to contemporary spaces, creating visual interest through repetition and shadow play. This refined design features evenly-spaced walnut slats mounted over a white background, the dark wood creating strong horizontal lines that guide the eye across the wall. The rhythmic pattern of wood alternating with white creates a barcode-like graphic quality that feels both natural and architectural. Integrated LED lighting tucked between select slats adds ambient illumination that highlights the wood grain while creating a subtle glow that enhances evening atmosphere.
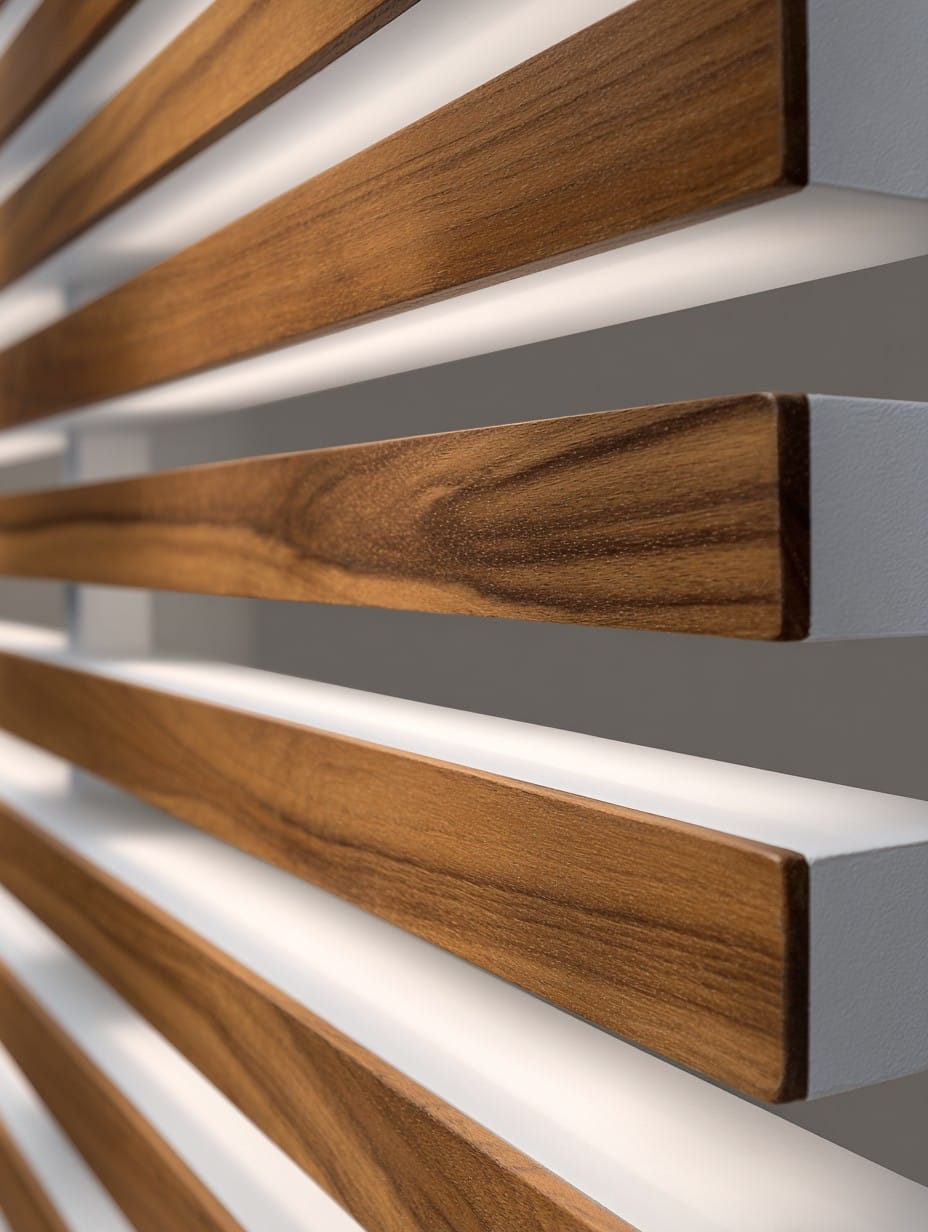
The precision of installation matters significantly with this treatment—consistent spacing between slats creates professional polish and visual rhythm. The walnut wood offers rich, warm brown tones with distinctive grain patterns that add organic texture to the geometric precision of the installation. The white backing ensures the room maintains brightness while the wood adds dimension and warmth. The horizontal orientation creates a visual expansion effect, making the room feel wider and more spacious.

Professional interior photography emphasizes the installation precision and natural wood grain with balanced exposure that captures both the warm wood tones and bright white background. The integrated lighting becomes particularly beautiful in evening hours, transforming the wall from a daytime texture element into a nighttime focal point with warm backlighting. This treatment works well in contemporary and modern spaces where clean lines and natural materials create sophisticated contrast.
- Create a detailed plan: Measure carefully and plan exact slat placement before beginning installation for consistent spacing.
- Use quality lumber: Select straight, kiln-dried hardwood slats that won’t warp or twist after installation.
- Route for LED strips: If including integrated lighting, route channels for LED strips before mounting slats to conceal wiring.
- Seal the wood: Apply protective finish to wood slats before installation to prevent staining and simplify future maintenance.
- Consider acoustic benefits: Slats with slight spacing provide modest sound absorption, beneficial in rooms with hard surfaces.
20. Nature-Inspired Preserved Moss Wall Art
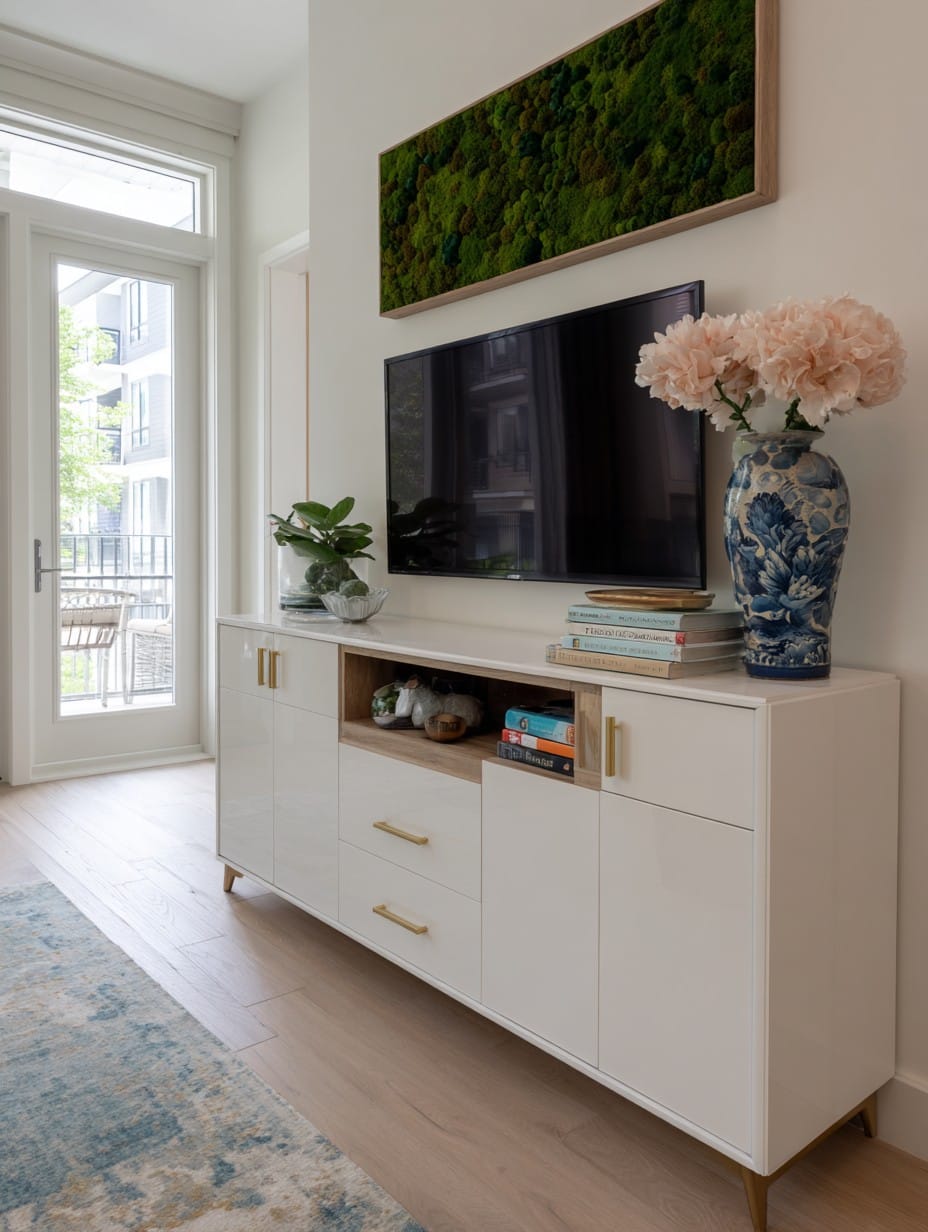
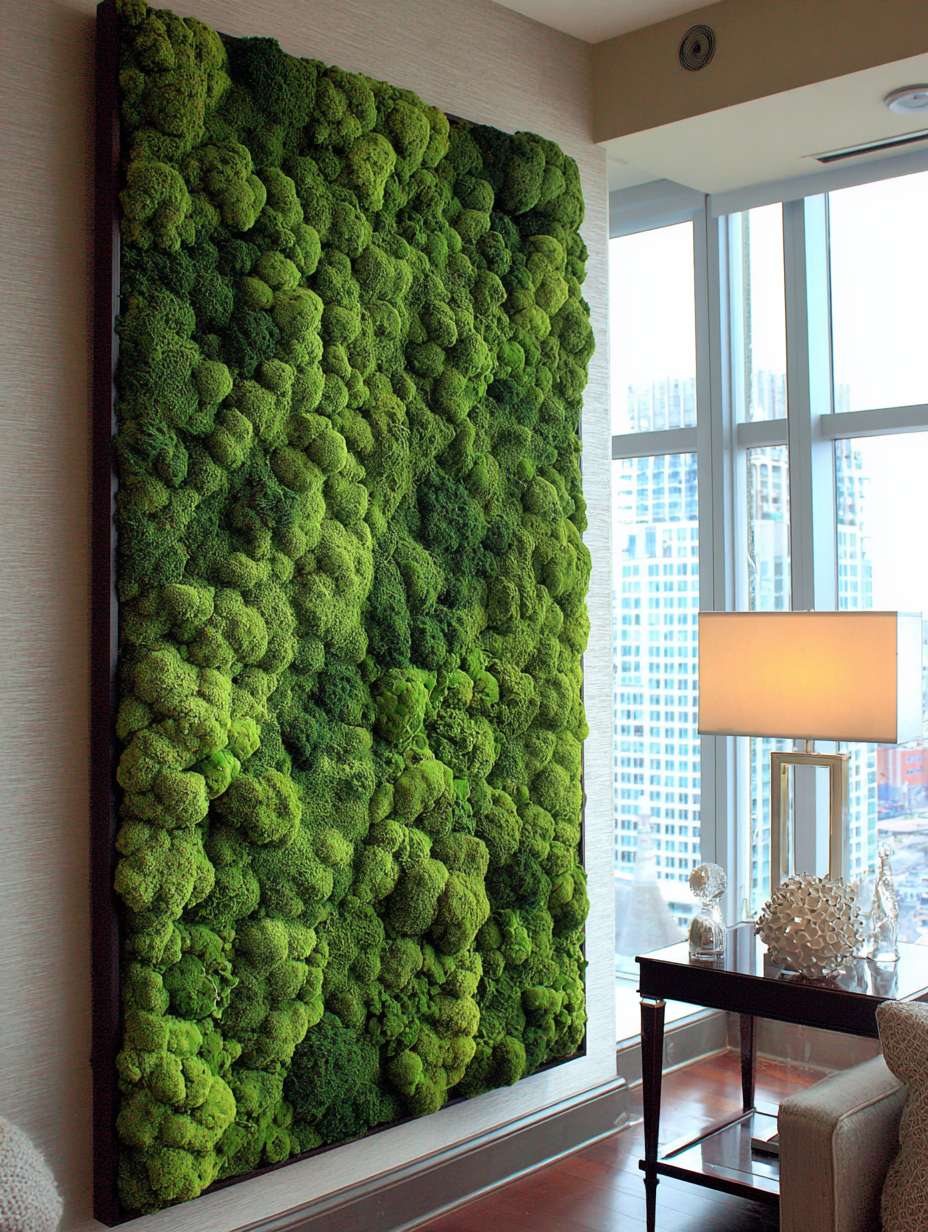
Biophilic design—connecting interior spaces to nature—has gained significant traction, and preserved moss installations represent one of the most striking ways to bring living texture indoors. This design features a large rectangular panel of preserved moss in natural green tones mounted as focal point wall art. The moss maintains its soft, three-dimensional texture and verdant color without requiring water, light, or any maintenance. The living wall texture creates immediate visual interest and tactile appeal, inviting closer inspection while adding organic softness to typically hard interior surfaces.
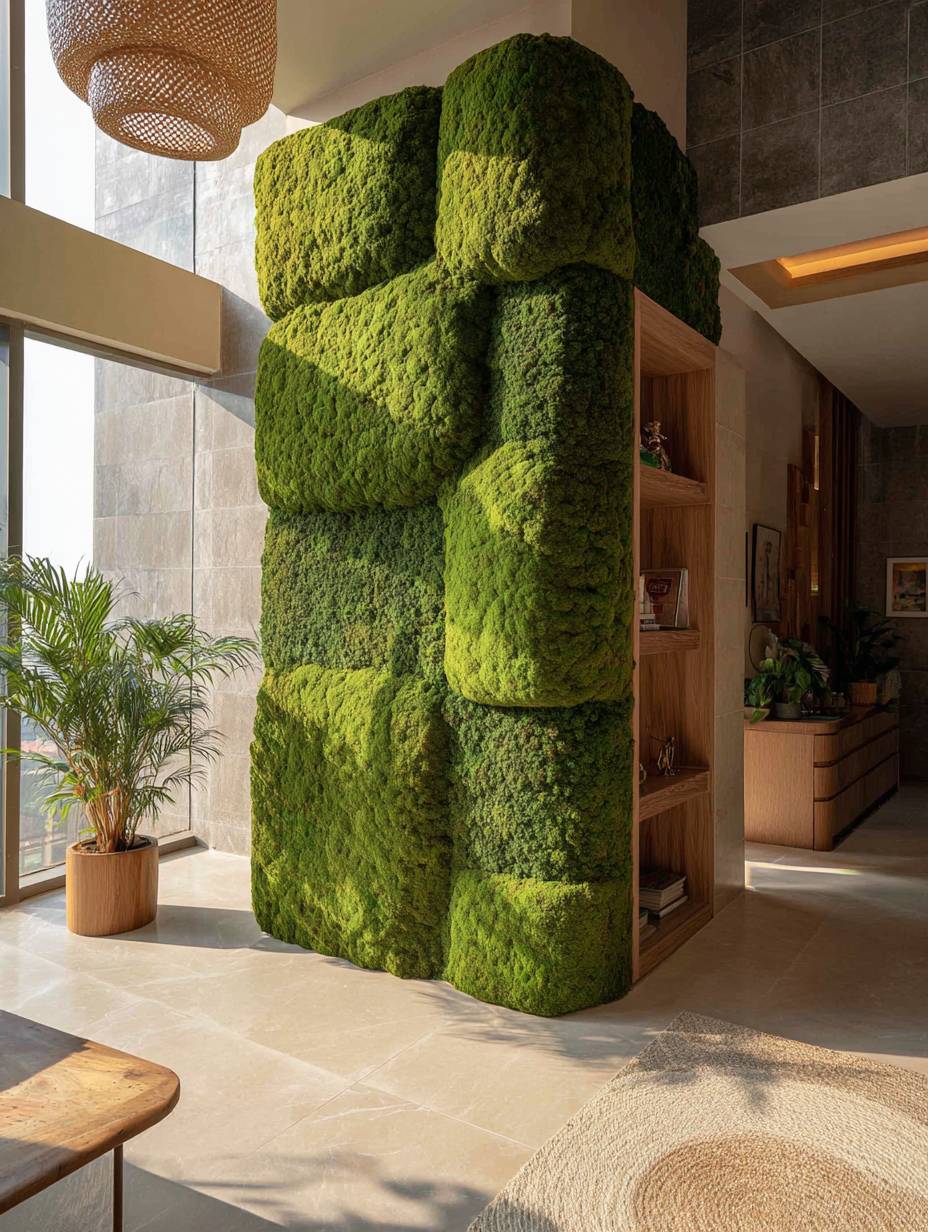
The preserved moss provides all the aesthetic benefits of living plants without any of the care requirements or concerns about lighting conditions. The panel creates a biophilic connection that research shows reduces stress and improves mood, bringing the calming effects of nature into your daily environment. The deep, dimensional texture of the moss creates fascinating shadow play as light moves across the surface throughout the day. Minimal surrounding decor keeps focus on the natural element, allowing it to serve as both art and focal point.
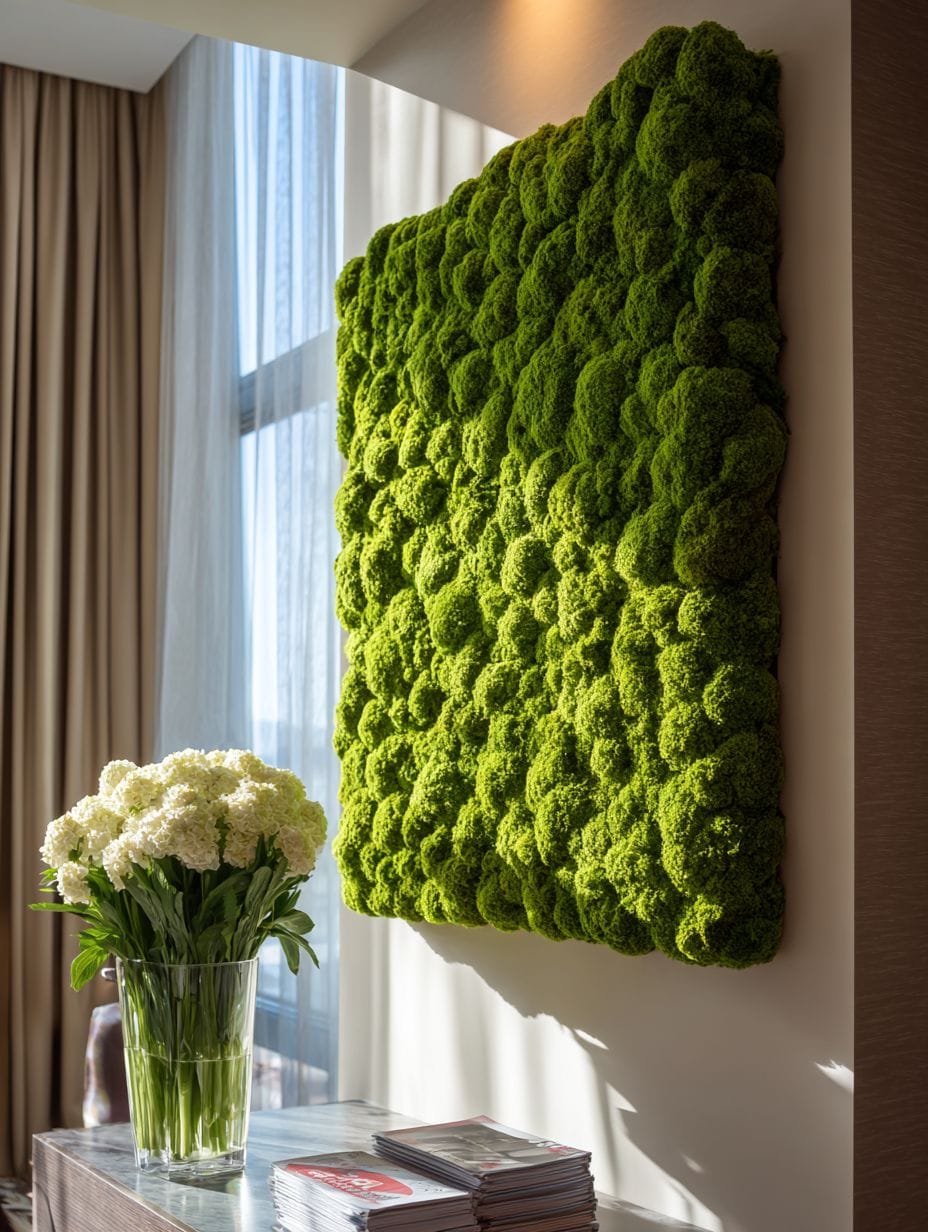
Interior design photography with natural daylight highlighting the moss texture and verdant color depth showcases how the installation brings life and organic beauty to the living room. The green tones work as a neutral in interior design, complementing virtually any color palette while adding freshness and vitality. This treatment suits contemporary, modern, and Scandinavian spaces where natural elements mixed with clean design create balanced, livable environments.
- Purchase from reputable sources: Quality preserved moss installations use proper preservation techniques ensuring color retention and longevity.
- Avoid moisture exposure: Preserved moss should not be exposed to high humidity or water, which can affect preservation and appearance.
- Install away from direct sun: While no care is needed, direct sunlight can fade preserved moss over time—choose shaded walls.
- Clean with compressed air: Dust gently using compressed air rather than touching or wiping the delicate moss.
- Consider panel size: Larger installations make stronger statements—plan for substantial size to justify the investment.
21. Two-Tone Paint Treatment with Horizontal Division
Two-tone paint treatments create visual interest and architectural definition through strategic color placement, offering more sophistication than single-color walls without the complexity of pattern. This design features darker warm grey on the lower half and lighter cool grey on the upper half, separated by thin white trim molding at chair rail height. The subtle contrast between the two grey tones adds dimension without introducing competing colors into the palette. The darker lower section grounds the room visually while providing practical benefits—darker colors show wear and marks less readily in high-traffic areas.
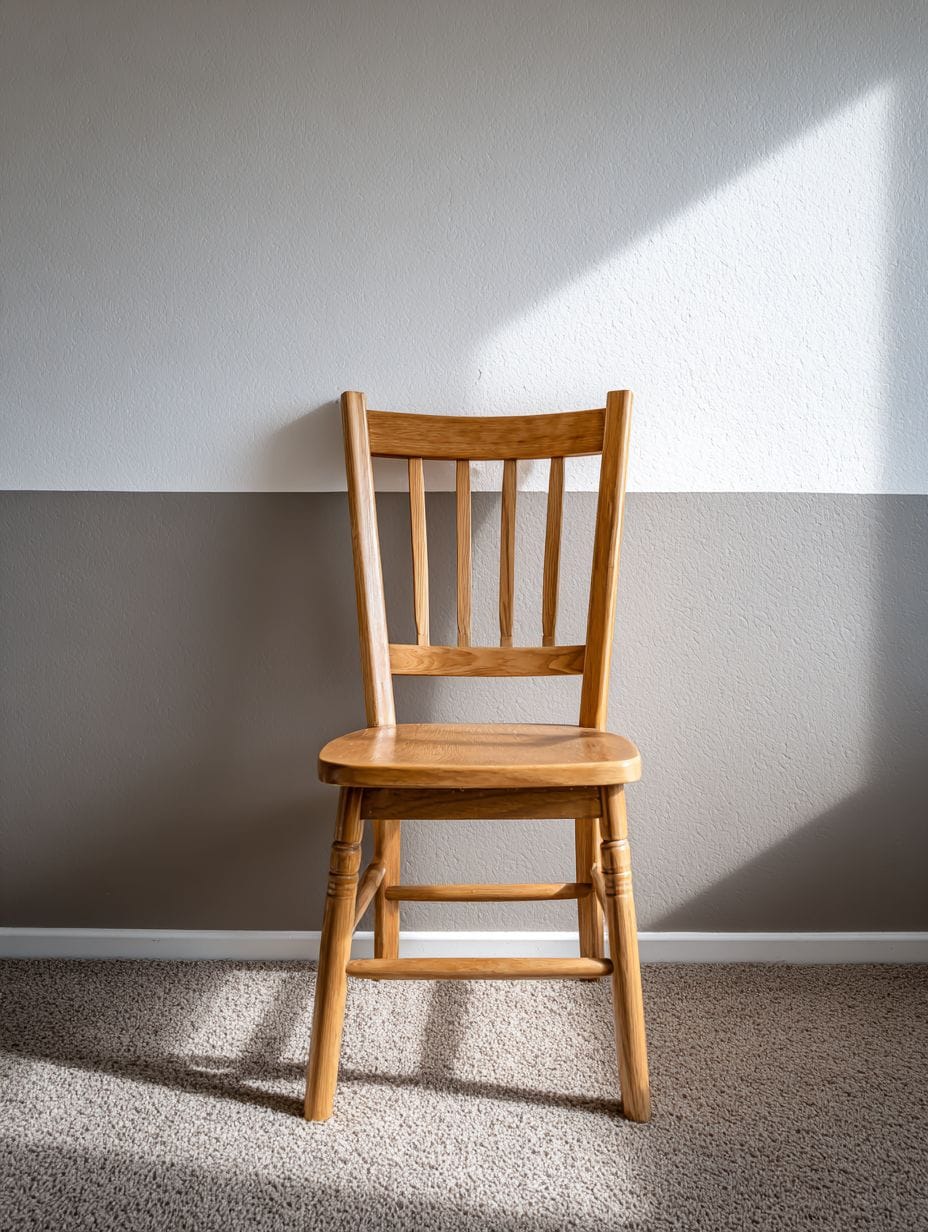
The division point at chair rail height (typically 32-36 inches from the floor) has historical precedent but also creates pleasing proportions in modern spaces. The thin white trim molding provides clean definition between the colors, creating a intentional break that prevents the transition from appearing uncertain or unfinished. The use of two grey tones—one warm, one cool—creates subtle temperature contrast that adds depth while maintaining overall neutrality that works with diverse furniture and decor choices.

Professional interior photography showcases the clean paint line execution and demonstrates how the two tones interact in natural lighting conditions, with the lighter upper section helping to reflect light throughout the room. This treatment particularly suits traditional and transitional spaces where divided walls feel historically appropriate, though simplified color choices make it work in contemporary settings as well. The technique offers visual interest at modest cost—creative use of paint remains one of the most budget-friendly ways to transform a space.
- Use a level for the division line: Mark your division line carefully using a laser level for perfectly straight results around the entire room.
- Apply tape after painting: Paint both colors slightly past where they’ll meet, then tape and cut in for the cleanest possible line.
- Choose coordinating greys: Select tones from the same paint family or use the same color in two different sheens for subtle sophistication.
- Adapt proportions to ceiling height: Lower division points work in rooms with standard 8-foot ceilings; higher placement suits taller ceilings.
- Consider baseboard height: Ensure sufficient space between baseboard top and division line for visual breathing room.
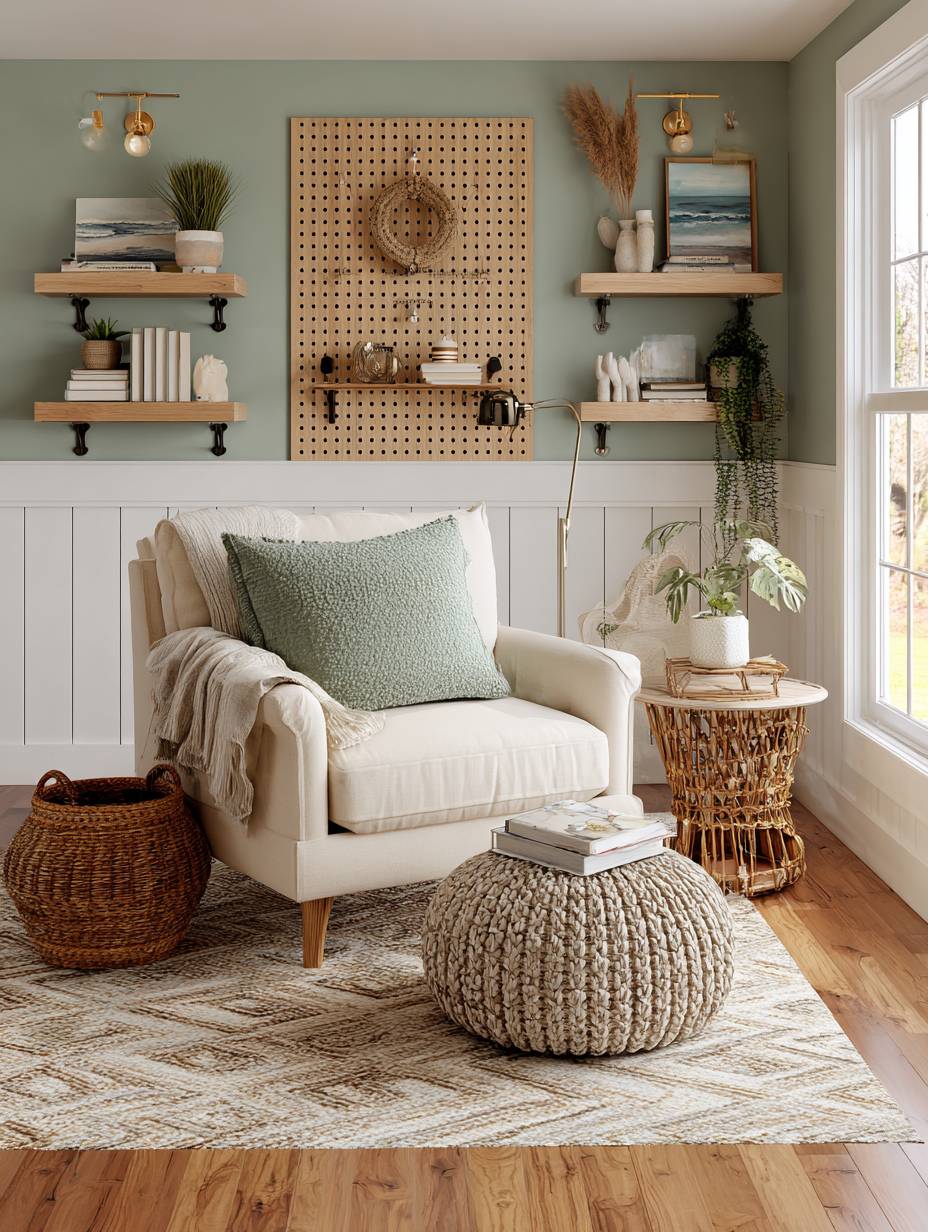
22. Functional Pegboard Wall System in Sage Green
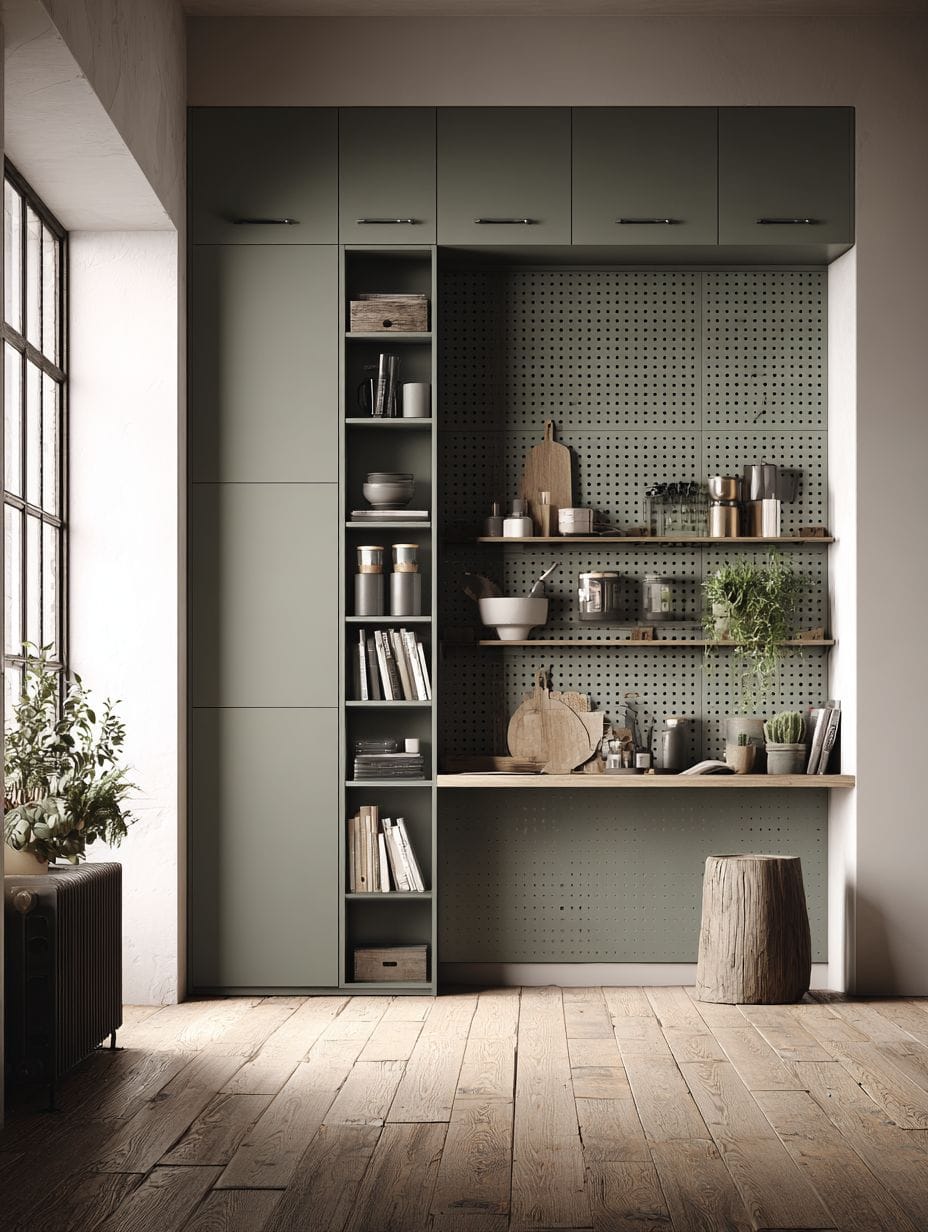
Pegboard transcends its garage and workshop origins to become a sophisticated organizational wall system when executed with residential finishes and thoughtful styling. This design features an expansive pegboard wall painted in muted sage green with natural wood pegs and shelving accessories, creating a customizable grid pattern that organizes books, plants, and decorative objects. The functional wall demonstrates that practical storage can be beautiful when approached as intentional design rather than utilitarian afterthought. White surrounding walls provide visual breathing room and contrast that allows the sage pegboard to serve as both functional and decorative focal point.
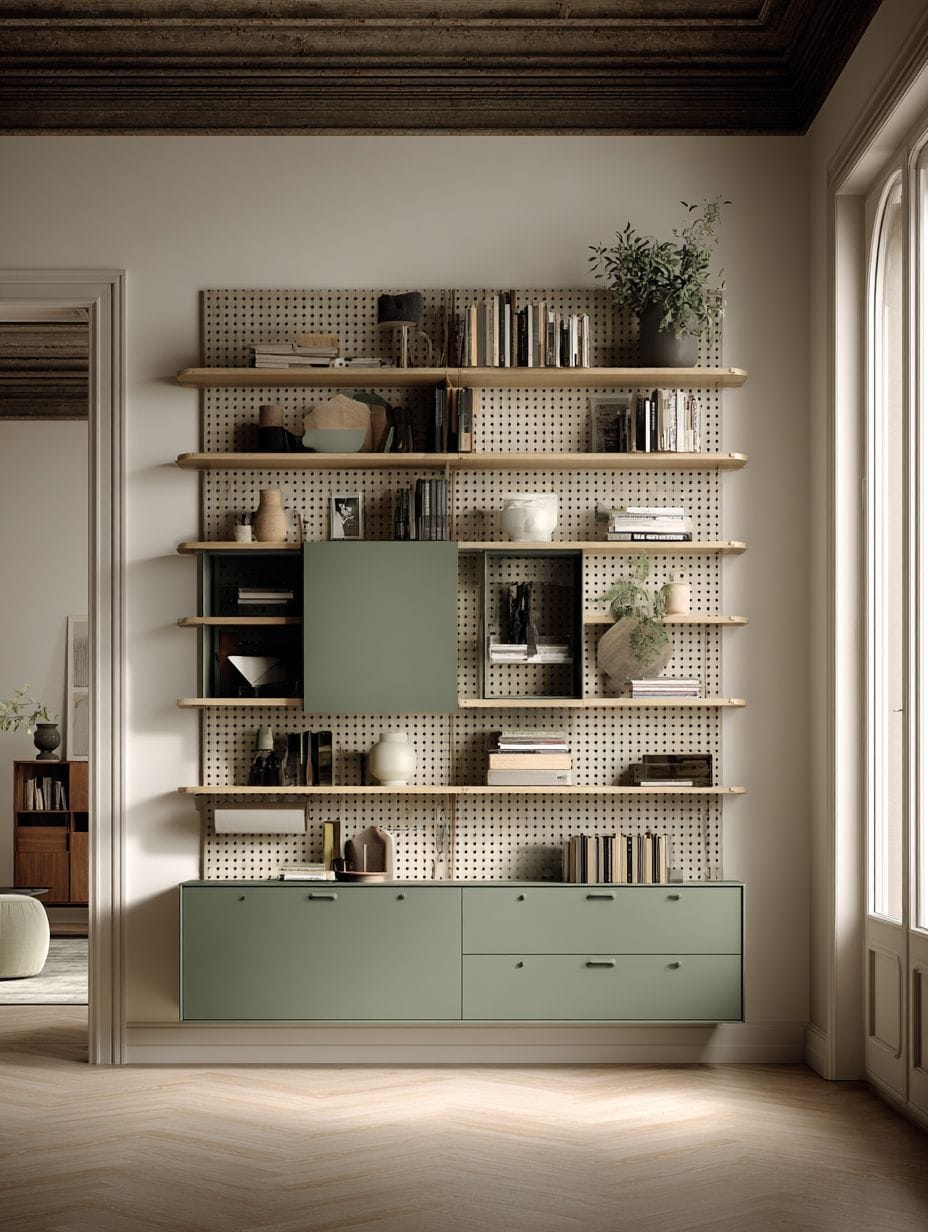
The sage green color brings natural, calming tones while being distinctive enough to make the pegboard feel like a design choice rather than exposed utility. Natural wood pegs and accessories add warmth and organic texture against the painted pegboard, creating subtle contrast that highlights the organizational elements. The true beauty lies in the flexibility—you can rearrange pegs, shelves, and hooks whenever needs or aesthetic preferences change, making this one of the most adaptable wall treatments available.
Wide-angle photography captures the organized aesthetic with even lighting that showcases the versatile storage solution and demonstrates how functional elements can be styled to feel intentional and beautiful. The three-dimensional nature of items displayed on the pegboard adds depth and prevents the wall from reading as flat. This treatment works particularly well in home offices, craft rooms, casual living spaces, and anywhere organizational needs exist but boring solutions aren’t acceptable.
- Choose residential-grade pegboard: Select smoother, higher-quality pegboard than standard hardware store options for a refined residential appearance.
- Frame the edges: Add wood trim around pegboard perimeter for a finished, built-in look rather than utilitarian appearance.
- Space off the wall: Mount pegboard on furring strips to create necessary space behind for peg insertion and adjustment.
- Coordinate accessories: Purchase pegboard accessories in matching materials (all wood, all metal) for cohesive rather than random appearance.
- Style with intention: Treat displayed items as you would style a bookshelf—thoughtfully arranged rather than haphazardly placed.
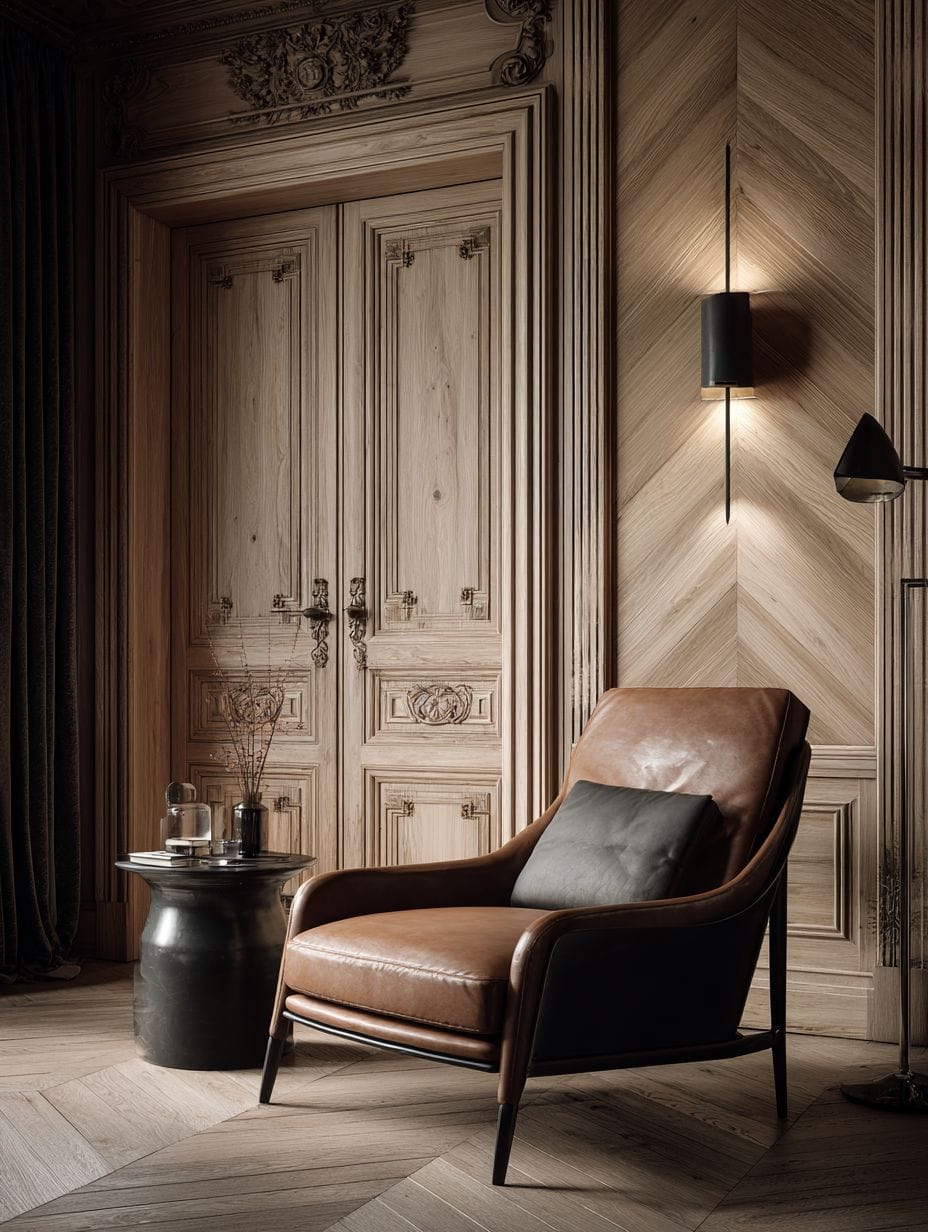
23. Sophisticated Herringbone Wood Paneling
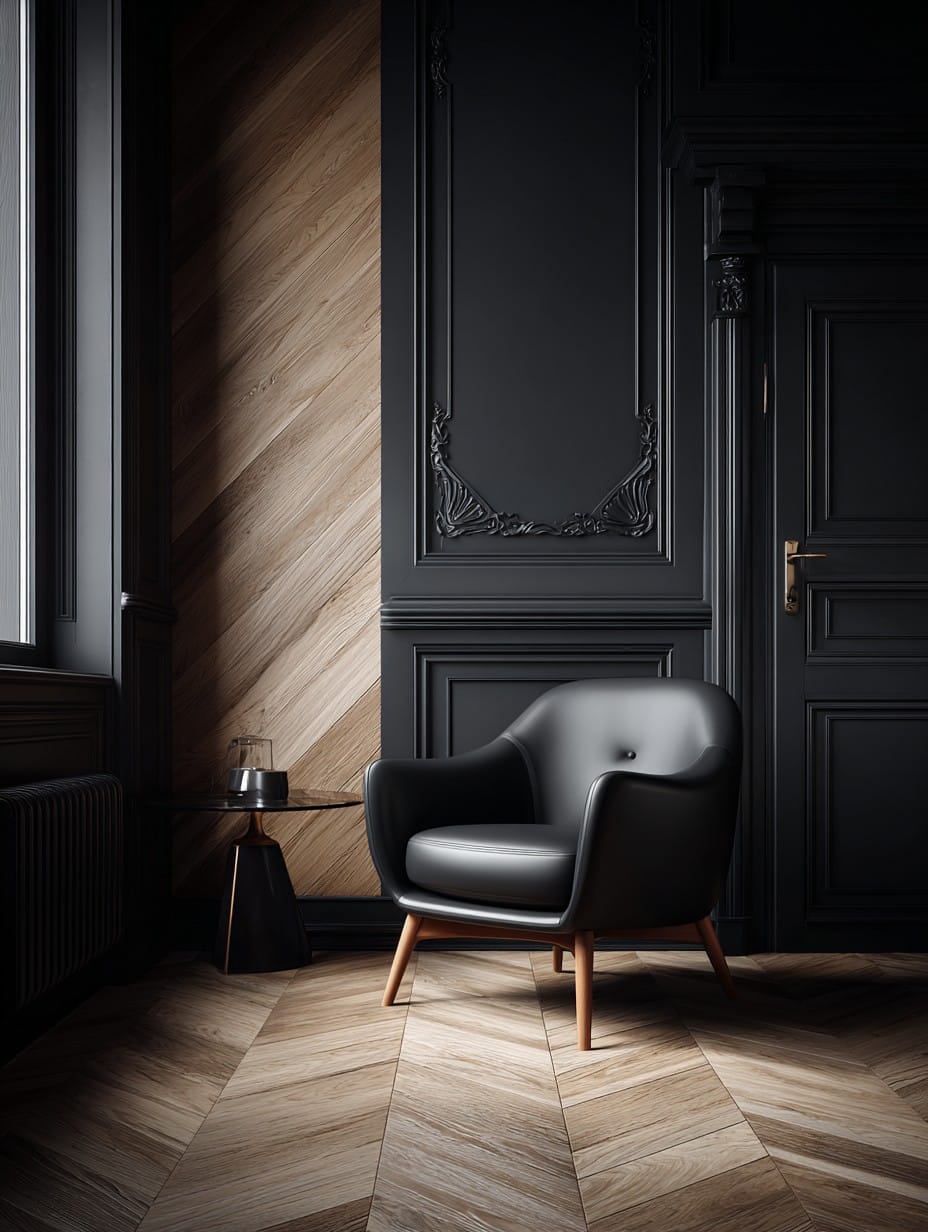
Herringbone patterns bring timeless elegance and geometric interest to walls, proving that wood applications can be far more sophisticated than simple horizontal or vertical planks. This refined design features light oak wood strips arranged in classic chevron pattern, creating V-shaped angles that create visual movement and complexity. The geometric arrangement draws the eye across the surface, creating engagement and interest impossible with simpler wood applications. A leather armchair positioned to appreciate the feature wall creates a reading nook or conversation area that celebrates the architectural detail.

The light oak wood offers warm, honey-toned color with visible grain patterns that add organic texture to the geometric precision. The herringbone pattern creates directional flow that guides the eye while the repetition creates rhythm and structure. The precision required for successful herringbone installation means every angle must be perfect—there’s no hiding imprecision in this unforgiving pattern. The dimensional nature of real wood strips creates subtle shadows along the angles, adding depth that flat wallpaper or painted patterns cannot achieve.
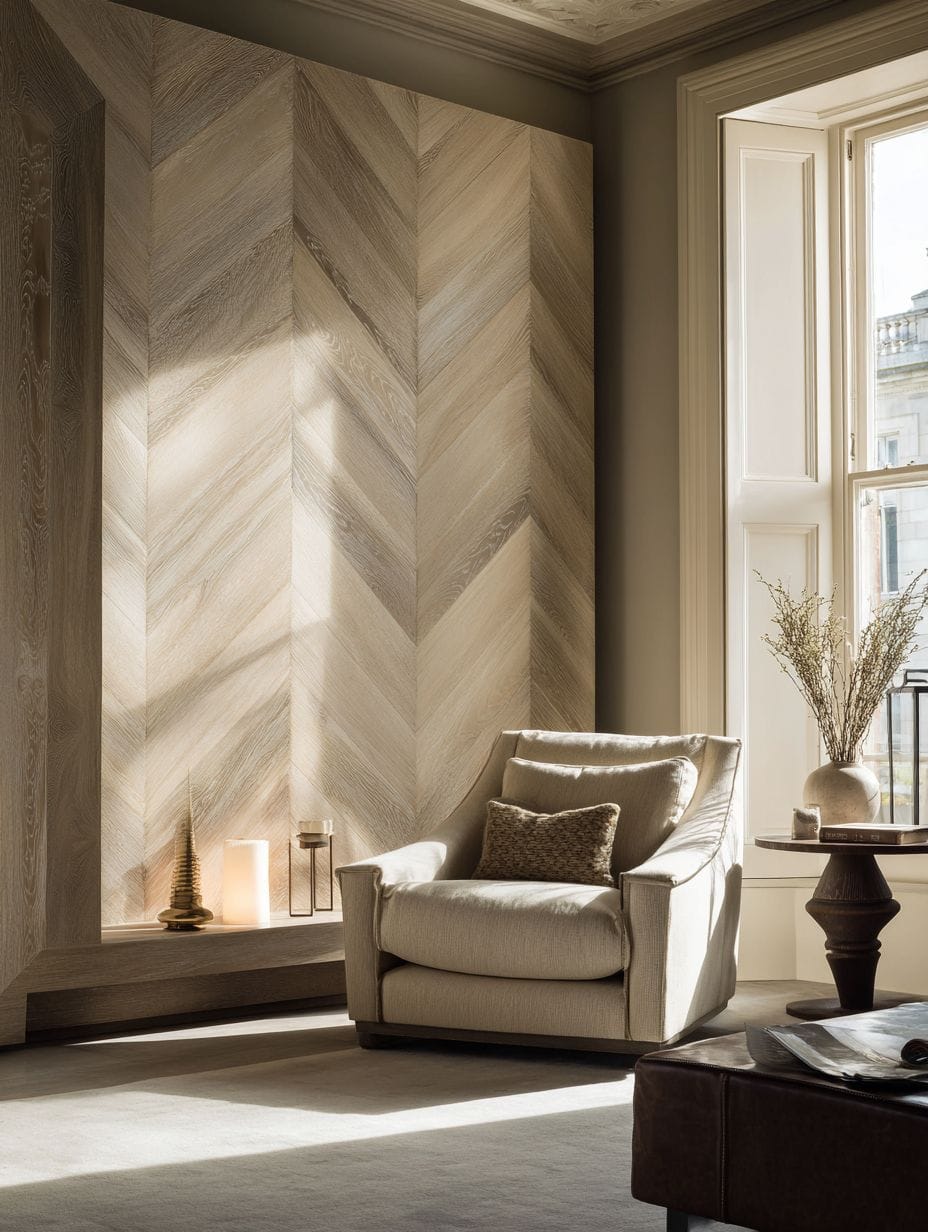
Architectural interior photography highlights the detailed woodwork pattern with natural side lighting that creates gentle shadows emphasizing the dimensional chevron pattern. The shadows shift throughout the day as light angles change, giving the wall dynamic quality that evolves from morning to evening. This treatment suits traditional, transitional, and contemporary spaces depending on wood finish choices—lighter, natural finishes feel contemporary while darker stains skew traditional. The investment in materials and skilled installation creates lasting value and timeless appeal.
- Hire experienced installers: Herringbone requires precise angle cuts and pattern alignment best left to skilled professionals.
- Plan the pattern carefully: Determine whether to center the pattern or start from one side based on room dimensions and focal points.
- Select appropriate wood species: Choose stable hardwoods that won’t expand or contract significantly with humidity changes.
- Finish before installation: Apply stain and sealer to individual pieces before installation for more even coverage and easier application.
- Acclimate the wood: Store wood in the installation room for several days before beginning to allow it to adjust to room conditions.
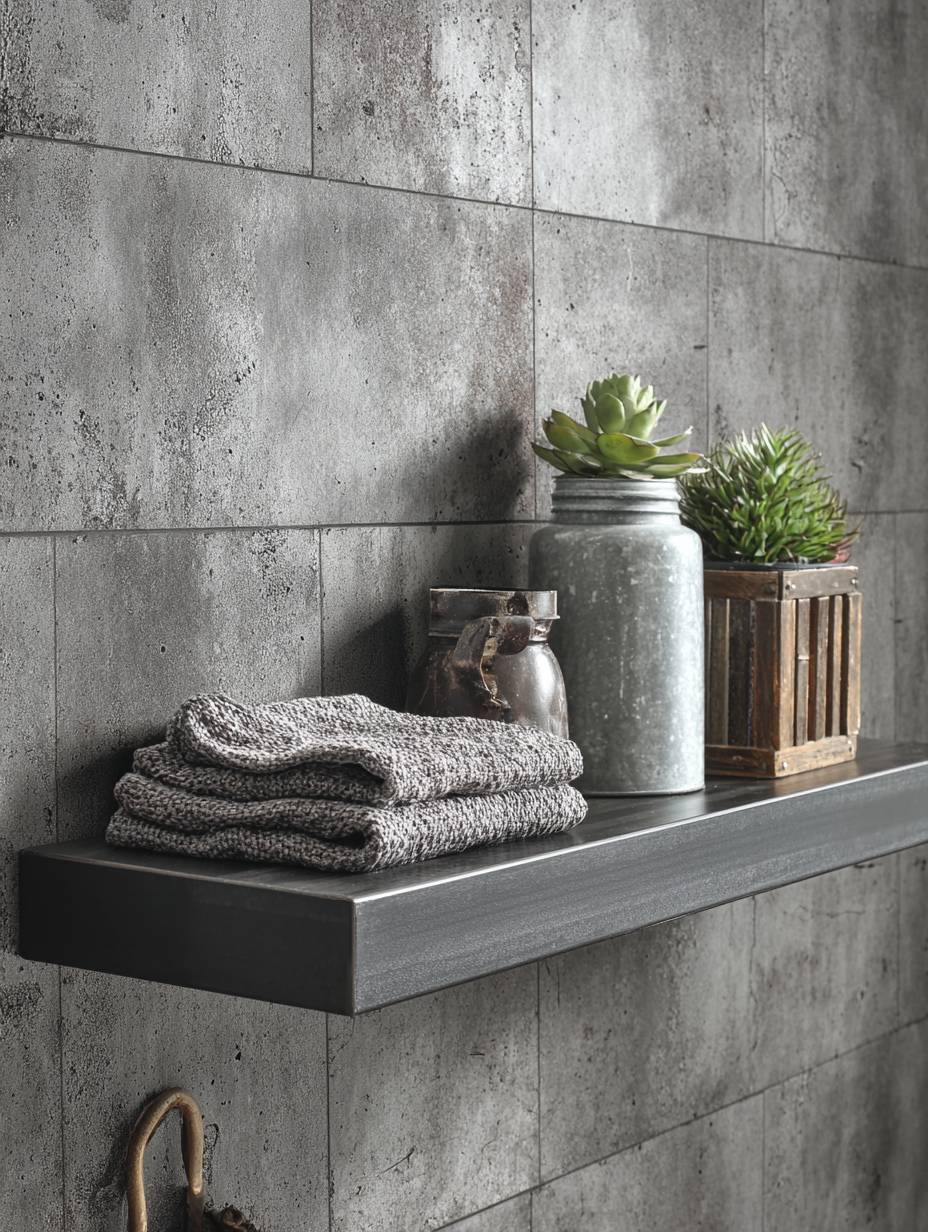
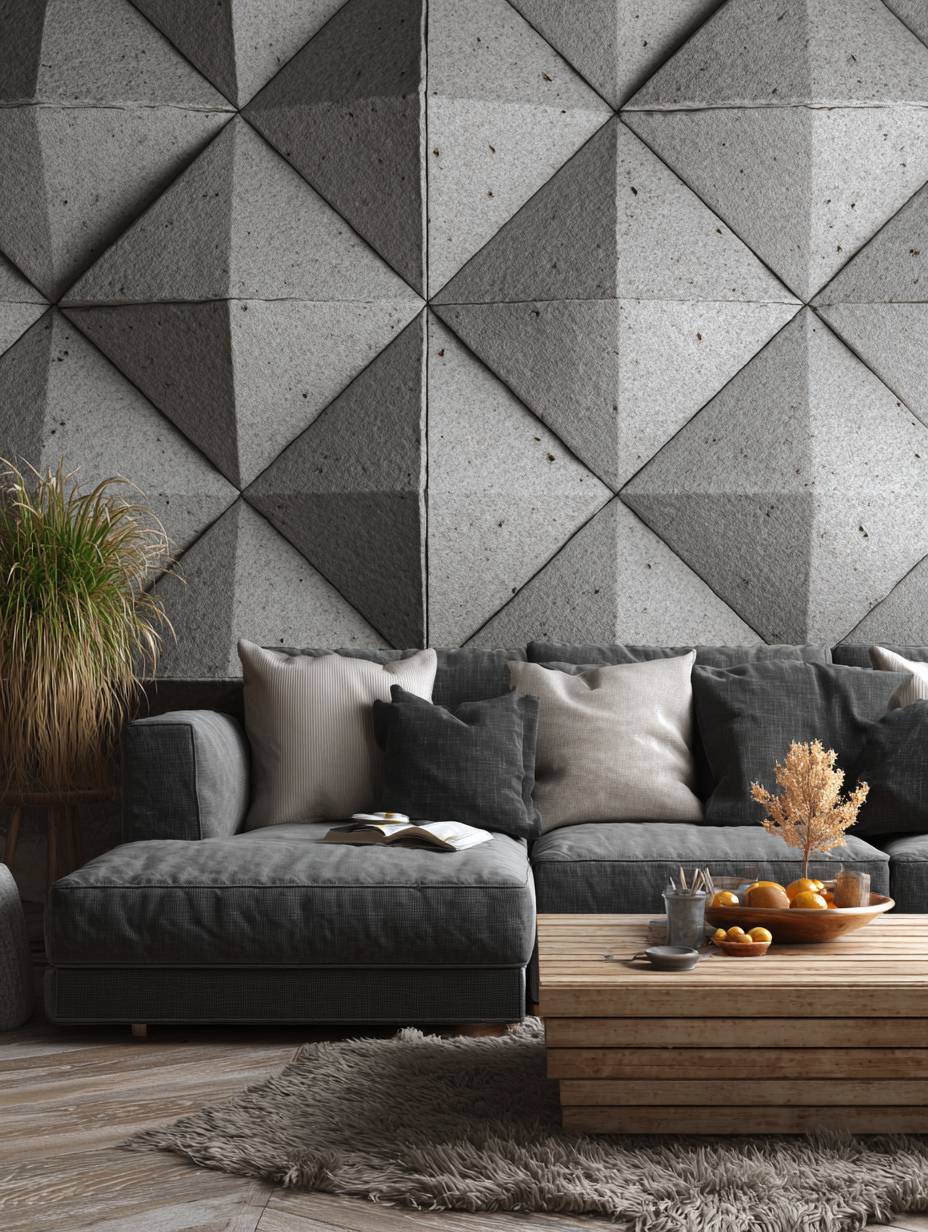
24. Industrial Concrete Panel Accent Wall
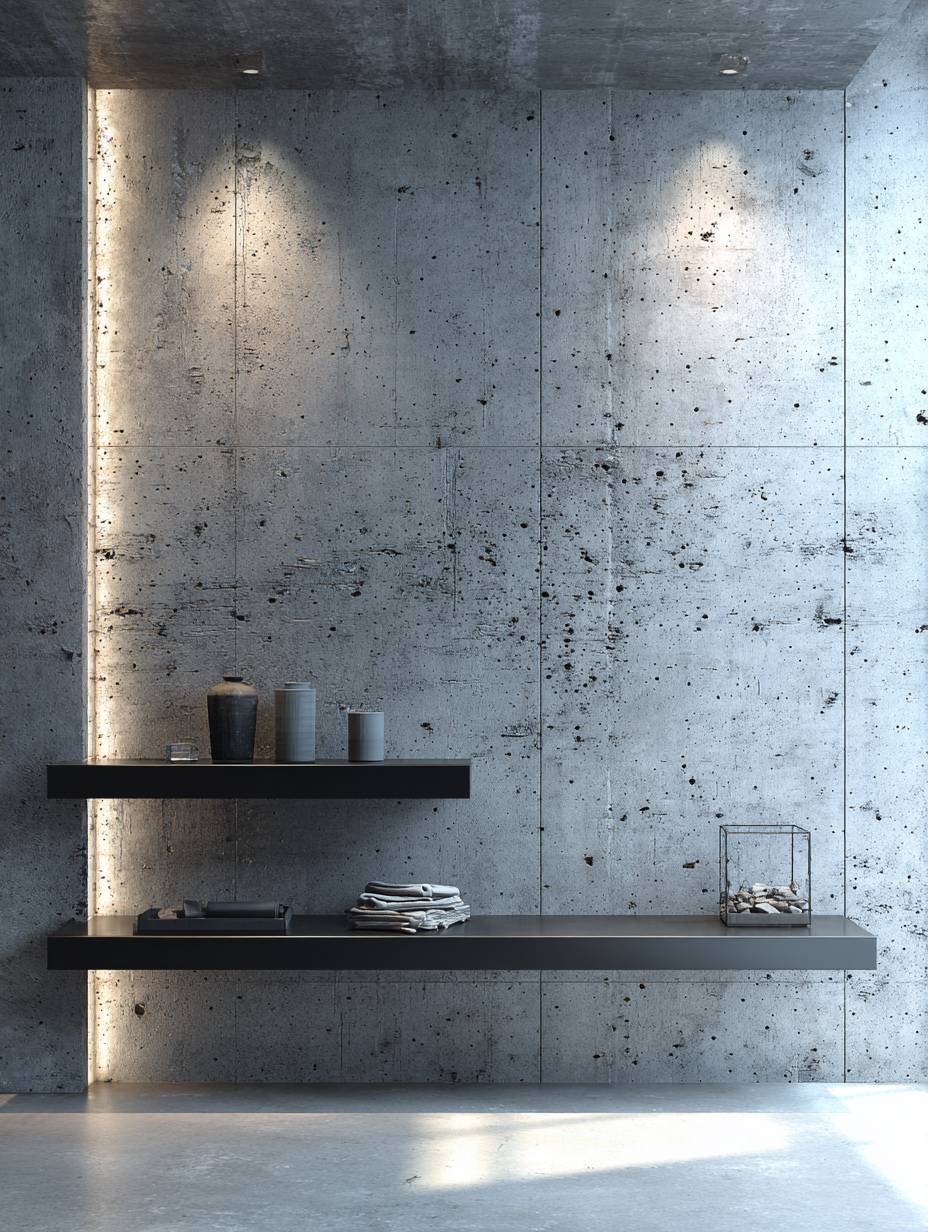
Concrete brings industrial authenticity and substantial presence to residential spaces, creating a bold statement that bridges modern aesthetics with raw materiality. This design features a smooth troweled concrete finish in medium grey with subtle surface variations, celebrating the industrial aesthetic while maintaining livable sophistication. The concrete’s inherent texture—slight trowel marks, color variations, and organic imperfections—creates visual interest without pattern or decoration. A matte black metal floating shelf provides display space while reinforcing the industrial vocabulary, its dark finish creating strong contrast against the concrete grey.
The beauty of concrete lies in its honesty—the material makes no attempt to be anything other than itself, celebrating utility and structure as aesthetic qualities. The medium grey tone provides neutrality while being distinctive enough to serve as a focal point. The smooth troweled finish maintains residential appropriateness while preserving enough texture to reward close inspection. Soft textile furnishings in the room balance the hard concrete surface, creating necessary contrast between rough and smooth, hard and soft, industrial and comfortable.
Interior design photography uses both natural and artificial lighting to capture the concrete’s authentic texture and color depth, showing how the surface changes appearance under different lighting conditions. The concrete panel technique provides the aesthetic impact of poured-in-place concrete at a fraction of the weight, cost, and structural requirements, making industrial style practical for renovation applications. The material provides excellent durability and requires minimal maintenance—ideal for high-traffic living spaces.
- Choose panel weight carefully: Lightweight concrete veneer panels offer the look with manageable weight for standard wall construction.
- Seal the surface: Apply penetrating sealer to prevent staining and make cleaning easier while maintaining the natural appearance.
- Plan for installation methods: Heavy panels may require professional installation with appropriate anchoring systems.
- Balance with softness: Include plenty of textiles, plants, and warm materials to prevent industrial concrete from feeling cold or harsh.
- Consider acoustic treatments: Concrete reflects sound readily—add soft furnishings and perhaps acoustic panels elsewhere to control echo.
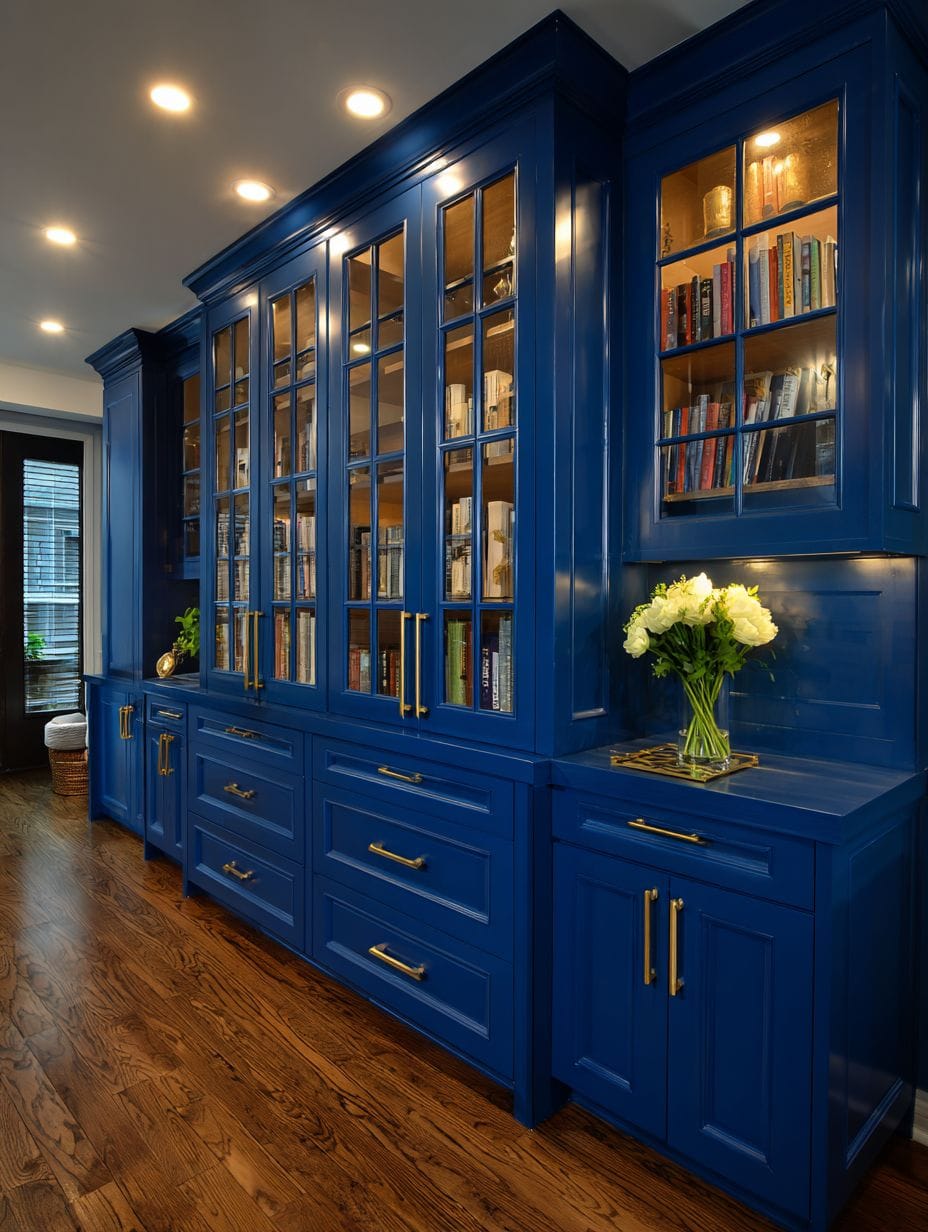
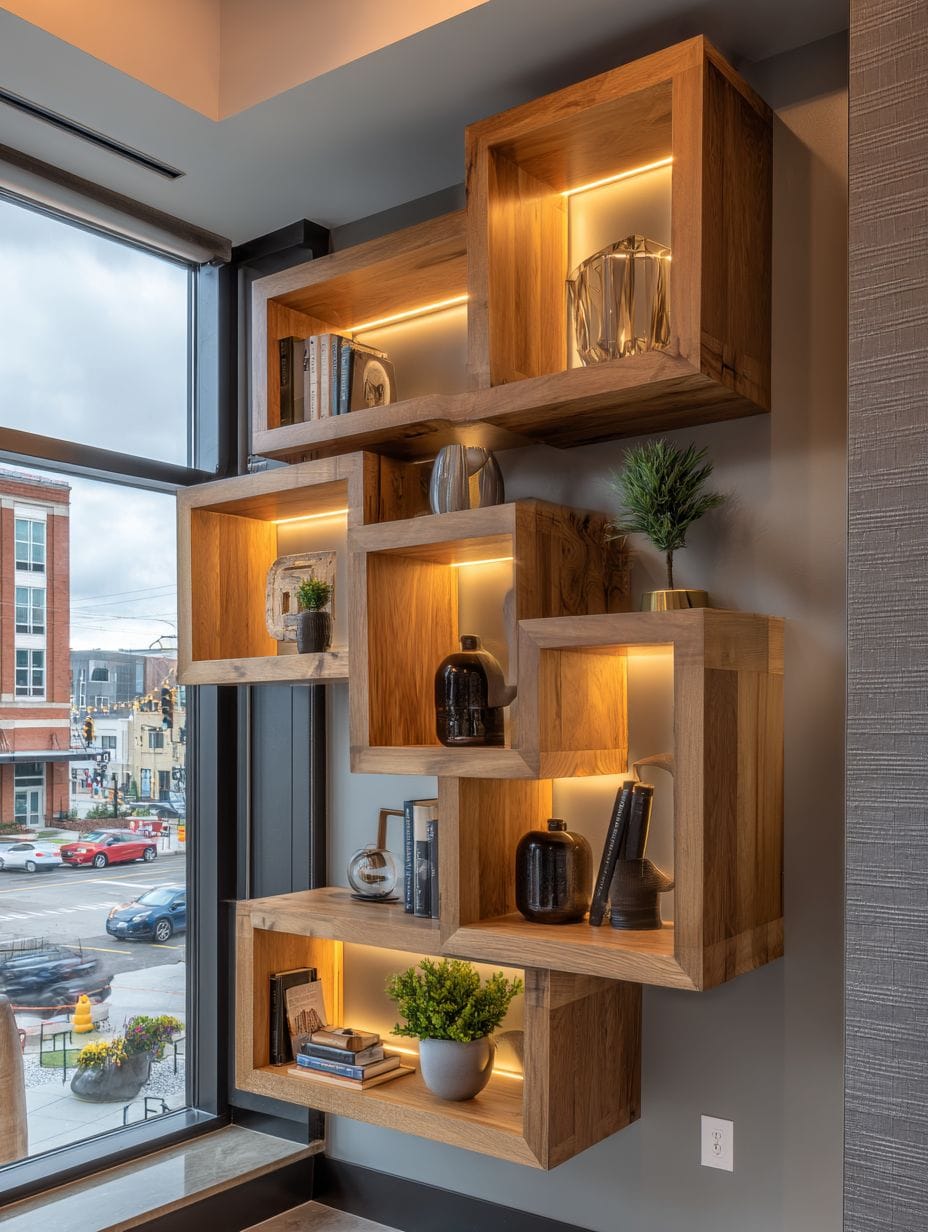
25. Floor-to-Ceiling Navy Built-In Cabinetry
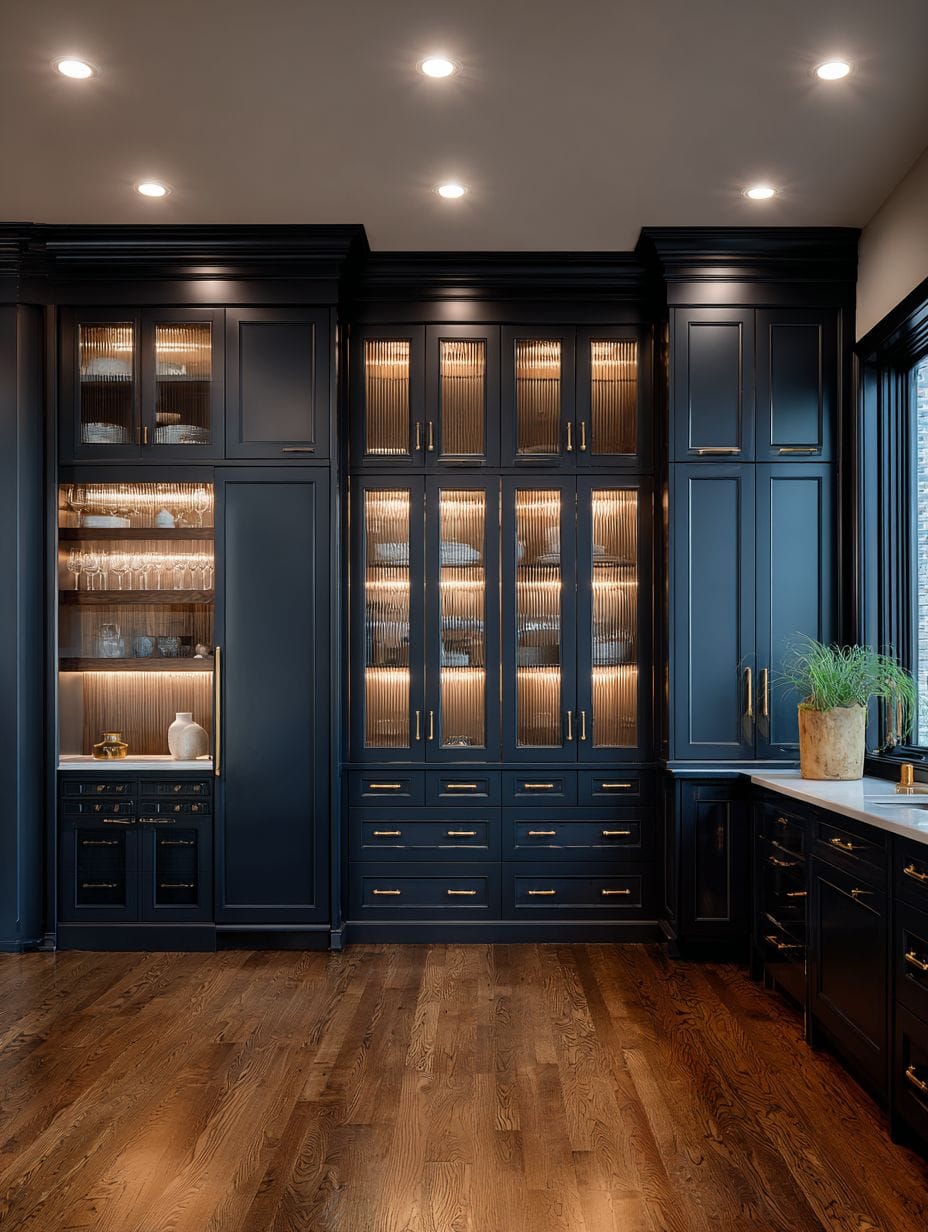
Built-in cabinetry transforms entire walls into functional storage while making powerful design statements, particularly when executed in bold colors rather than standard neutrals. This dramatic design features floor-to-ceiling cabinetry painted in rich navy blue, with glass-front upper sections revealing styled displays and solid lower cabinets concealing practical storage. Brass hardware adds luxury detail, the warm metallic finish glowing against the deep navy background. Interior cabinet lighting illuminates the glass-front sections, creating warm focal points that draw the eye and highlight treasured objects on display.
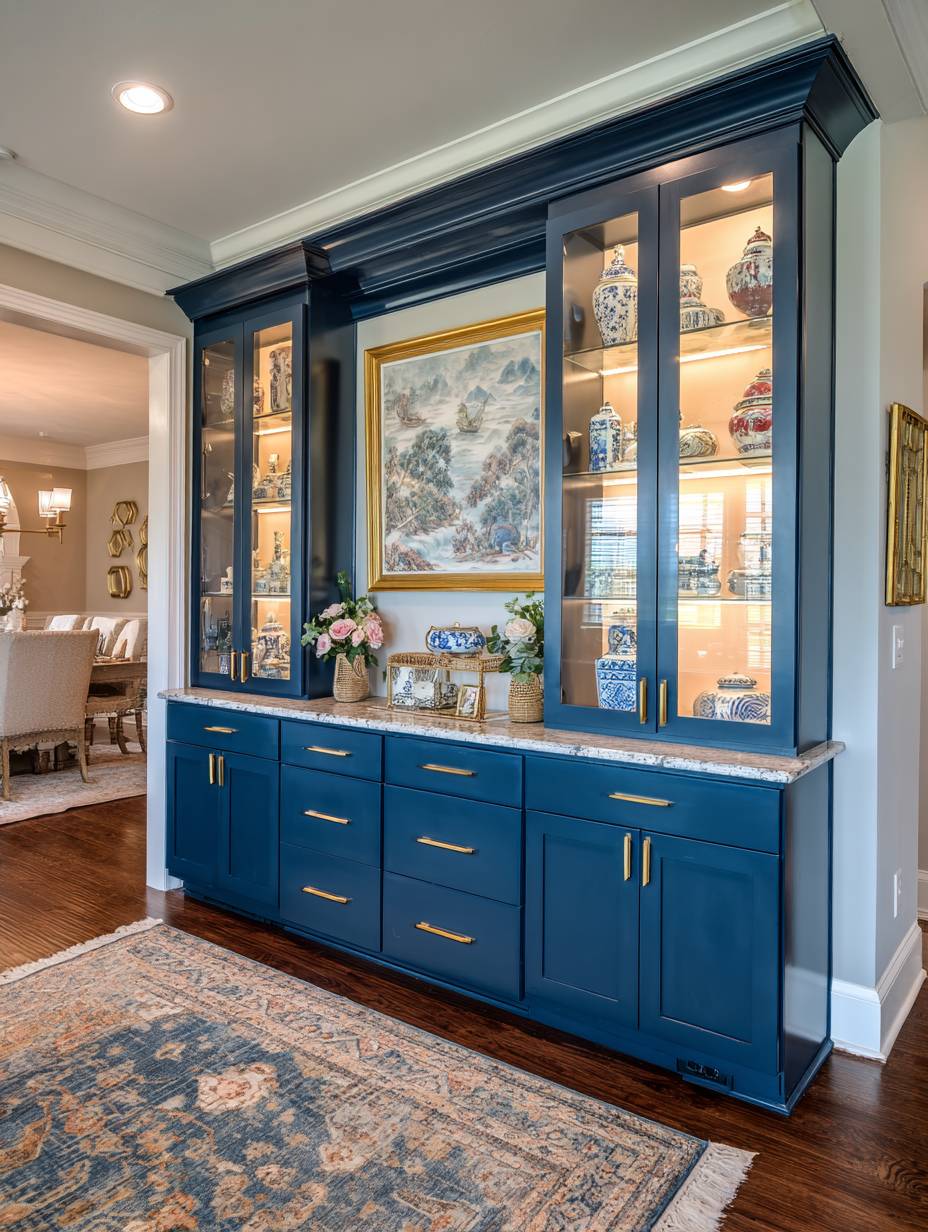
The entire wall becomes both functional storage and dramatic focal point, demonstrating that practical elements need not be boring or purely utilitarian. The navy color provides sophisticated drama without the stark contrast of black, working as a deep neutral that complements rather than clashes with most color palettes. The combination of glass-front upper cabinets and solid lower cabinets provides display opportunities for beautiful objects while concealing less attractive everyday items—the perfect balance of show and hide.
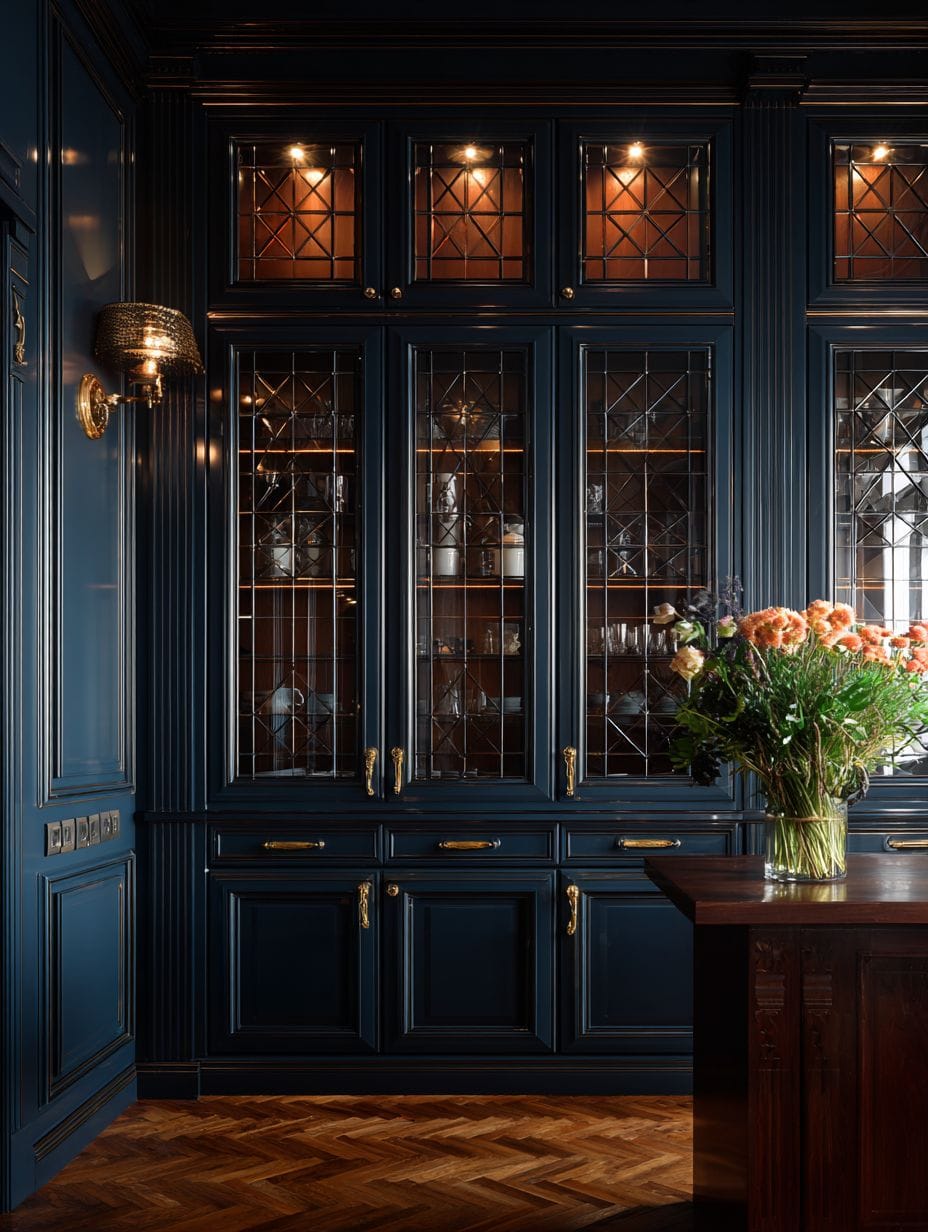
Professional photography with balanced exposure showcases both the exterior cabinet design and the illuminated interior displays, demonstrating how integrated lighting transforms built-ins from simple storage into museum-quality showcases. The floor-to-ceiling application maximizes vertical space while creating strong architectural presence that appears original to the home rather than added later. This investment adds genuine value to your home while solving storage challenges with beauty rather than purely function.
- Plan for electrical needs early: Route wiring for interior cabinet lighting during construction phase before cabinets are installed.
- Choose quality hardware: Solid brass or high-quality plated hardware justifies the investment in custom cabinetry and ensures longevity.
- Consider adjustable shelving: Include adjustable shelf pins to allow flexibility as displayed items change over time.
- Measure precisely: Custom built-ins must fit perfectly—measure multiple times and account for baseboards and crown molding.
- Style interior displays thoughtfully: Treat glass-front cabinets as curated collections rather than catch-all storage for cohesive appearance.
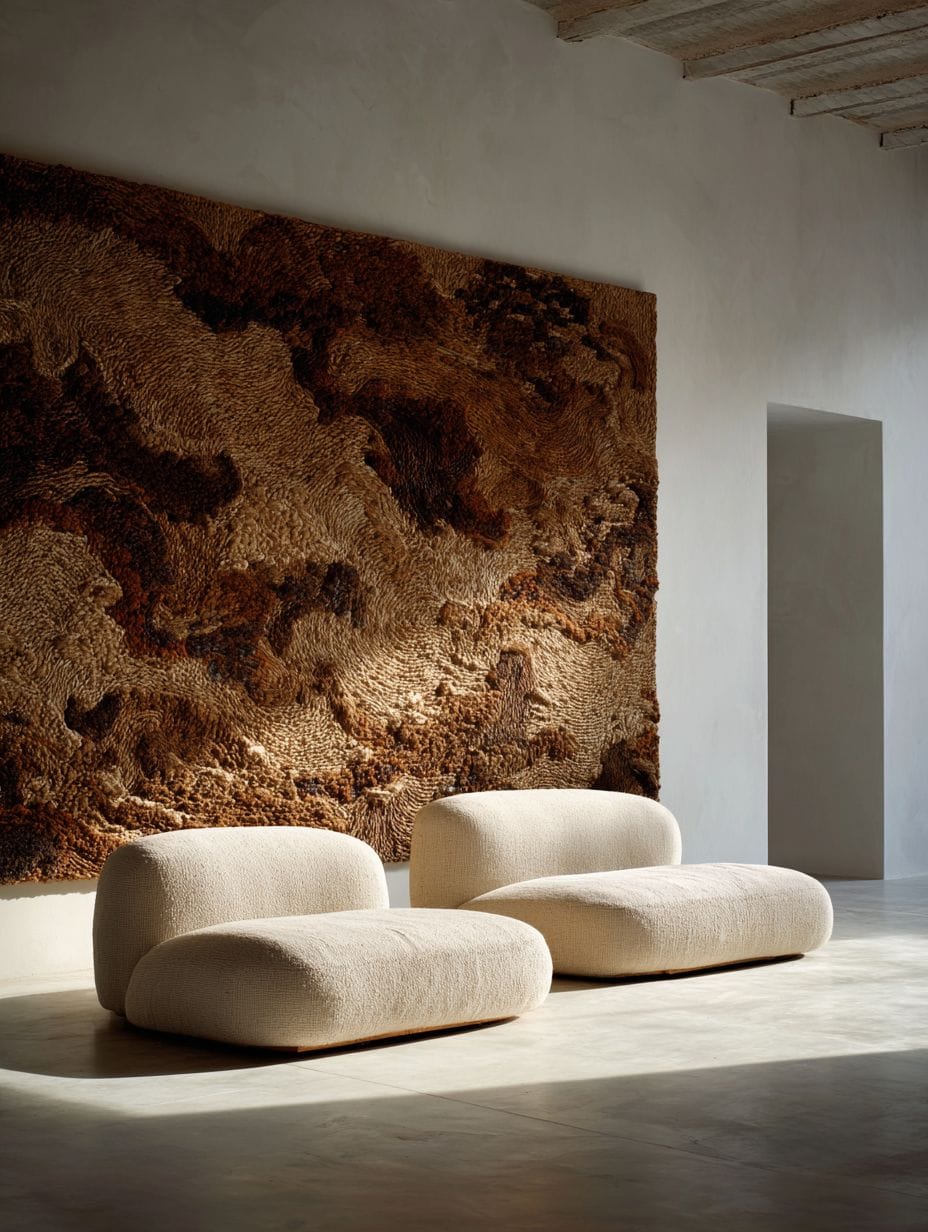
26. Artistic Rope Wall Hanging Installation

Large-scale textile art brings organic texture, handcrafted quality, and sculptural dimension to walls, offering a softer alternative to traditional framed artwork. This design showcases a substantial rope wall hanging (5 feet wide) created in natural jute using modern macramé-style geometric patterns. The thick rope creates dimensional texture that casts shadows and adds tactile appeal, inviting touch and close inspection. The natural jute fiber brings warm, earth tones that work as a neutral while adding organic texture that contrasts beautifully against smooth painted walls. The bohemian elegance of the piece adds personality without requiring commitment to a single style.
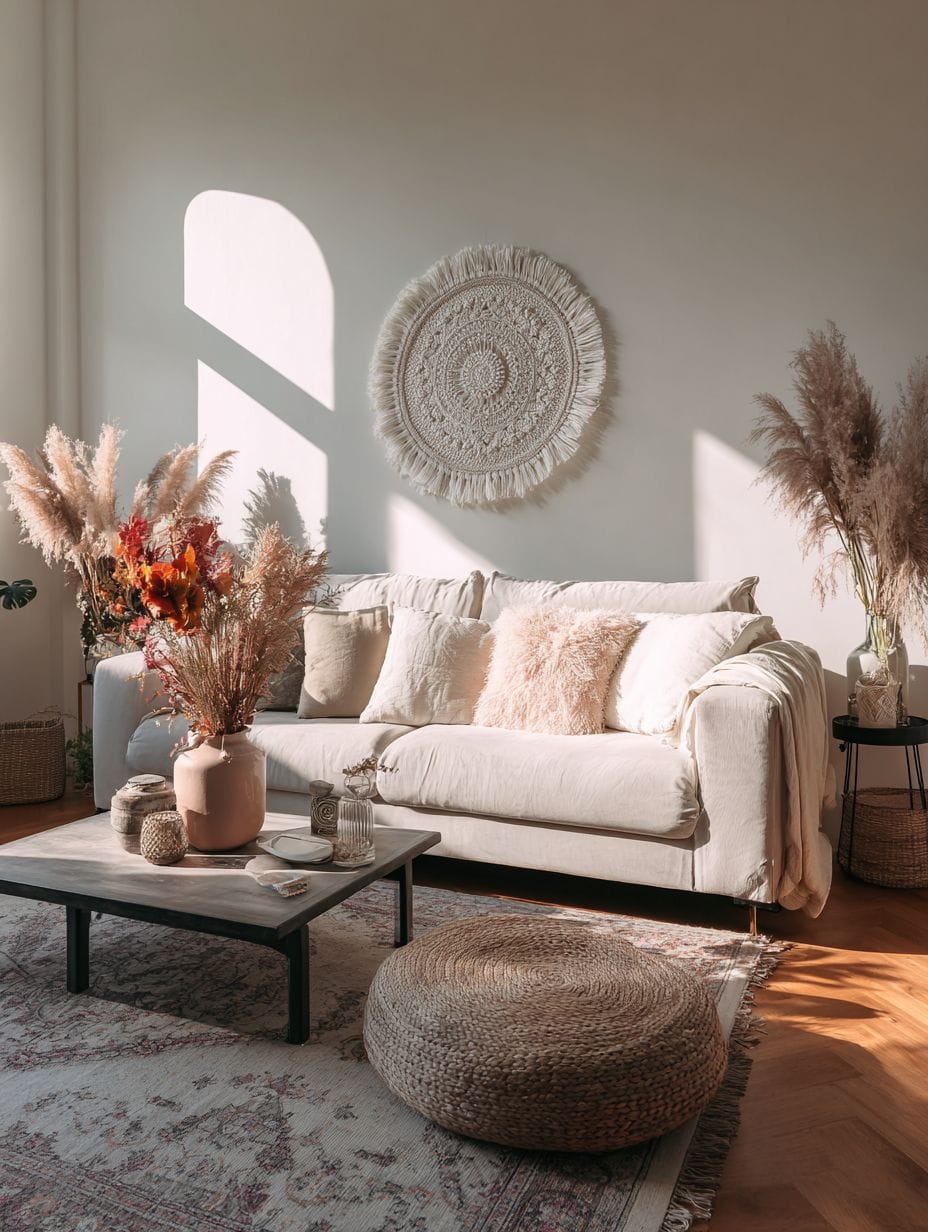
The artistic installation against a white wall creates a focal point that draws immediate attention, the substantial size ensuring the piece commands presence rather than appearing decorative afterthought. Minimal furniture and decor surrounding the rope art allows it to be the primary focus, demonstrating sophisticated design restraint. The handcrafted quality of the macramé adds authenticity and character impossible to replicate with mass-produced items—each knot represents human skill and attention.
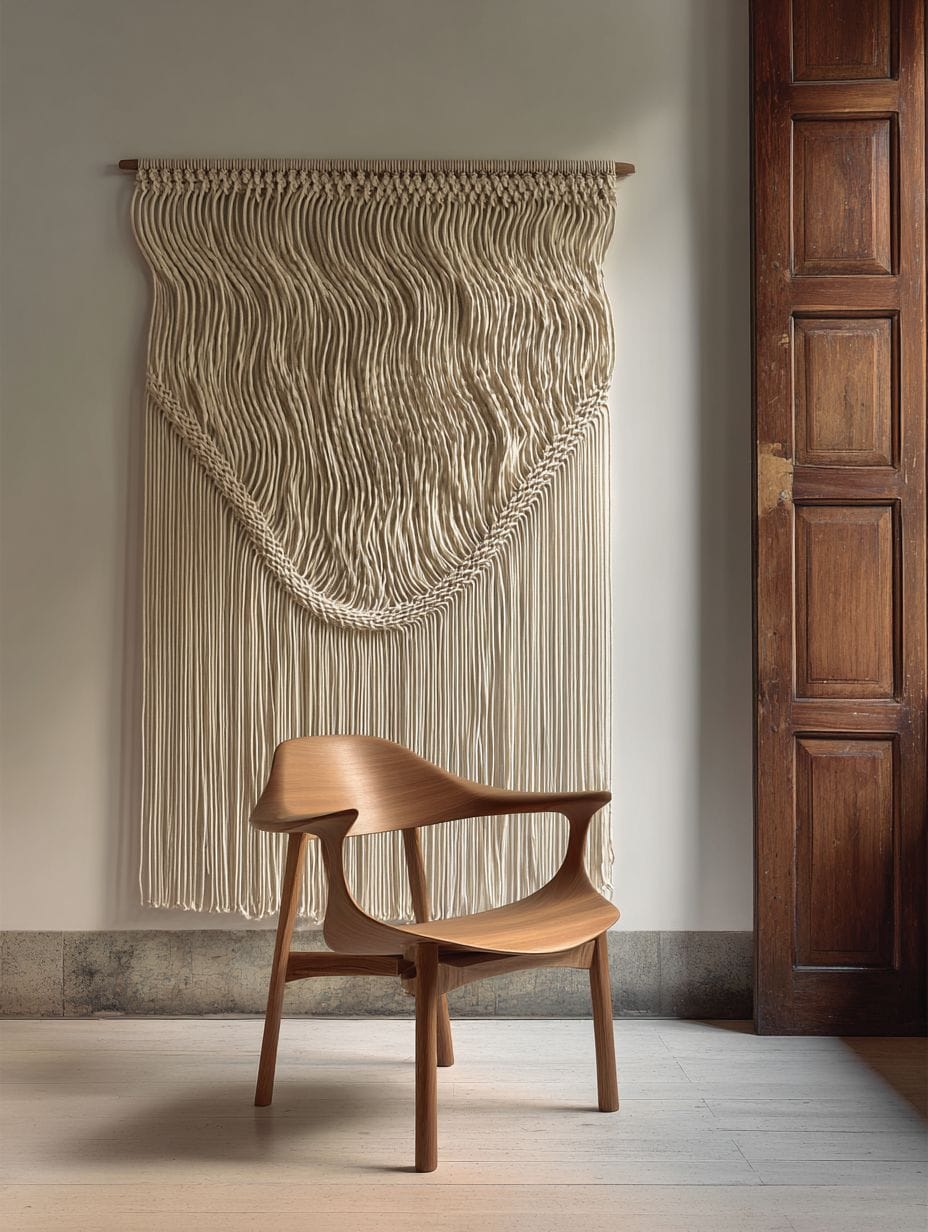
Interior photography with soft natural light highlights the rope texture and intricate knot work, showcasing how light plays across the dimensional surface throughout the day. The piece serves as both art and architectural element, adding softness and warmth to the living space while demonstrating that wall treatments need not be permanent or structural to make significant impact. This approach suits bohemian, coastal, and natural modern styles where handcrafted, organic elements feel at home.
- Choose appropriate scale: Large-scale fiber art makes statements—don’t be timid about size when investing in handcrafted pieces.
- Support the weight properly: Large rope installations can be surprisingly heavy—use appropriate anchors and hanging methods.
- Consider maintenance needs: Natural fibers collect dust—plan for periodic gentle cleaning with soft brushes or vacuum attachments.
- Allow breathing room: Give fiber art substantial negative space so the texture and craftsmanship can be fully appreciated.
- Source from artisans: Support fiber artists directly when possible for quality pieces and the knowledge that you own something truly unique.
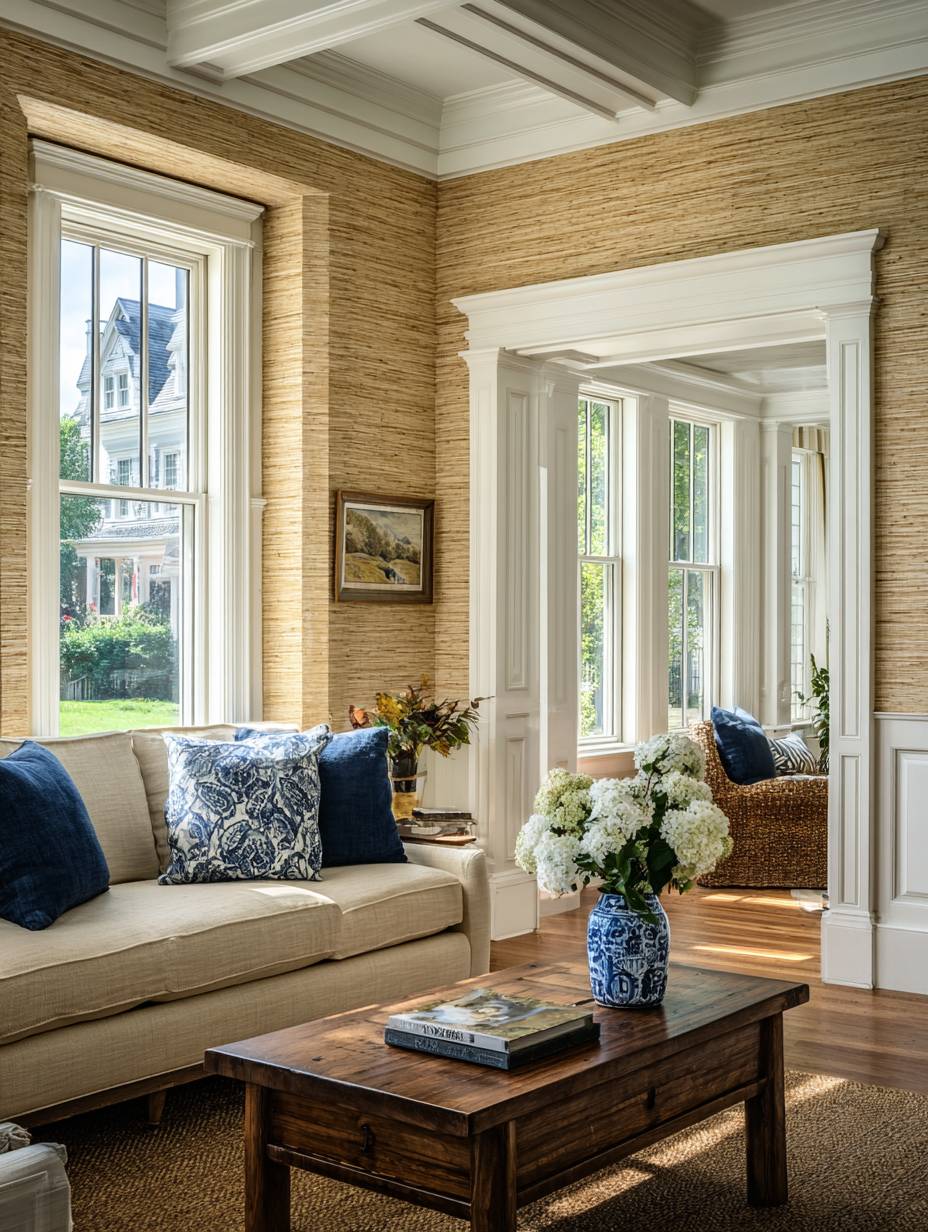
27. Sophisticated Grasscloth Wallpaper
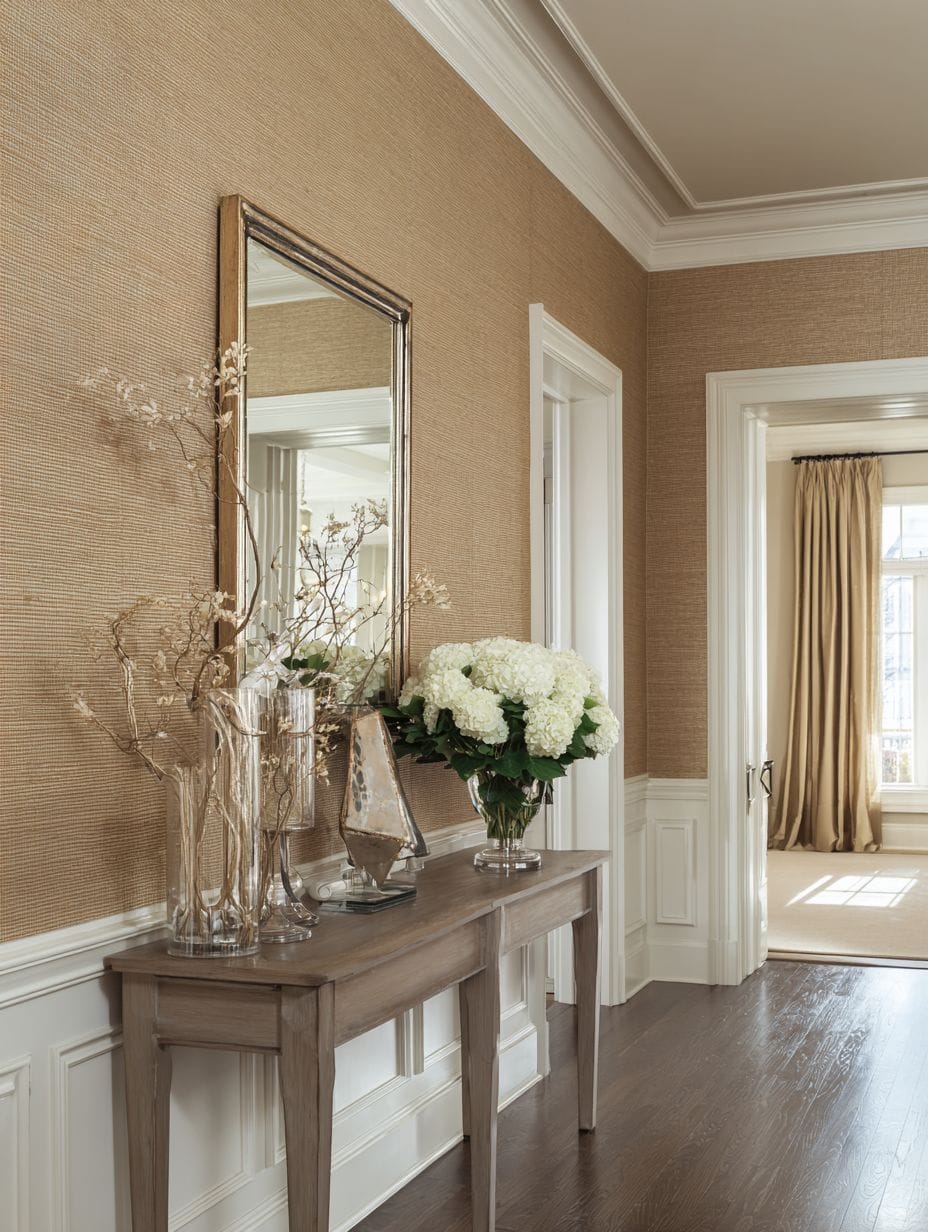
Grasscloth wallpaper represents one of the most luxurious wall coverings available, bringing natural texture, organic color variations, and handcrafted quality to interiors. This elegant design features grasscloth in natural wheat tones covering the walls, displaying authentic woven texture with visible natural fiber variations. The organic material creates subtle pattern through the irregular weave, adding visual interest without formal repeats or geometric precision. The woven texture catches and reflects light differently than smooth surfaces, creating dimensional quality that changes throughout the day.
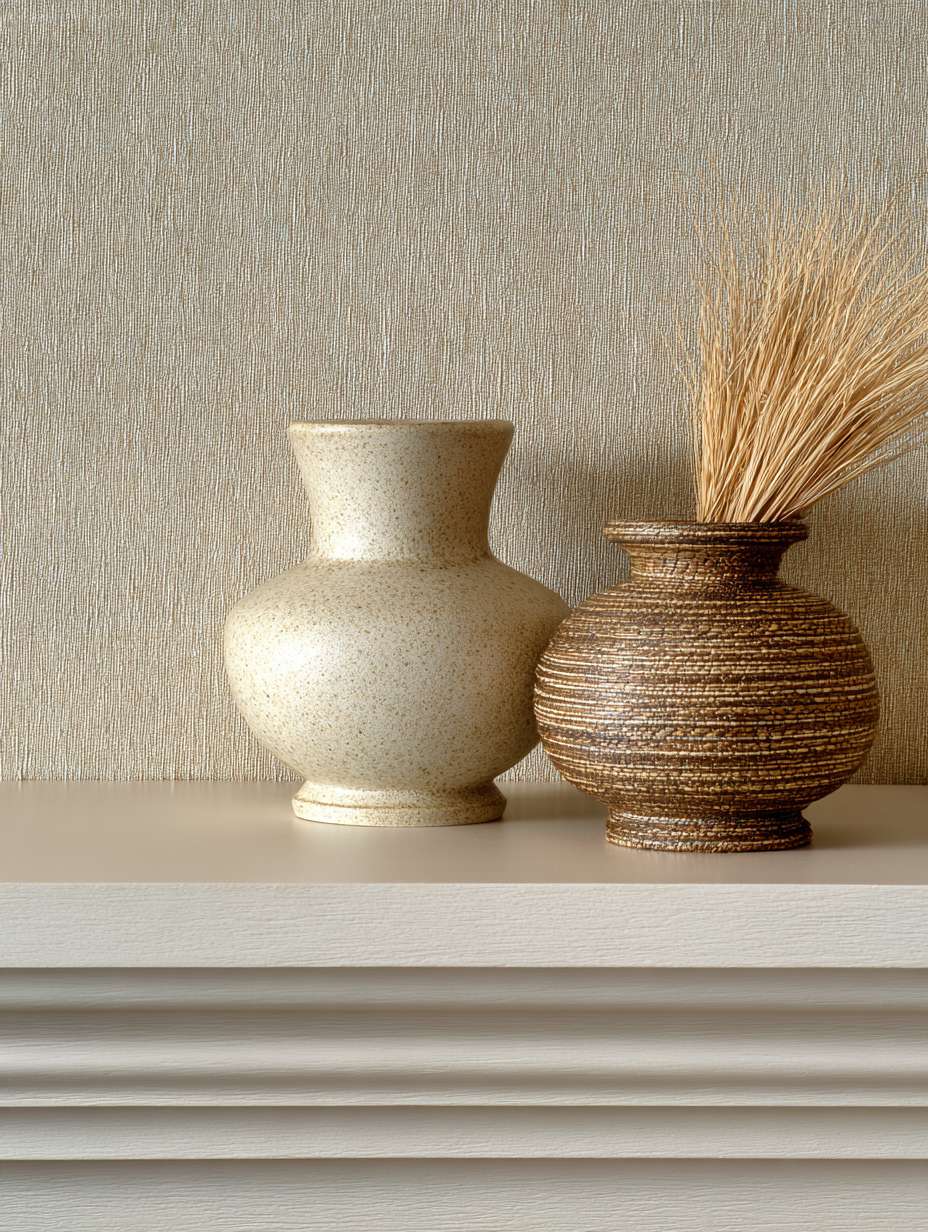
The natural wheat tones provide warmth without reading as distinctly yellow or brown, offering sophisticated neutrality that works as a backdrop for diverse furniture styles and color palettes. White trim molding at baseboards, doors, and ceiling provides clean contrast that frames the textured walls beautifully. The grasscloth adds warmth and subtle pattern without overwhelming, creating enveloping comfort rather than visual noise. The natural material also provides modest acoustic benefits, helping to absorb sound and reduce echo.
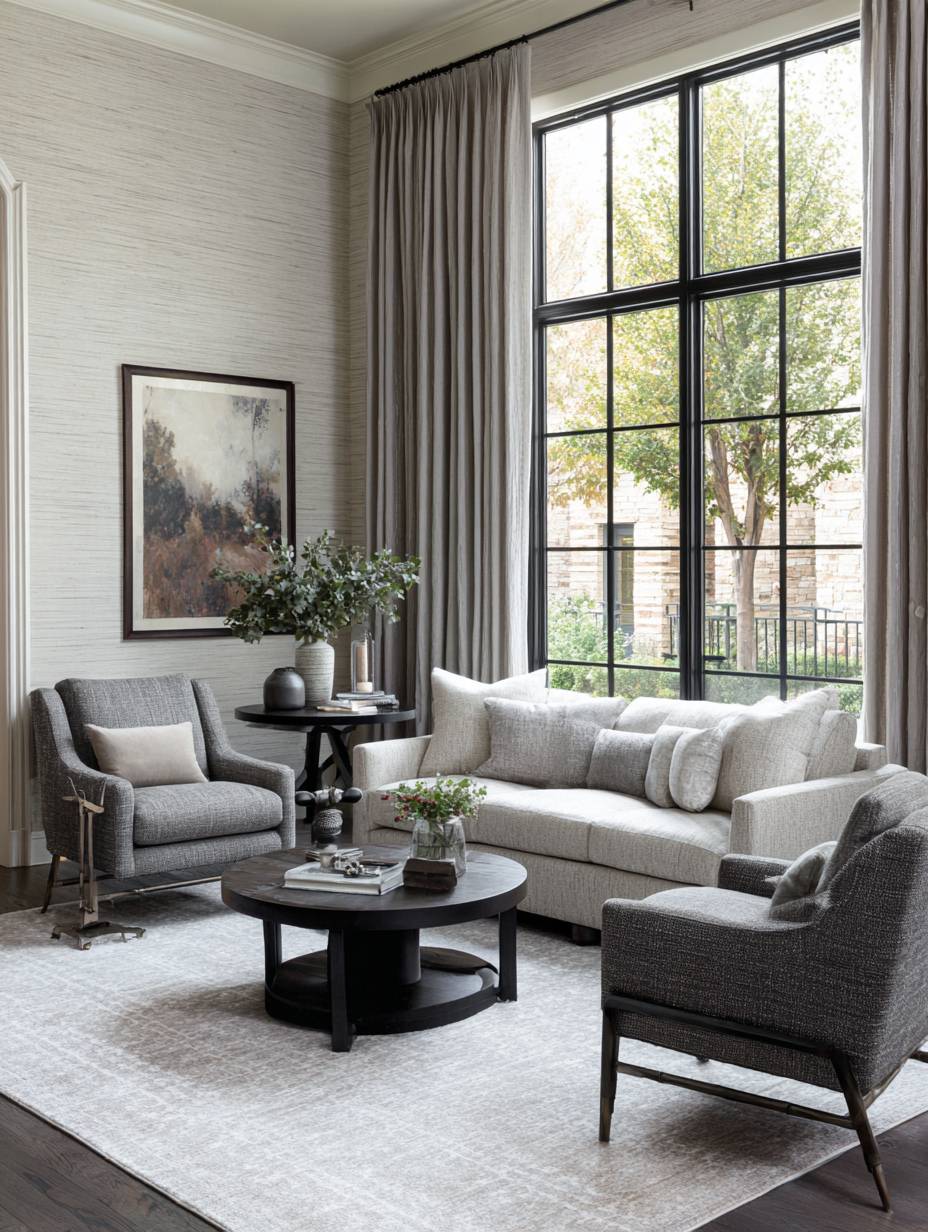
Professional interior design photography captures the authentic grasscloth texture detail with natural lighting that reveals the material’s organic quality and subtle color variations. The investment in grasscloth—significantly more expensive than standard wallpaper—pays dividends in the perceived luxury and quality it brings to the space. The natural material ages beautifully, developing gentle patina rather than looking worn. This treatment suits traditional, transitional, and contemporary spaces where understated luxury and natural materials create sophisticated environments.
- Hire professional installers: Grasscloth requires specific expertise to install properly without visible seams or damage to delicate material.
- Accept natural variations: Grasscloth’s beauty lies in its organic irregularities—embrace rather than resist the natural material variations.
- Prepare walls meticulously: Walls must be perfectly smooth as grasscloth is semi-transparent and will show imperfections beneath.
- Plan for delicate care: Grasscloth cannot be scrubbed—it requires gentle dusting and spot cleaning only.
- Order extra: Purchase additional rolls as grasscloth from different dye lots can vary noticeably in color.
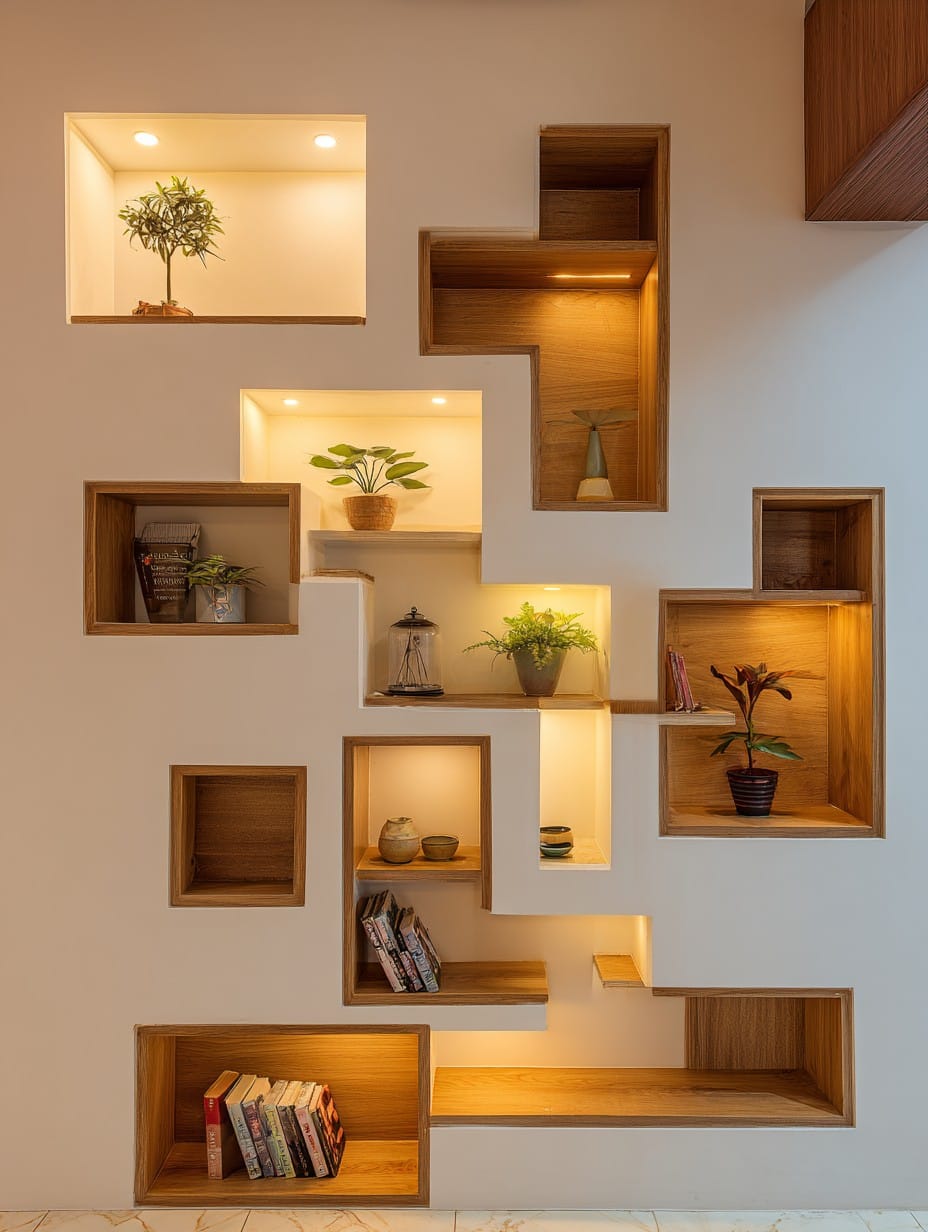
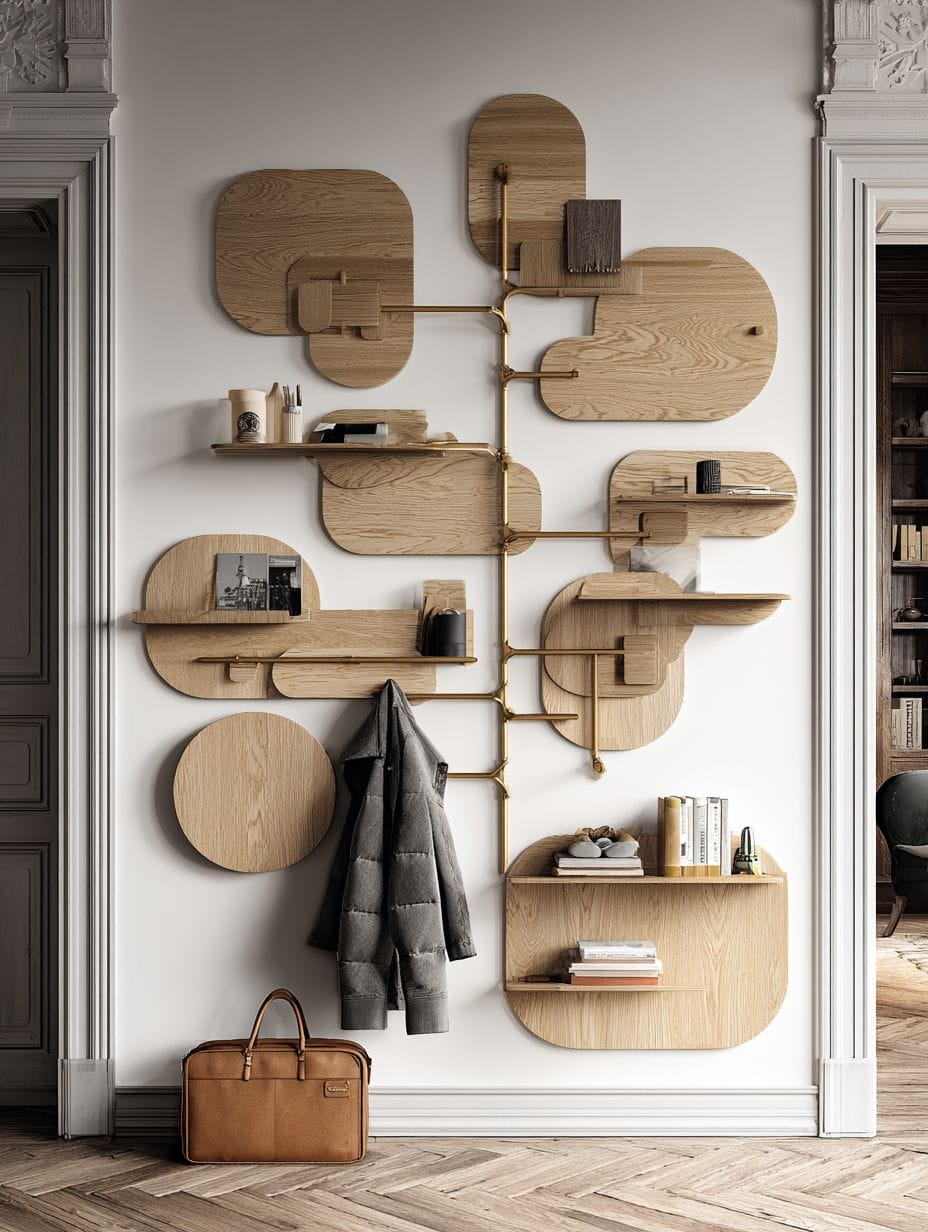
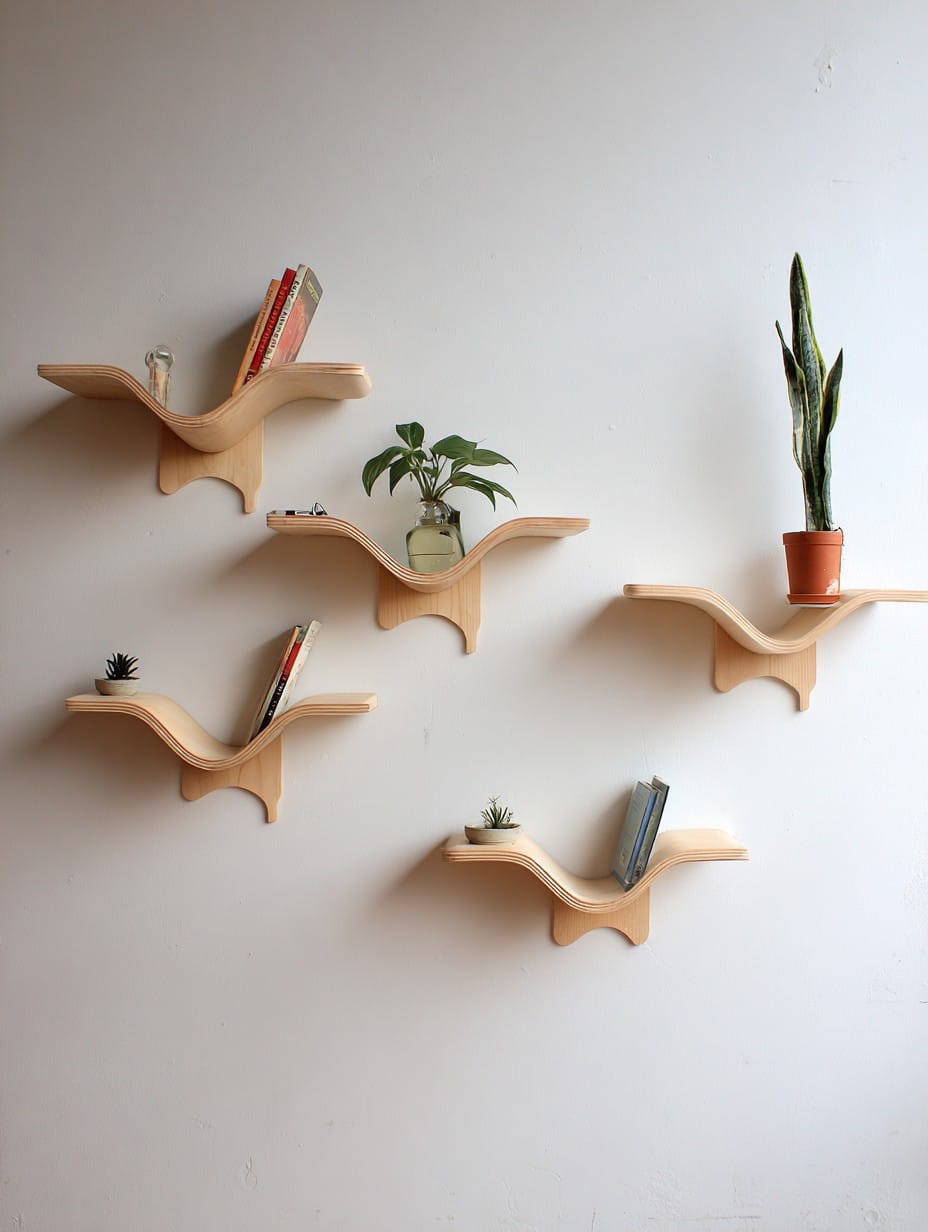
28. Asymmetric Floating Shelf Arrangement
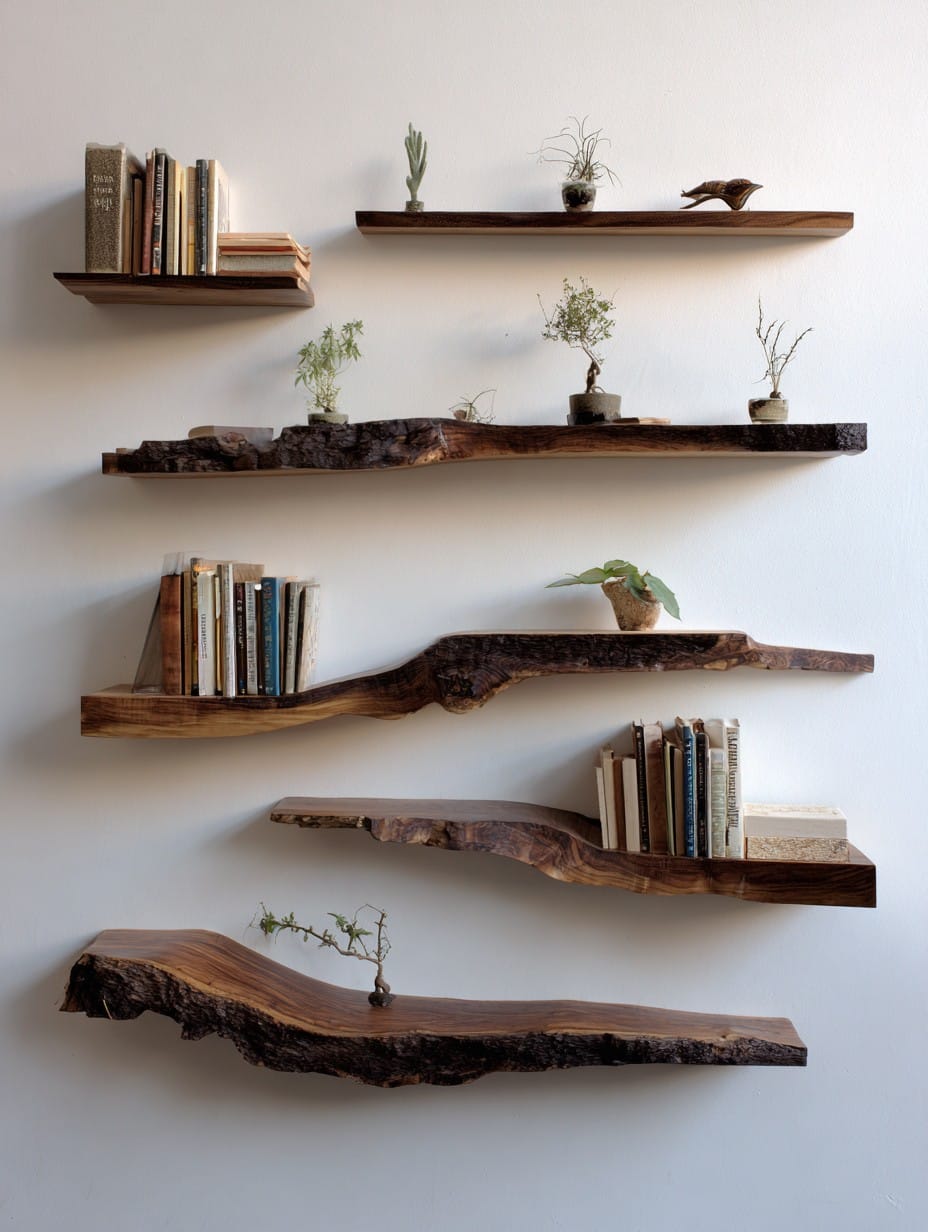
Floating shelves become sculptural installations when arranged asymmetrically, creating dynamic compositions that serve both functional and aesthetic purposes. This modern design features five natural wood shelves in varying lengths mounted at different heights, creating a modern sculptural effect against a white wall background. The asymmetric arrangement breaks from traditional symmetry, offering organic rhythm that feels contemporary and intentional. Each shelf displays carefully curated objects, books, and small plants, transforming functional storage into a styled vignette that changes with your collections and seasons.
The natural wood tones stand out beautifully against the white background, creating warm contrast while the varied shelf lengths create visual interest through diversity. The three-dimensional nature of actual shelves adds depth that flat wall treatments cannot achieve, while the negative space between shelves becomes as important as the shelves themselves. The arrangement creates opportunities to play with scale and grouping—larger objects balanced with smaller collections, vertical elements (plants) contrasted with horizontal ones (stacked books).
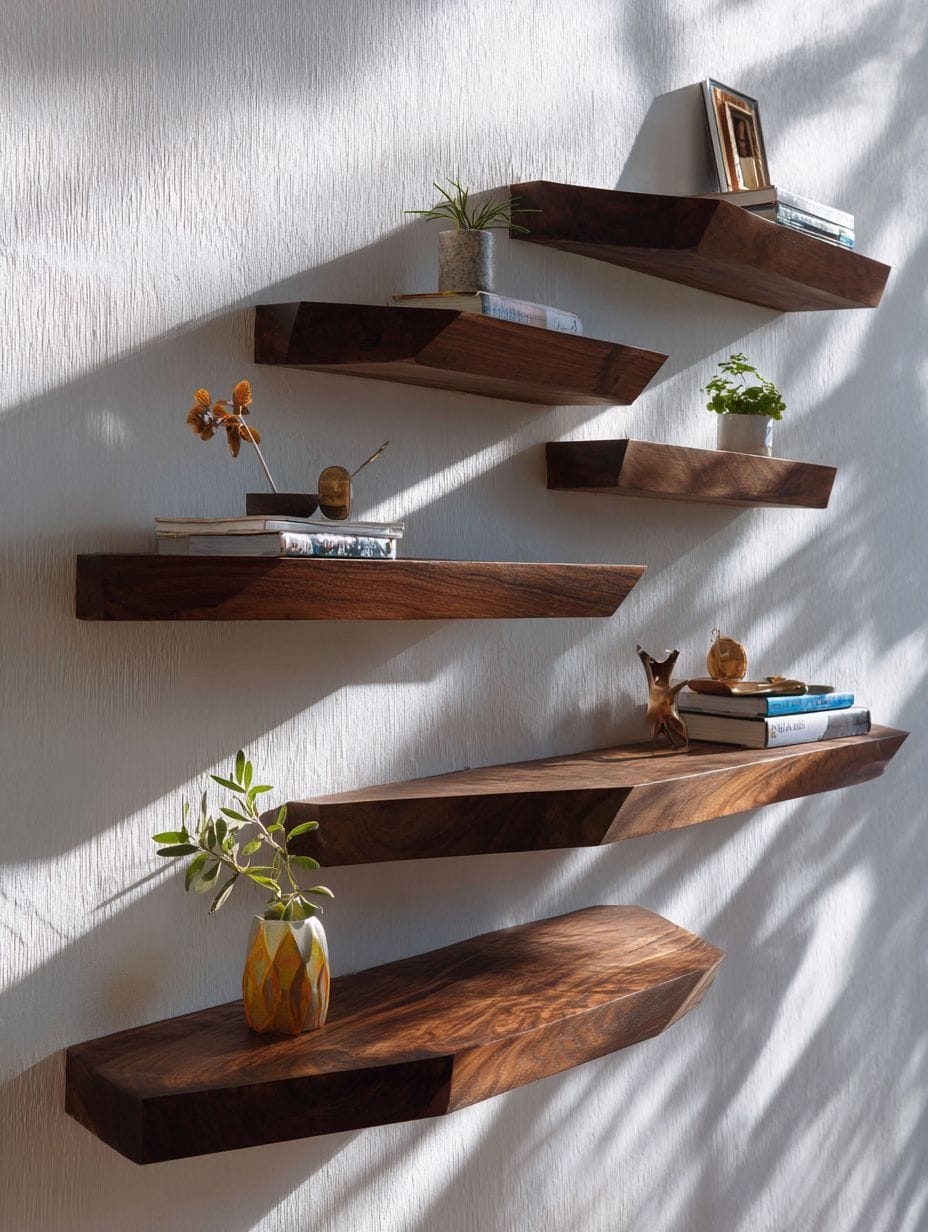
Interior photography showcases the dynamic composition with natural lighting that emphasizes wood grain and highlights displayed items, demonstrating how functional shelving transcends utility to become genuine design element. The beauty of this approach lies in its flexibility—you can easily add shelves, remove them, or rearrange the composition as your needs and tastes evolve. This treatment works in contemporary, modern, and eclectic spaces where breaking from traditional symmetry feels appropriate and fresh.
- Plan the composition: Sketch your arrangement and mark positions on the wall before drilling any holes for best results.
- Vary shelf lengths significantly: Include substantial variety in lengths (mix 24″, 36″, and 48″ shelves) for dramatic asymmetry.
- Consider sight lines: Ensure shelves don’t block views to windows or interfere with furniture placement.
- Install into studs: Locate wall studs and use proper anchors to support the weight of shelves plus displayed items.
- Style with restraint: Leave some shelves sparsely styled or empty to prevent visual overwhelm and allow breathing room.
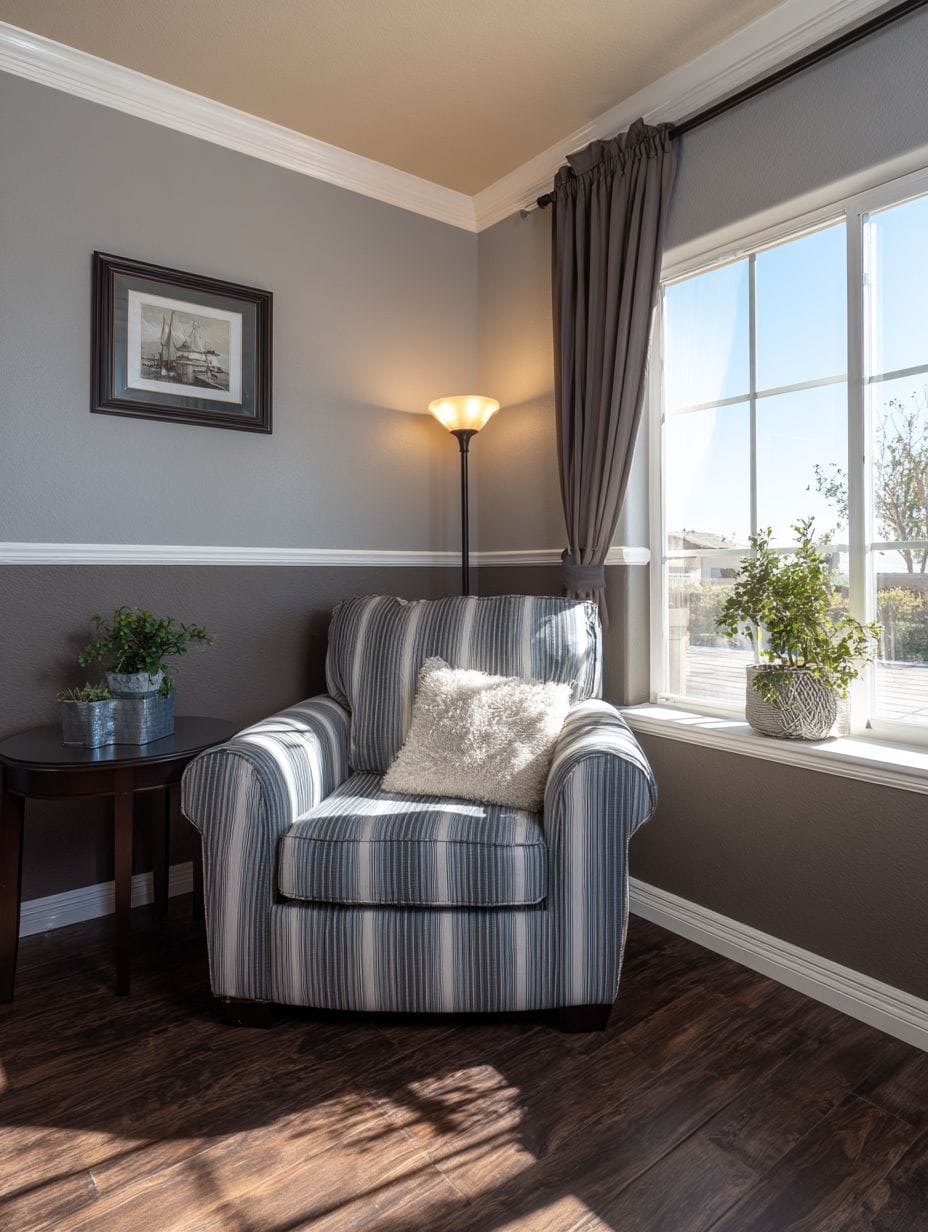
29. Classic Wainscoting in Forest Green and Cream
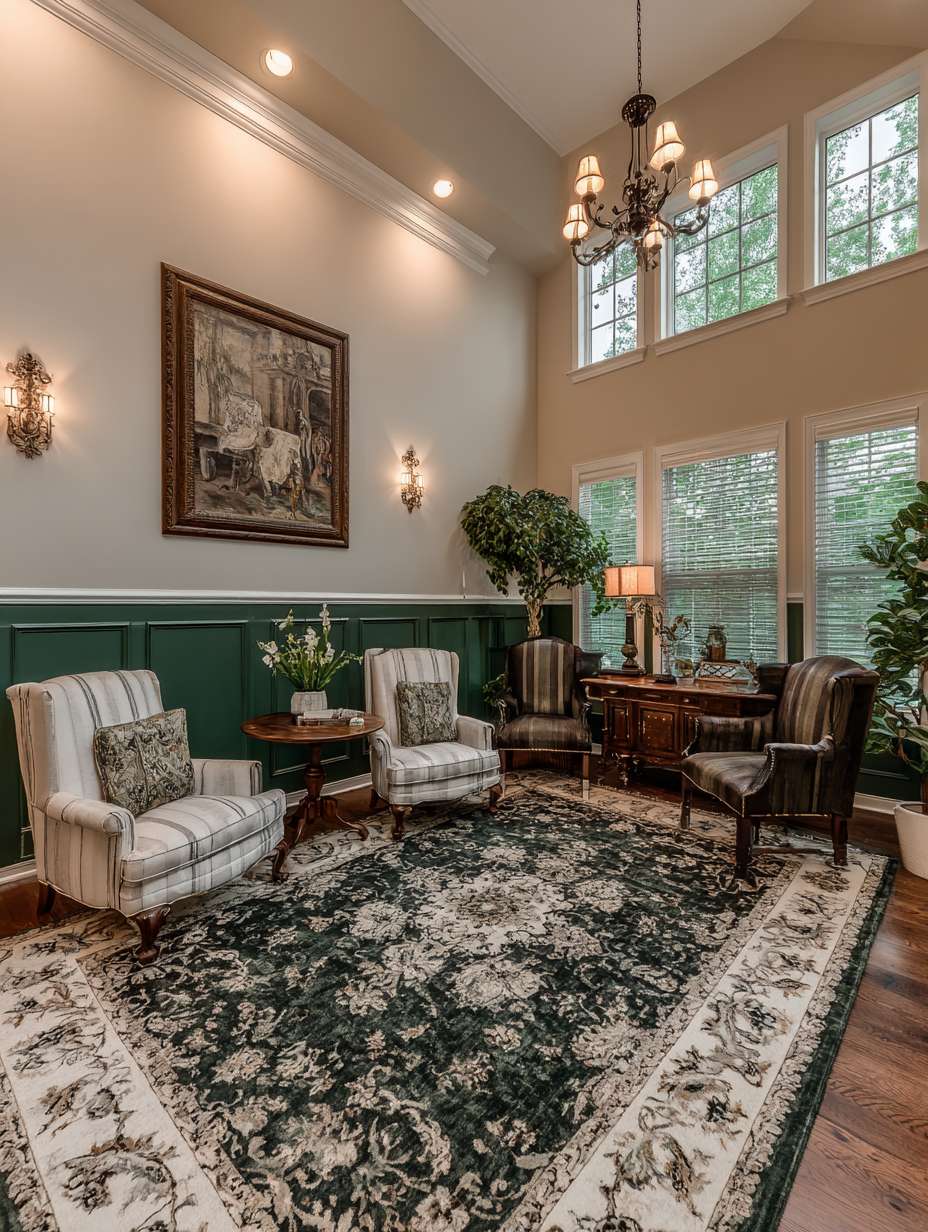
Wainscoting painted in bold colors rather than traditional white offers fresh interpretation of classic architectural detail, bringing personality and drama to traditional applications. This design features wainscoting panels in dark forest green below and soft cream above, separated by white chair rail molding. The rich green grounds the lower portion of the wall while the lighter cream above maintains airiness and light reflection. Crown molding at the ceiling completes the elegant architectural detail, creating a fully realized traditional treatment with contemporary color choices.
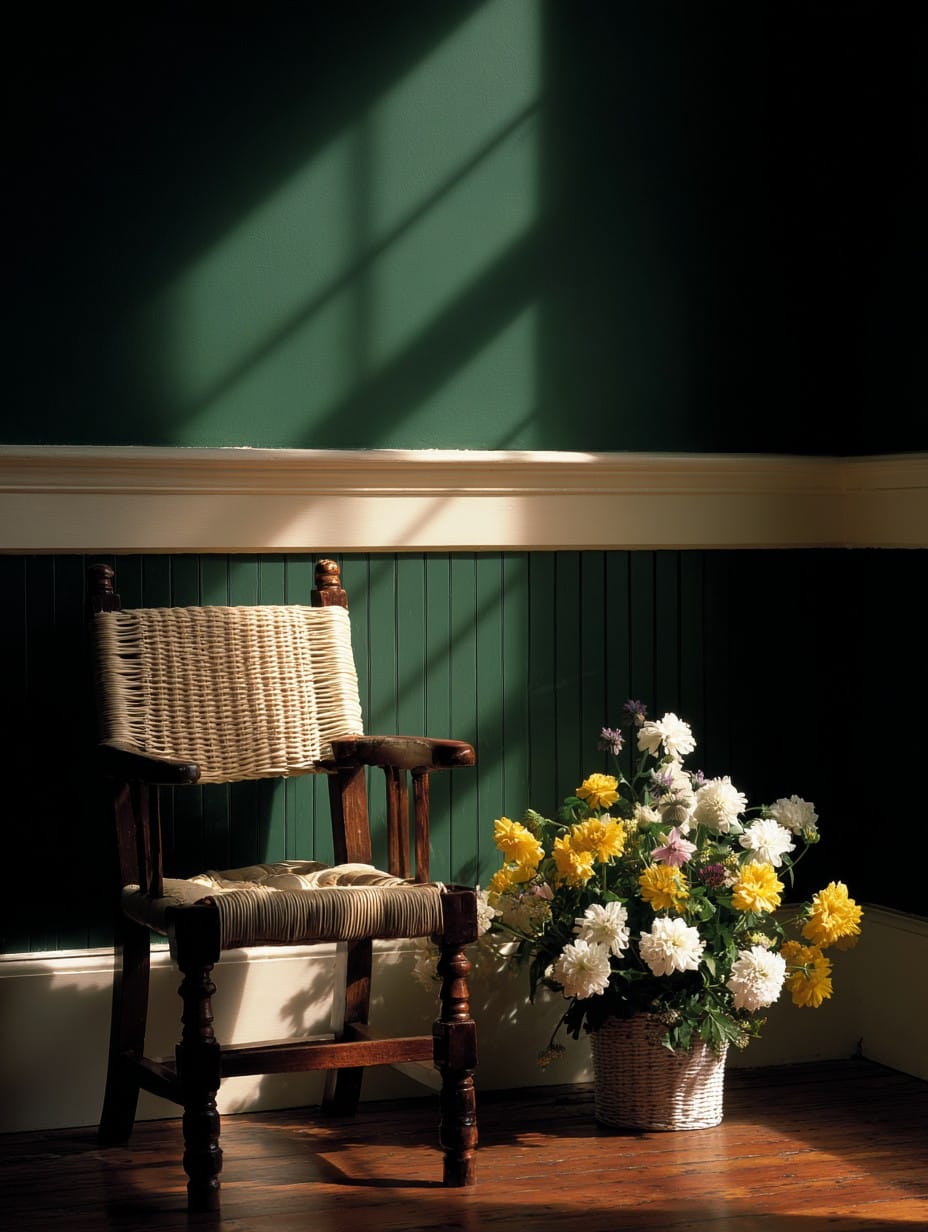
The dark forest green provides sophisticated drama without the stark contrast of black, offering depth and richness that works as a complex neutral. The traditional wainscoting treatment gains contemporary relevance through the bold color choice, demonstrating how classic techniques remain vital when executed with modern confidence. The white chair rail provides clean separation between the colors, ensuring the transition reads as intentional architectural detail rather than uncertain paint choice. The cottage charm of the complete treatment creates welcoming warmth perfect for living spaces where comfort and tradition meet.
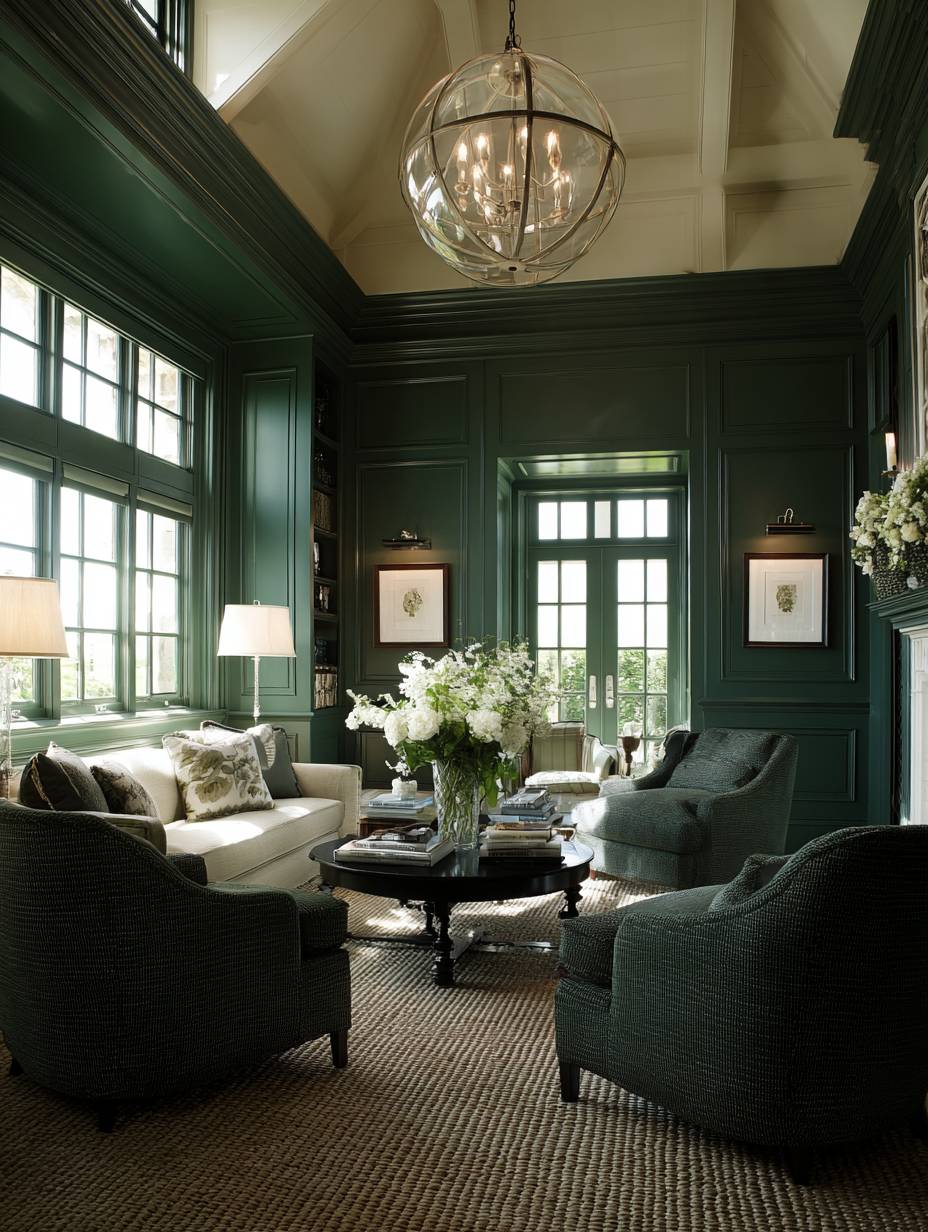
Architectural photography with natural window light highlights the rich green color depth and showcases the crafted woodwork details, demonstrating how light plays across the dimensional wainscoting throughout the day. The investment in proper millwork and quality paint creates lasting value and timeless appeal—while color trends may evolve, the architectural bones remain eternally relevant. This treatment suits traditional and transitional spaces where architectural detail feels appropriate and celebrated.
- Choose the right green: Test multiple green shades as they can vary dramatically in different lighting—seek depth without appearing muddy.
- Consider the room’s use: Bold dark colors work well in spaces with good natural light; use caution in darker rooms.
- Balance with neutrals: Keep furniture and larger elements neutral to prevent the room from feeling too heavy or overwhelming.
- Seal the paint: Apply protective clear coat to wainscoting in high-traffic areas for durability and easy cleaning.
- Extend to door frames: Paint door frames in the green to create continuity and intentional design rather than afterthought.
30. Contemporary Acoustic Panel Wall Treatment
Acoustic panels prove that functional elements addressing sound control can double as sophisticated design features when approached with aesthetic intention. This contemporary design features fabric-wrapped sound-absorbing panels in soft grey arranged in a geometric pattern across the wall. The panels serve the practical purpose of reducing echo and controlling sound while creating visual interest through dimensional placement and pattern. The geometric arrangement prevents the utilitarian appearance acoustic treatment might otherwise suggest, instead creating an intentional design statement that happens to provide acoustic benefits.
The soft grey fabric covering the panels provides subtle texture and sophisticated color that works as a neutral backdrop while being more interesting than flat painted walls. The dimensional nature of the panels—typically 2-3 inches thick—creates shadow play that adds depth and architectural presence. The geometric pattern created by varied panel sizes and placement positions guides the eye across the wall while breaking up large expanses into more human-scaled sections.
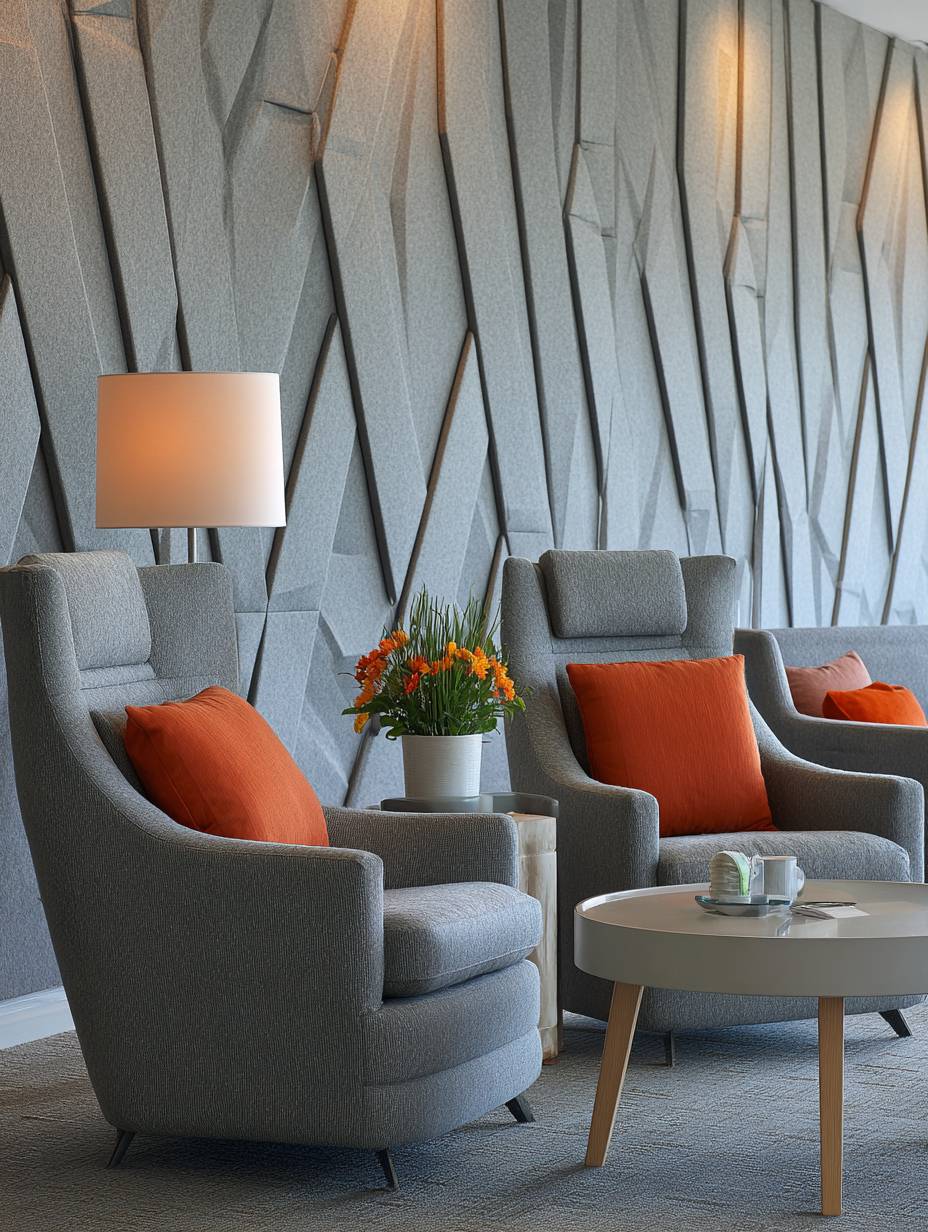
Professional interior photography showcases both the practical and aesthetic aspects with balanced lighting that highlights the dimensional installation and demonstrates how sound control solutions can be beautiful when thoughtfully designed. This treatment works particularly well in media rooms, home theaters, music rooms, and open-concept spaces where sound control enhances the room’s function while the design enhances its appearance. The investment addresses real challenges while adding design value rather than purely practical modification.
- Choose appropriate panel thickness: Two-inch panels provide significant acoustic benefits while three-inch panels offer maximum sound absorption.
- Plan panel placement strategically: Concentrate panels at primary reflection points for maximum acoustic improvement with minimum panels.
- Select quality fabrics: Choose acoustically transparent fabrics that won’t impede sound absorption while offering desired color and texture.
- Create pattern variety: Mix panel sizes and orientations to create visual interest while addressing acoustic needs.
- Consider professional acoustic consultation: For critical applications, consult acoustic engineers to optimize placement and panel specifications.
31. Dramatic Ombré Painted Wall
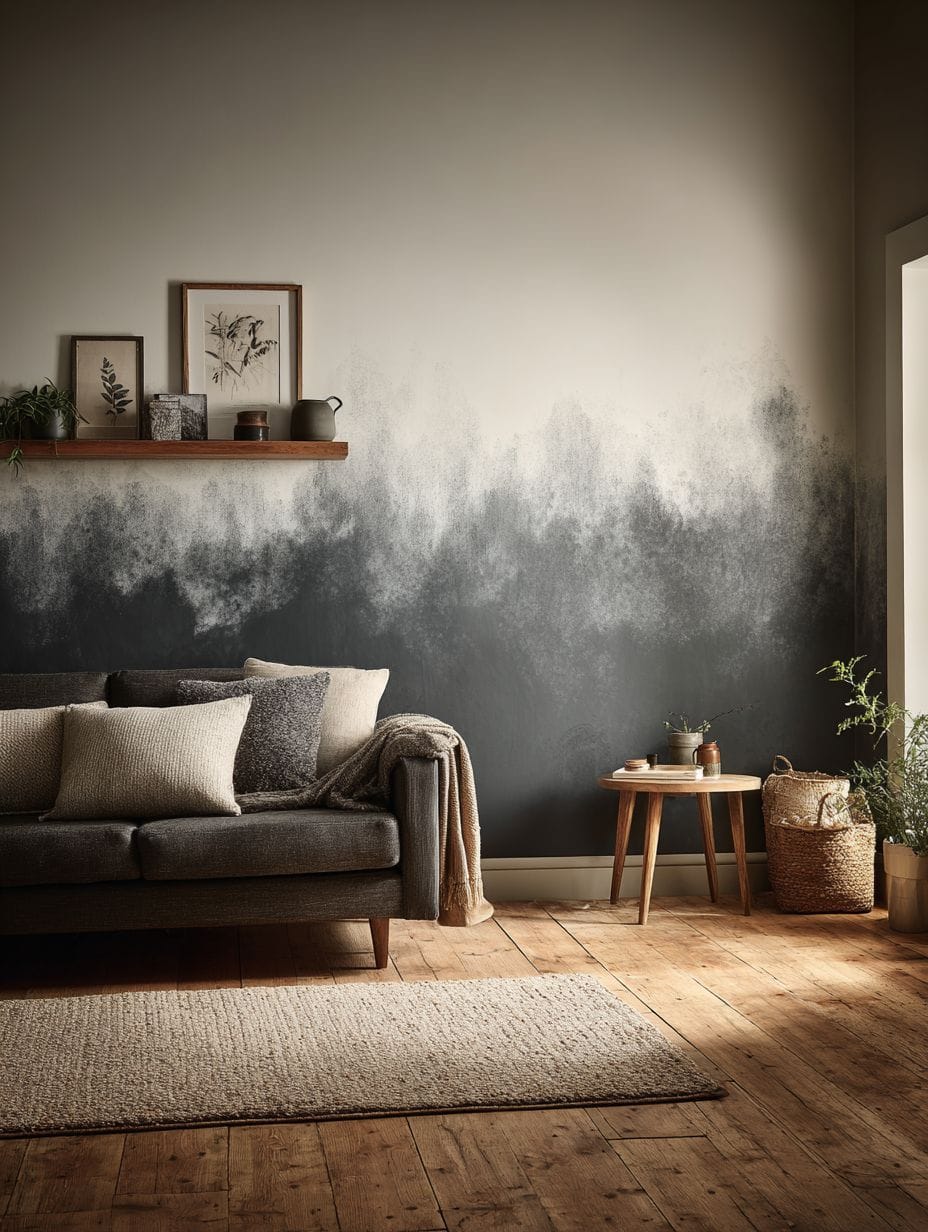
Ombré painting techniques bring artistic gradation to walls, creating sophisticated color transitions that transform simple surfaces into genuine art installations. This dramatic design features a gradient transitioning from deep charcoal at floor level to soft white at the ceiling, creating a smooth color progression that draws the eye upward. The artistic paint technique requires skill and patience but creates unique character that cannot be replicated with any other approach. The gradient serves as the room’s focal point while neutral furnishings allow the wall treatment to shine without competition.
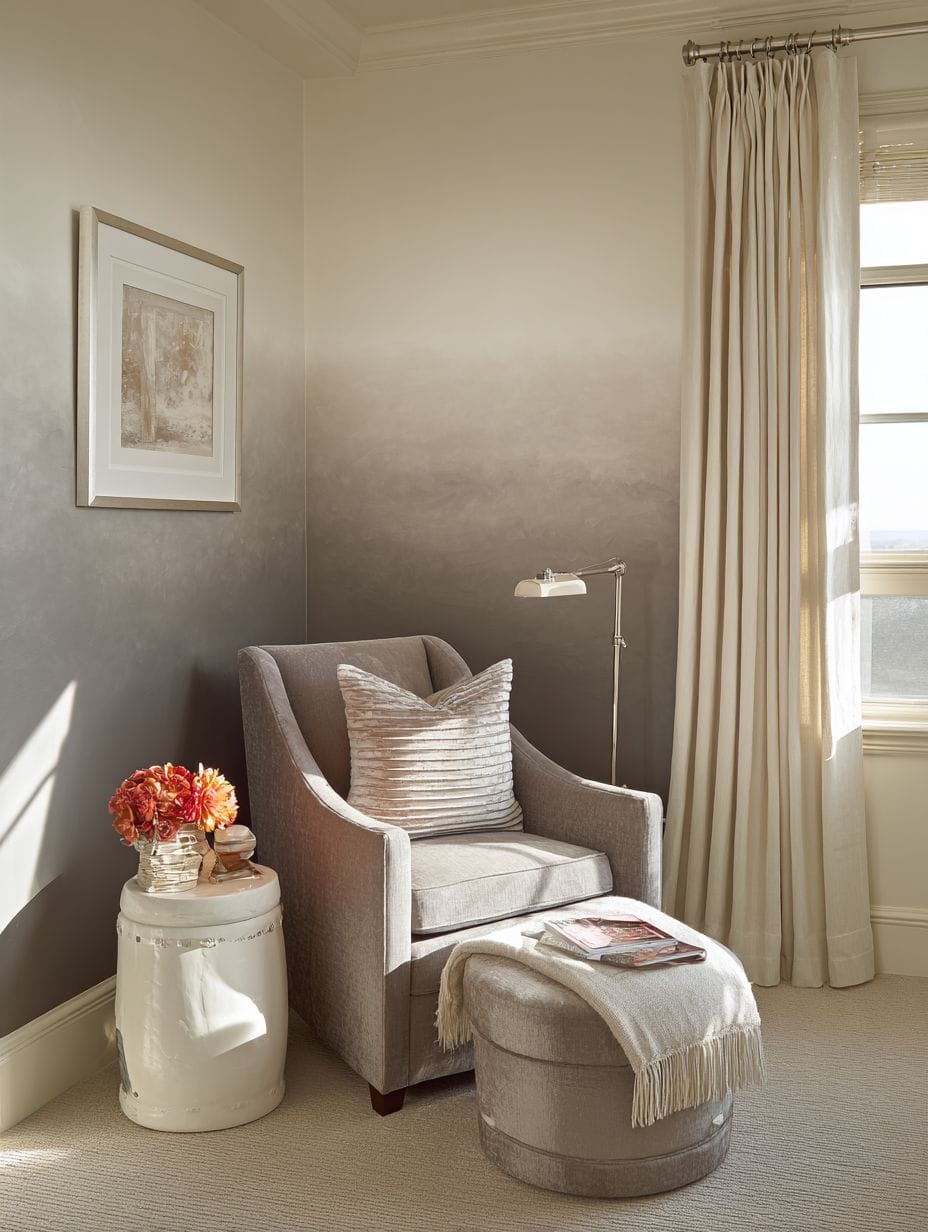
The beauty of ombré lies in the seamless blending between colors—there should be no visible line where one color ends and another begins, instead creating smooth transition that appears almost ethereal. The technique can make ceilings appear higher by drawing the eye upward through the color progression. The charcoal-to-white progression provides both drama (through the dark lower section) and airiness (through the white upper section), balancing these typically opposing qualities in a single treatment.
Interior design photography captures the smooth color transition with natural lighting that reveals the gradient’s subtle shifts and demonstrates professional execution. The technique requires multiple layers of paint and careful blending while wet, making it more labor-intensive than standard painting but creating results impossible to achieve otherwise. This treatment works in contemporary and artistic spaces where unique, one-of-a-kind installations feel appropriate and celebrated. The gradient creates dynamic backdrop that changes appearance throughout the day as lighting conditions shift.

- Work with wet paint: Ombré requires blending while paint remains wet—work in manageable sections and have helpers for larger walls.
- Use similar paint sheens: All colors should be the same sheen (all matte or all satin) for seamless blending without visible texture changes.
- Practice technique first: Test your blending method on boards before tackling the actual wall to perfect your technique.
- Plan the transition zone: Determine where the mid-point color should occur and work outward from there for balanced gradation.
- Accept imperfection: Ombré’s beauty lies partly in its handcrafted quality—embrace slight variations rather than seeking machine-perfect precision.
Why These Wall Design Ideas Represent the Best Options for Living Rooms
The wall design ideas presented throughout this comprehensive guide represent the pinnacle of contemporary interior design thinking, combining aesthetic excellence with practical functionality. These living room wall design concepts span the full spectrum from traditional architectural details like wainscoting and picture frame molding to cutting-edge contemporary treatments like three-dimensional textured panels and preserved moss installations. Each approach addresses specific design challenges while offering unique aesthetic rewards, making them suitable for diverse architectural styles, personal preferences, and budget considerations.
What makes these accent wall ideas particularly valuable is their proven track record in real residential applications. These aren’t theoretical concepts or passing fads—they’re established design techniques that have demonstrated lasting appeal and practical success. Whether you’re drawn to the raw authenticity of exposed brick walls, the sophisticated luxury of Venetian plaster finishes, or the warm organic quality of reclaimed wood accent walls, each treatment has been refined through years of professional application and homeowner satisfaction. The variety ensures that regardless of your living room’s size, architectural style, natural lighting conditions, or existing design direction, multiple viable options exist to enhance your space.
The wall treatment ideas featured here also excel in their versatility and adaptability. Take the gallery wall arrangement, for instance—this approach works equally well in contemporary lofts and traditional colonial homes, in compact urban apartments and spacious suburban residences. The board and batten wainscoting bridges centuries of design history while remaining thoroughly relevant in today’s interiors. The color-blocked geometric walls can be customized to any color palette, while built-in bookshelf walls adapt to individual collections and storage needs. This flexibility means you’re not locked into a single aesthetic—the foundational technique can evolve with your changing tastes and life circumstances.
From a practical standpoint, these feature wall designs address real-world concerns that homeowners face. The dark accent wall approach solves the challenge of adding drama without overwhelming smaller spaces. The shiplap wall treatment provides visual interest while remaining neutral enough to work with evolving furniture and decor. The stone veneer accent wall delivers the gravitas of natural materials without the structural requirements of solid masonry. The acoustic panel wall addresses sound control needs while functioning as design element rather than merely practical necessity. Each solution demonstrates sophisticated problem-solving that considers both aesthetic desires and functional requirements.
The contemporary wall design options presented here also represent smart investments in your home’s value and your own daily experience. Quality architectural wall treatments like custom millwork, natural materials, and skilled artistic applications add genuine value to your property while enhancing your lived experience every single day. Unlike furniture that can be replaced or decor that can be swapped, these permanent wall installations become integral parts of your home’s architecture, providing years or even decades of visual pleasure and functional benefit. The reclaimed wood walls, stone accents, and custom built-ins featured here represent the kind of thoughtful, quality improvements that knowledgeable buyers recognize and appreciate.
Another crucial factor making these wall design concepts optimal choices is their alignment with current design principles emphasizing authenticity, sustainability, and connection to nature. The biophilic design elements like preserved moss walls and natural wood applications tap into our innate connection to the natural world, creating spaces that feel calming and restorative. The emphasis on authentic materials—real wood, genuine stone, hand-applied plaster, artisan-crafted textiles—reflects contemporary values that prioritize quality and authenticity over mass-produced alternatives. Even the painted treatments emphasize craft and technique, celebrating the human hand in creating our living environments.
The professional execution standards demonstrated in these designer wall treatments ensure results that look polished and intentional rather than amateurish or uncertain. The emphasis on proper installation techniques, quality materials, and thoughtful planning means your investment delivers professional-quality results that enhance rather than detract from your home’s overall aesthetic. The attention to details like consistent spacing, precise color matching, proper lighting integration, and seamless transitions separates truly excellent wall treatments from mediocre attempts. Following the guidance provided for each technique ensures your project achieves the sophisticated results you envision.
These transformative wall ideas also excel in their ability to set the tone for entire rooms while remaining flexible enough to accommodate changing decor. A well-executed accent wall can anchor your furniture arrangement, establish your color palette, and create the atmosphere you desire while still allowing you to swap throw pillows, refresh artwork, or replace accessories as trends and preferences evolve. This balance between making a statement and maintaining flexibility represents sophisticated design thinking that considers both immediate impact and long-term livability.
Conclusion: Transforming Your Living Room Through Thoughtful Wall Design
The walls of your living room represent some of the most valuable real estate in your home—they’re what you see daily, what guests notice immediately, and what ultimately defines the character and atmosphere of your space. The 31 wall design ideas explored in this comprehensive guide demonstrate that walls need not be afterthoughts or simple painted backgrounds. Instead, they can be transformed into architectural features, artistic installations, functional storage solutions, and genuine focal points that elevate your entire living environment. Whether you’re drawn to the timeless elegance of traditional wainscoting, the bold drama of dark accent walls, the organic warmth of natural wood, or the contemporary sophistication of geometric patterns, the perfect wall treatment exists to realize your vision.
The key to successful wall design lies in thoughtful consideration of your specific space, lifestyle, and aesthetic preferences. Consider your room’s natural lighting conditions—abundant light opens possibilities for darker, bolder treatments, while limited light suggests lighter, reflective approaches. Think about your existing furniture and decor—some wall treatments work best as neutral backdrops while others demand to be the star. Evaluate your commitment level—permanent installations like built-in millwork require confidence, while removable wallpaper or gallery walls offer flexibility. Most importantly, trust your instincts about what makes you feel comfortable and inspired in your own home. The best wall design isn’t necessarily the trendiest or most dramatic—it’s the one that makes you happy to walk into your living room every single day.
As you embark on your wall transformation journey, remember that even the most impressive results begin with careful planning and proper preparation. Take time to research techniques thoroughly, gather inspiration from multiple sources, create detailed plans before beginning work, and don’t hesitate to consult or hire professionals for aspects beyond your skill level. Quality materials, proper tools, and patient execution make the difference between amateur results and professional polish. Whether you’re tackling a weekend paint project or commissioning custom millwork, the investment in doing things properly pays dividends in results that look intentional, polished, and permanent. Your living room walls have the potential to be so much more than structural necessity—they can be the defining elements that make your house truly feel like home.